Configure the OPNsense Virtual Machine
- Install OPNsense on the Virtual Machine
- Assign Network Interfaces and IP Addresses on the OPNsense Router
- Log in to the OPNsense Web GUI and Complete Networking Configuration
Install OPNsense on the Virtual Machine
In the first phase of configuration, you need to boot the virtual machine and run the installation media contained in the ISO file.
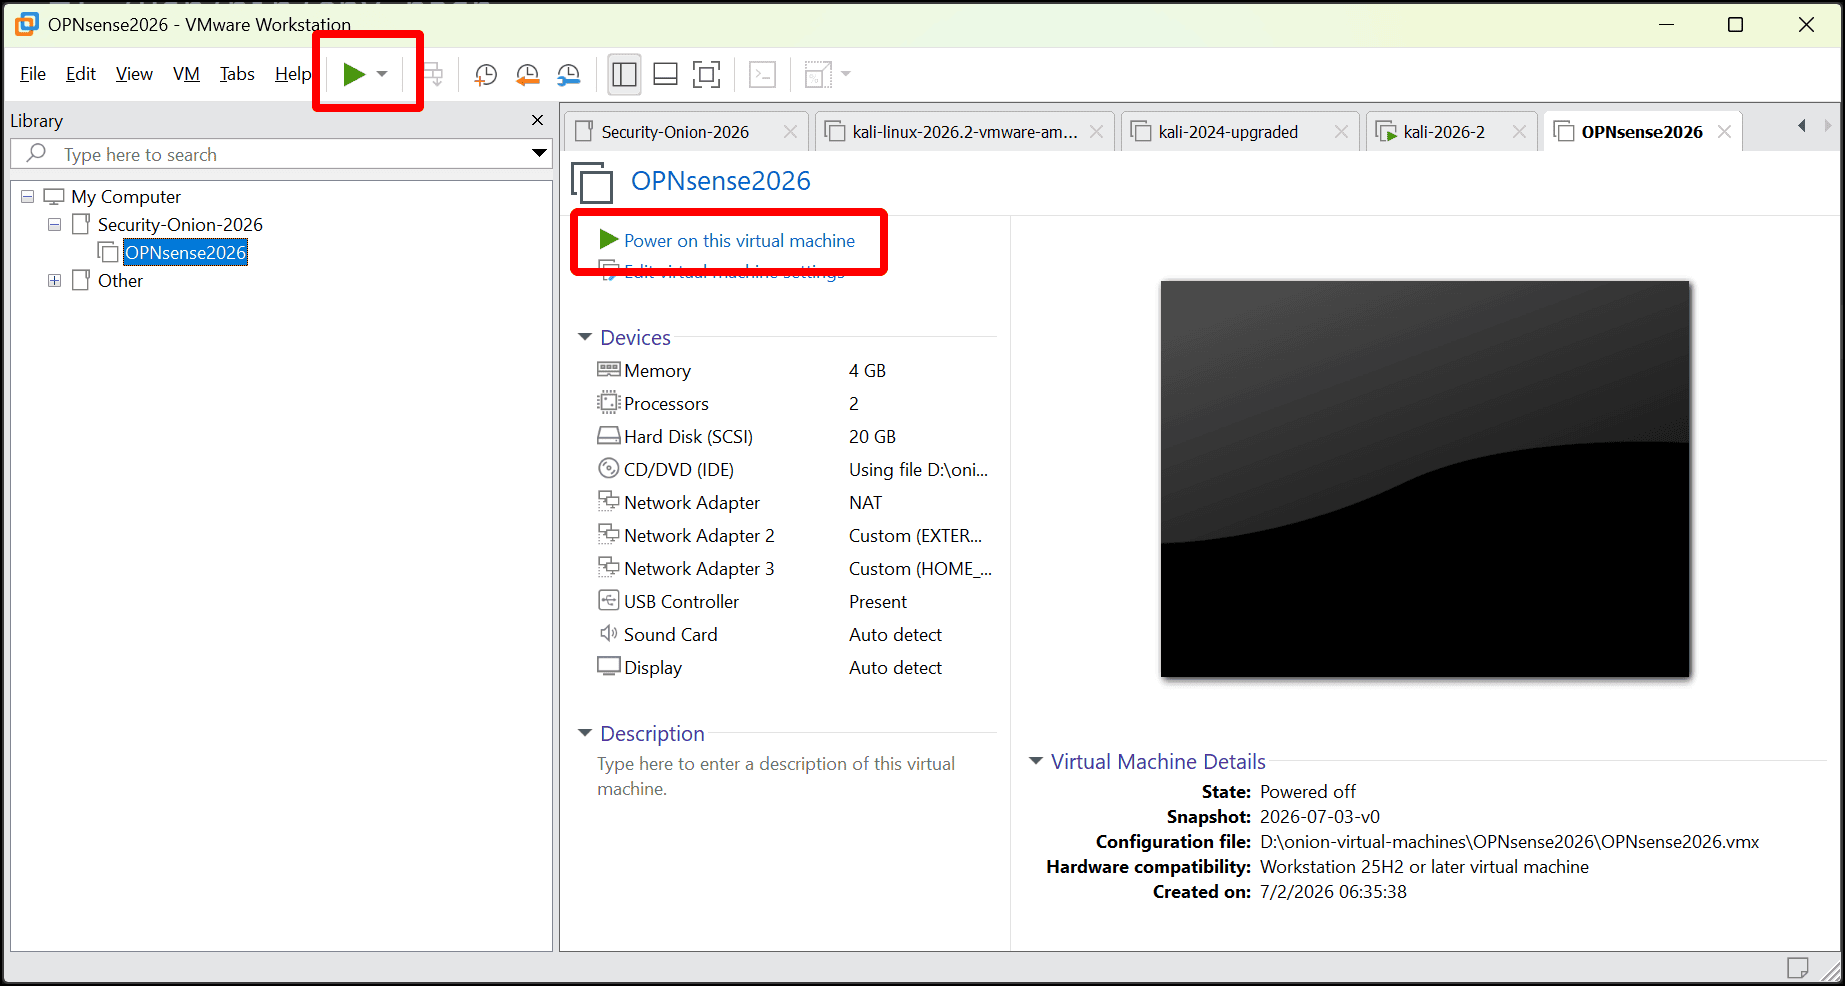
- Click the play icon to run the virtual machine (VM) in the VMware Workstation Pro menu bar. (You can also select the VM (Virtual Machine) menu and click Power on this virtual machine.)
-
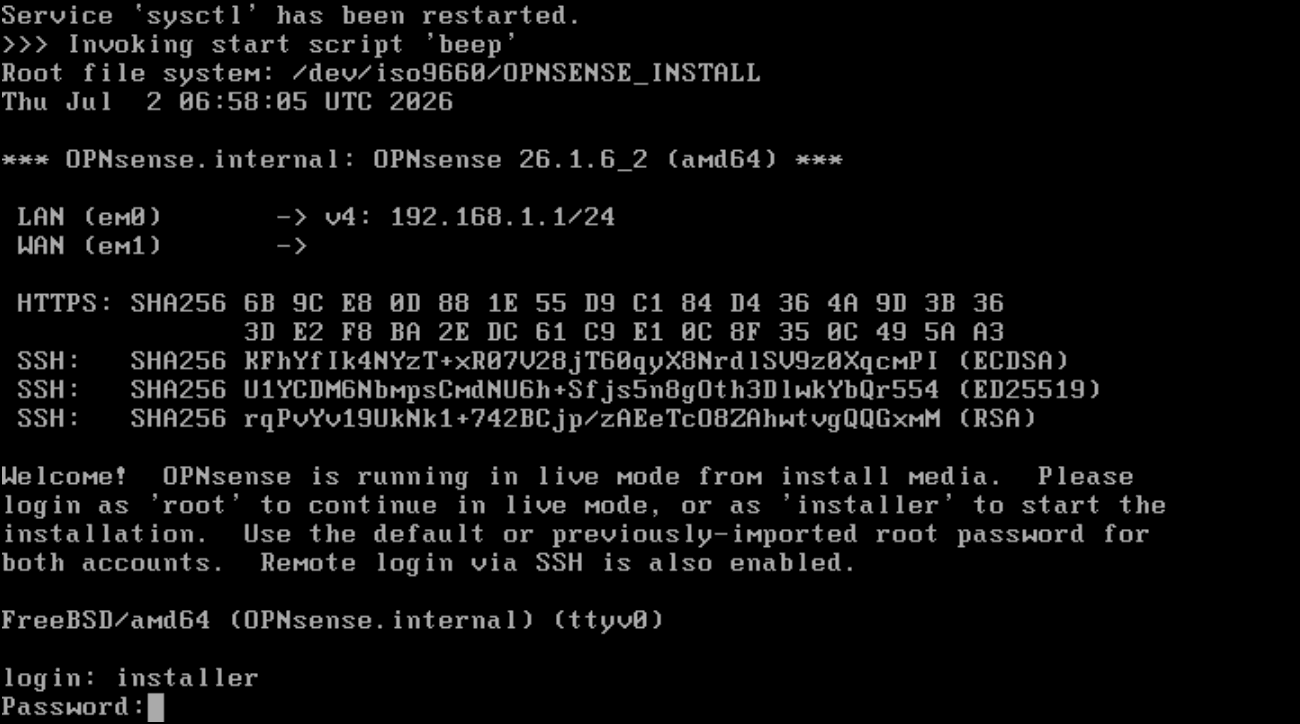
When you see the login prompt after the VM starts, use OPNsense’s default credentials for installation:
- Username: installer
- Password: opnsense
- On the Keymap Selection pane, leave the default option Continue with default keymap and press
Tabto choose the Select option, then pressEnter.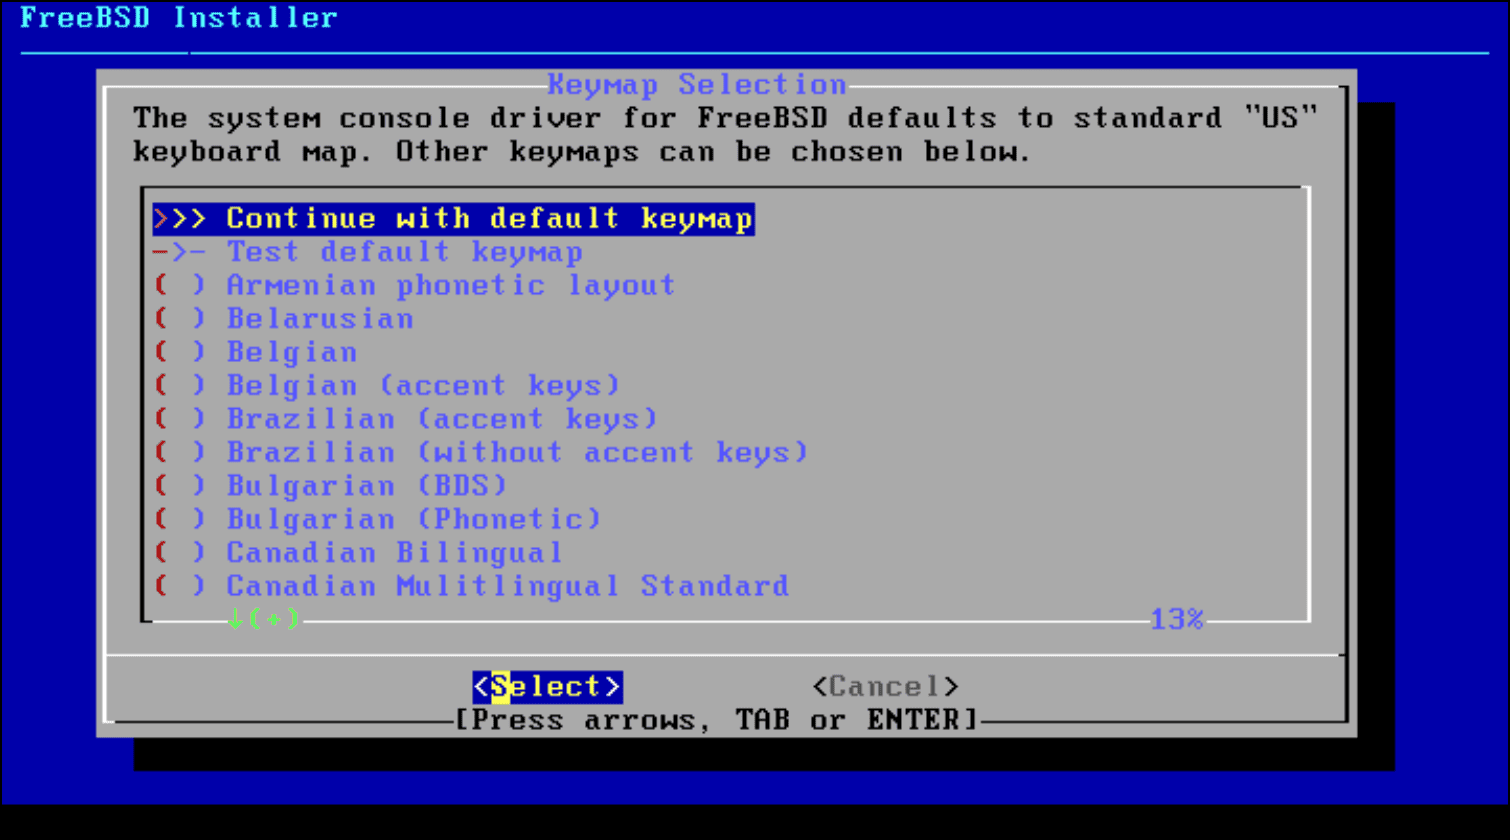
- Leave the Install (UFS) | ZFS GPT/UEFI Hybrid option selected and press
Enterto select OK.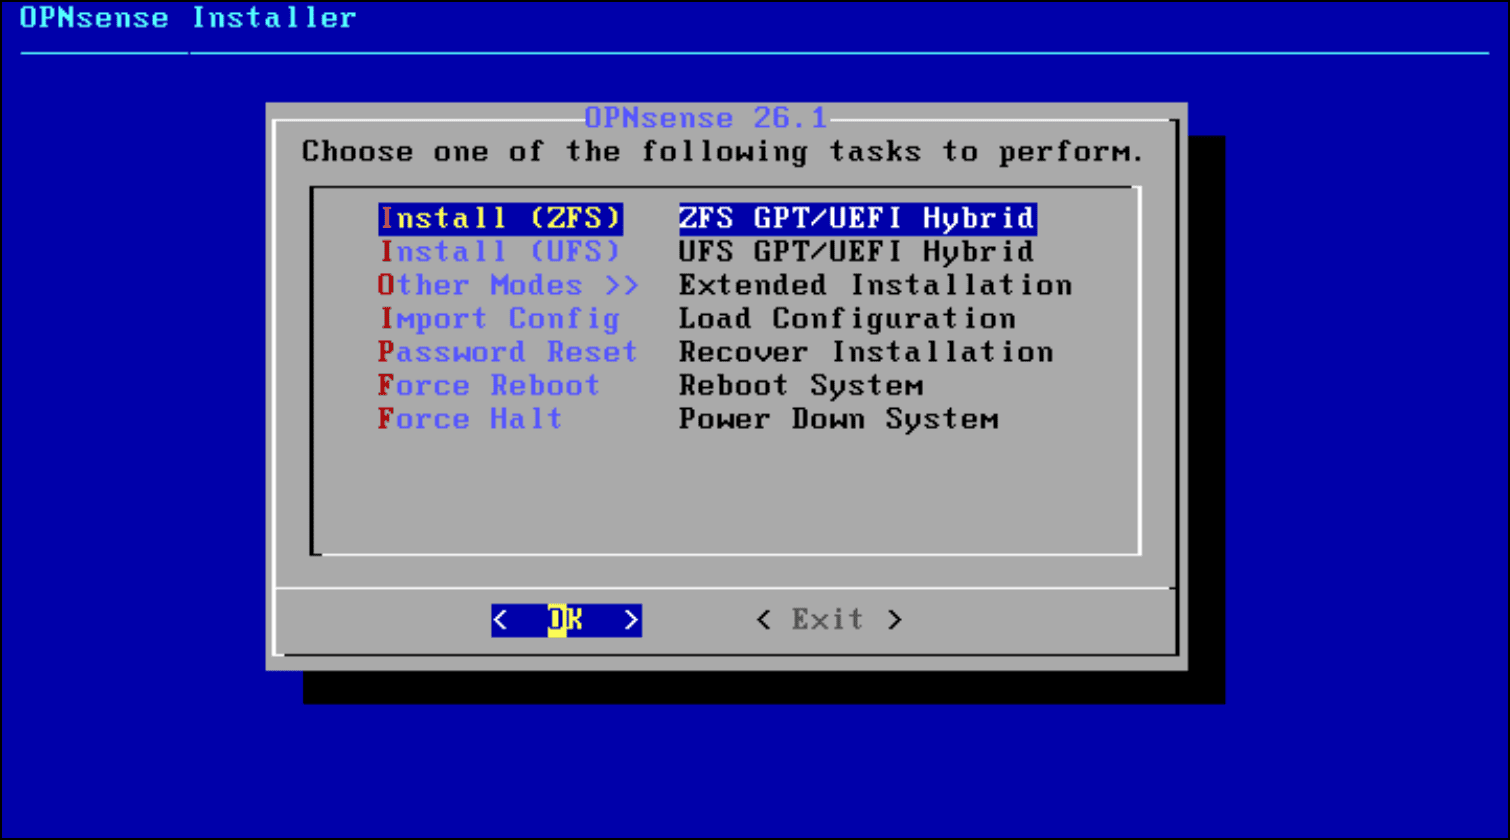
- Leave Stripe | Stripe - No redundancy selected as the ZFS Configuration virtual device type. Press
Enterto select OK.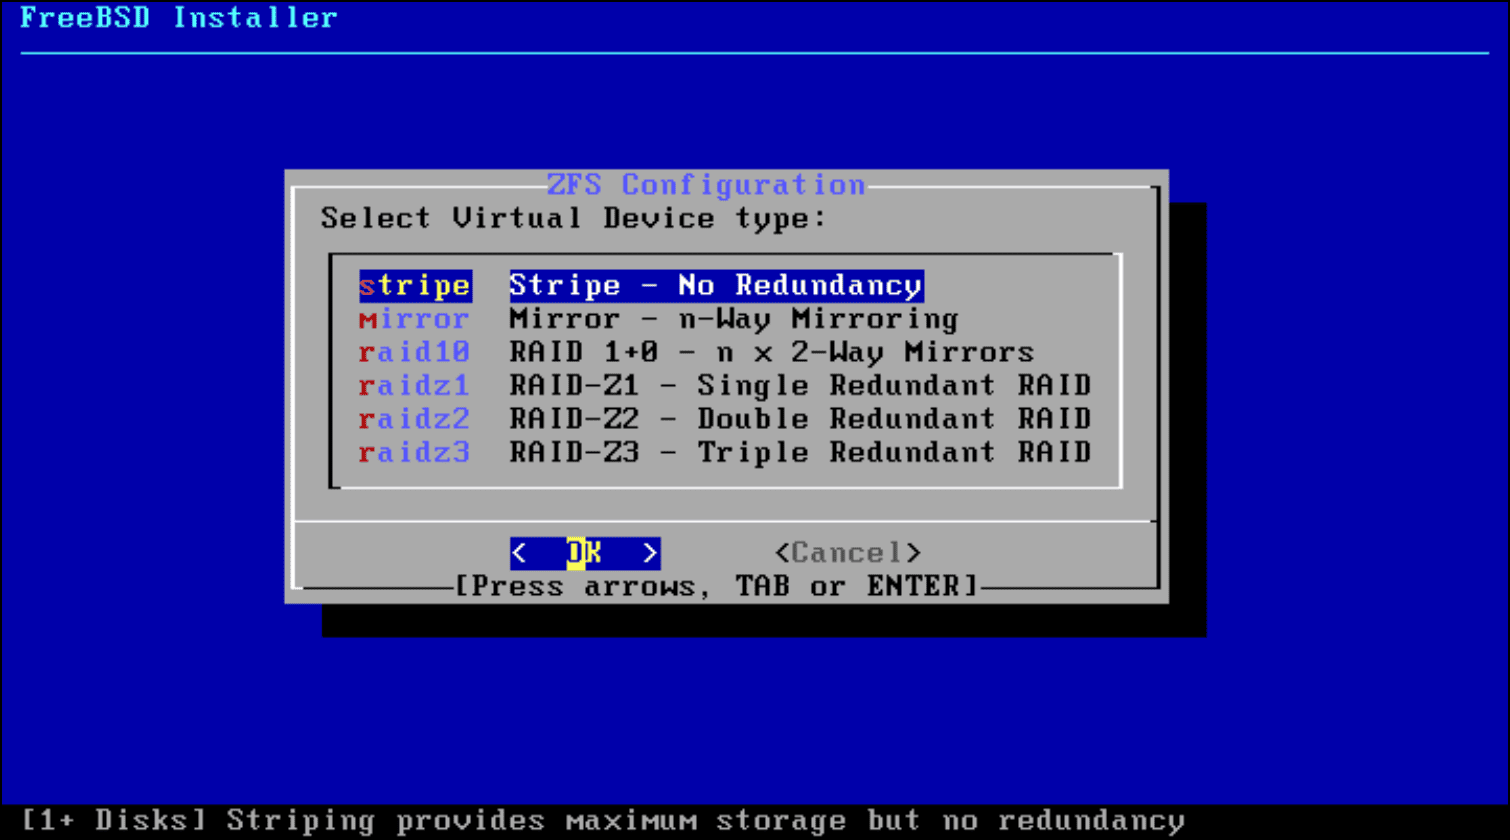
- Press the space bar to select da0 to select the target disk with a * and press
Enterto select OK.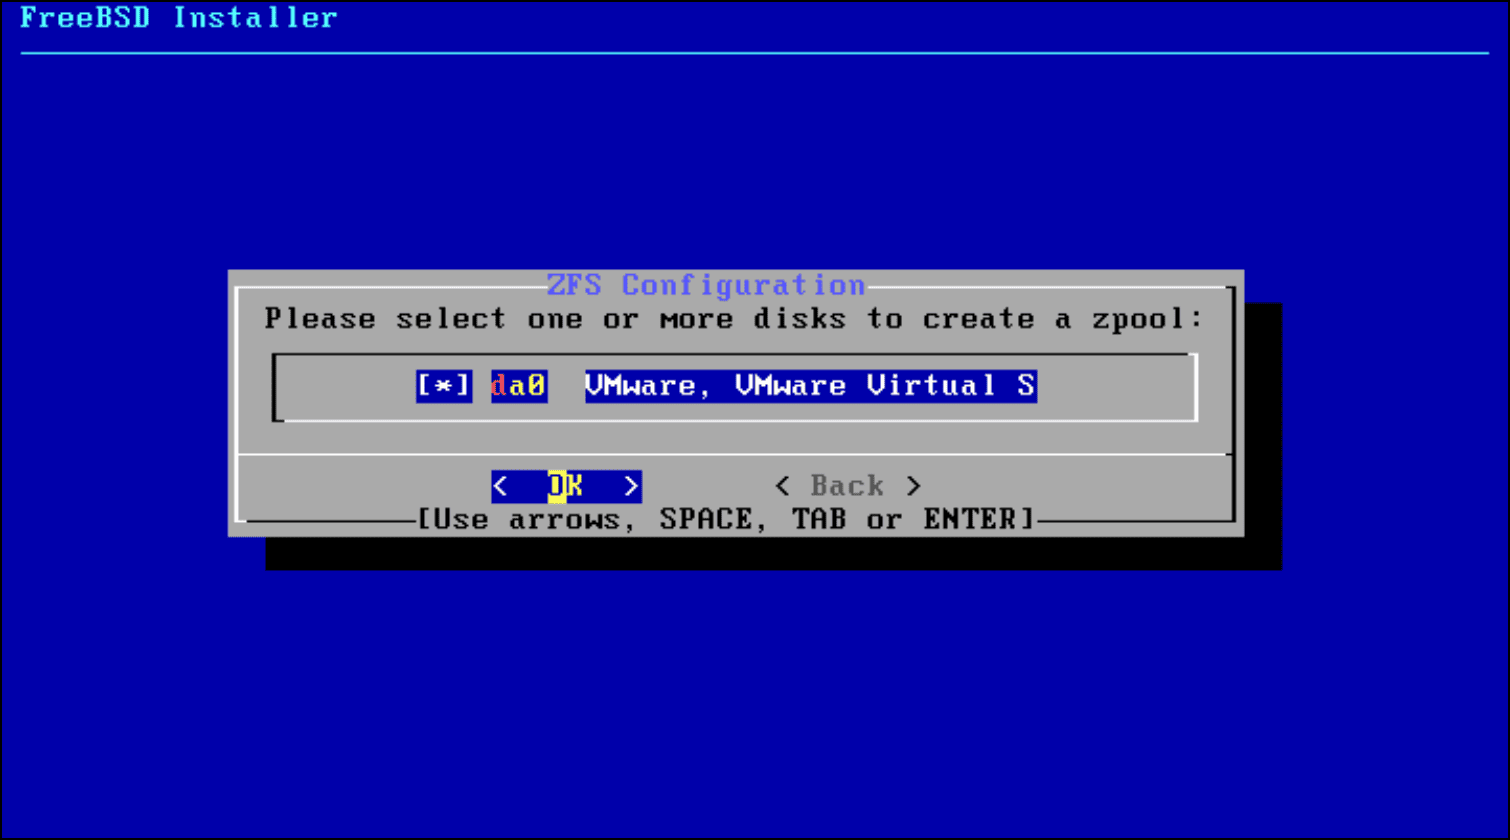
- There is a drive-erasure warning. Use the left arrow key to select Yes and press
Enter.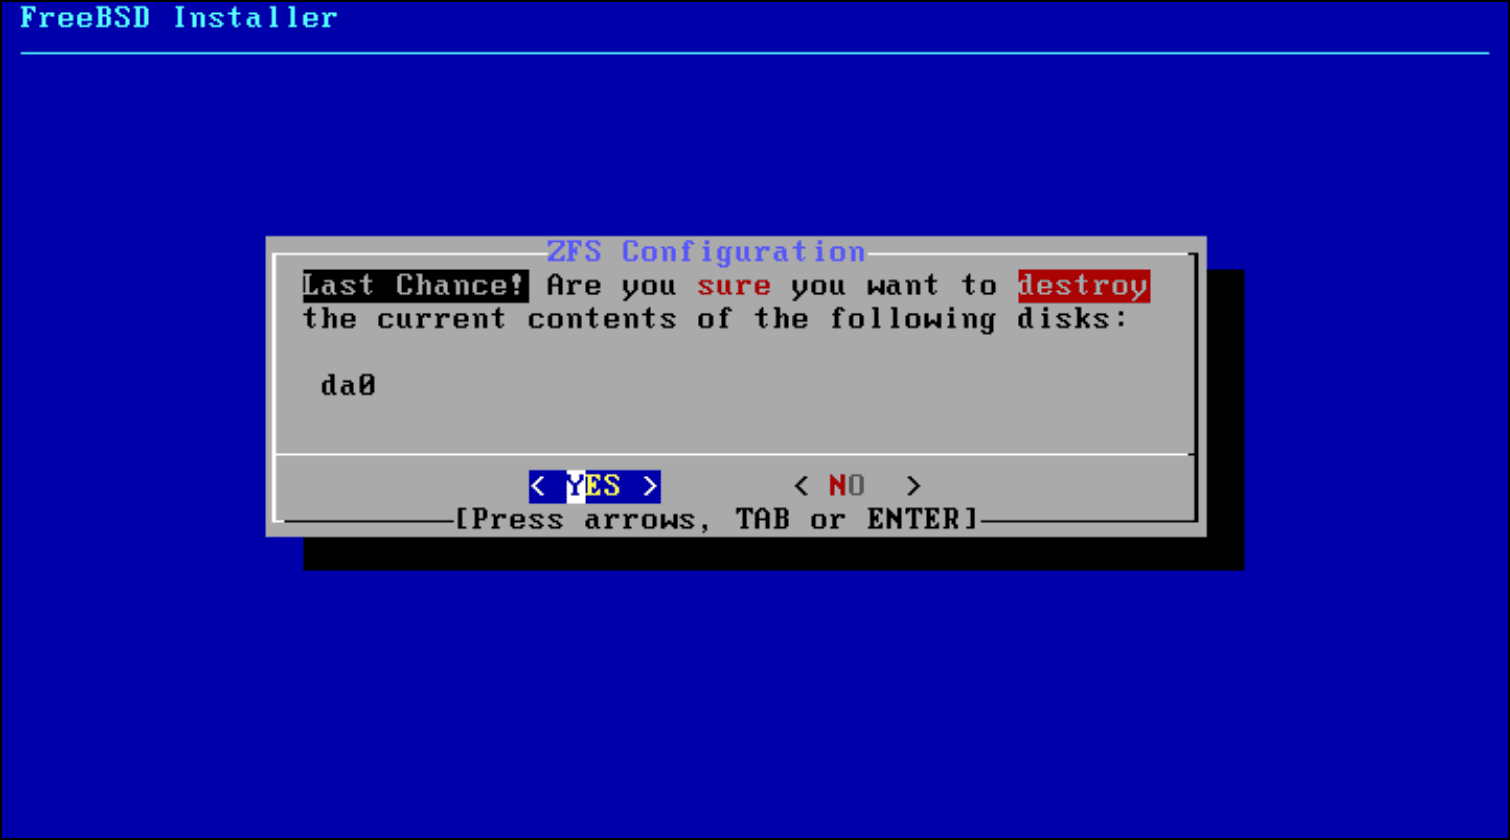
-
The Installation Progress indicator displays.
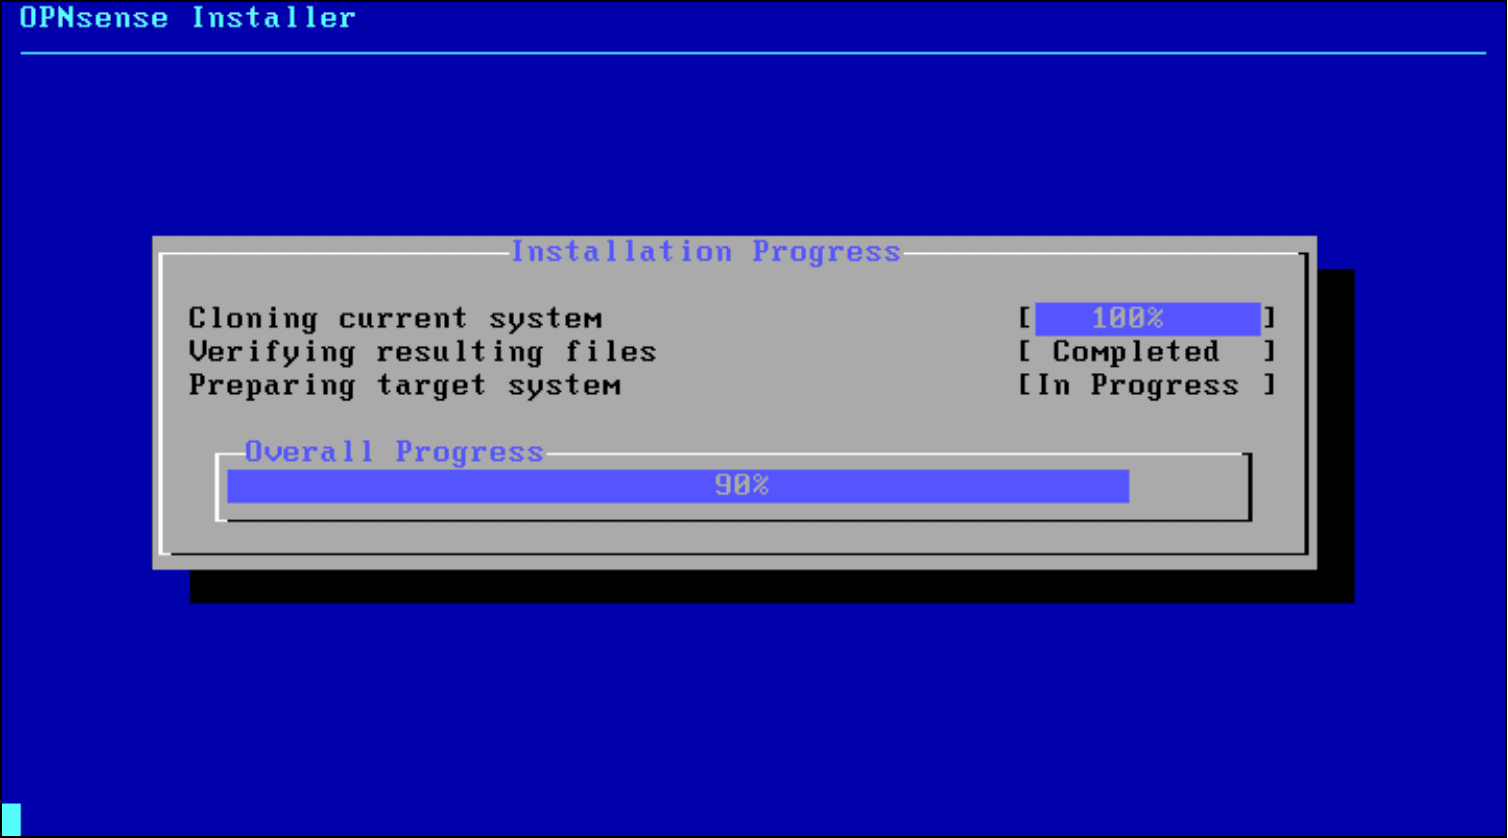
This part of the installation took about 15 minutes in mid-2026 with a VM with 4GB of RAM.
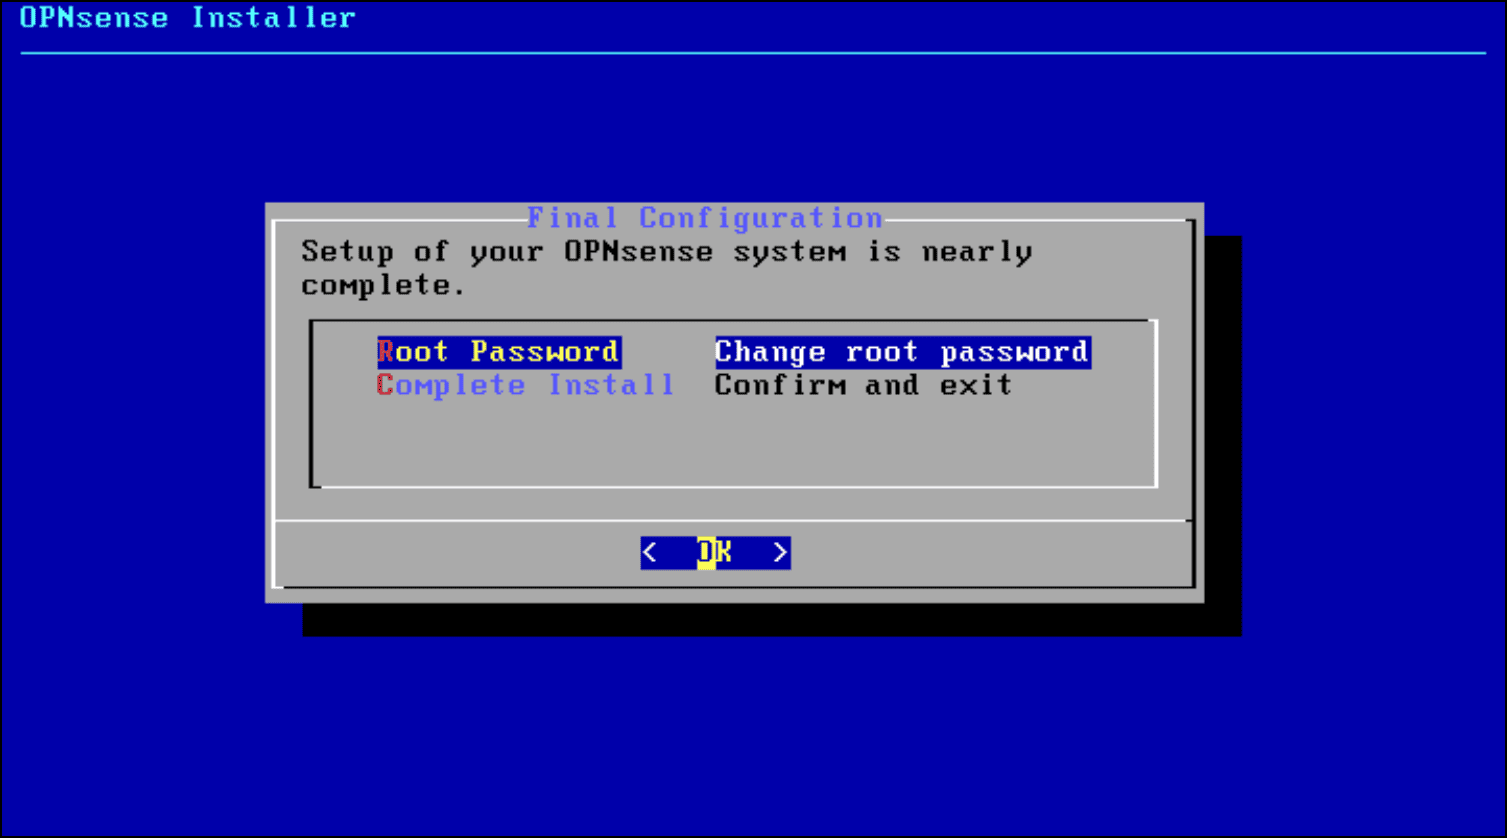
- On the Final Configuration pane, press enter for Root Password | Change root password.
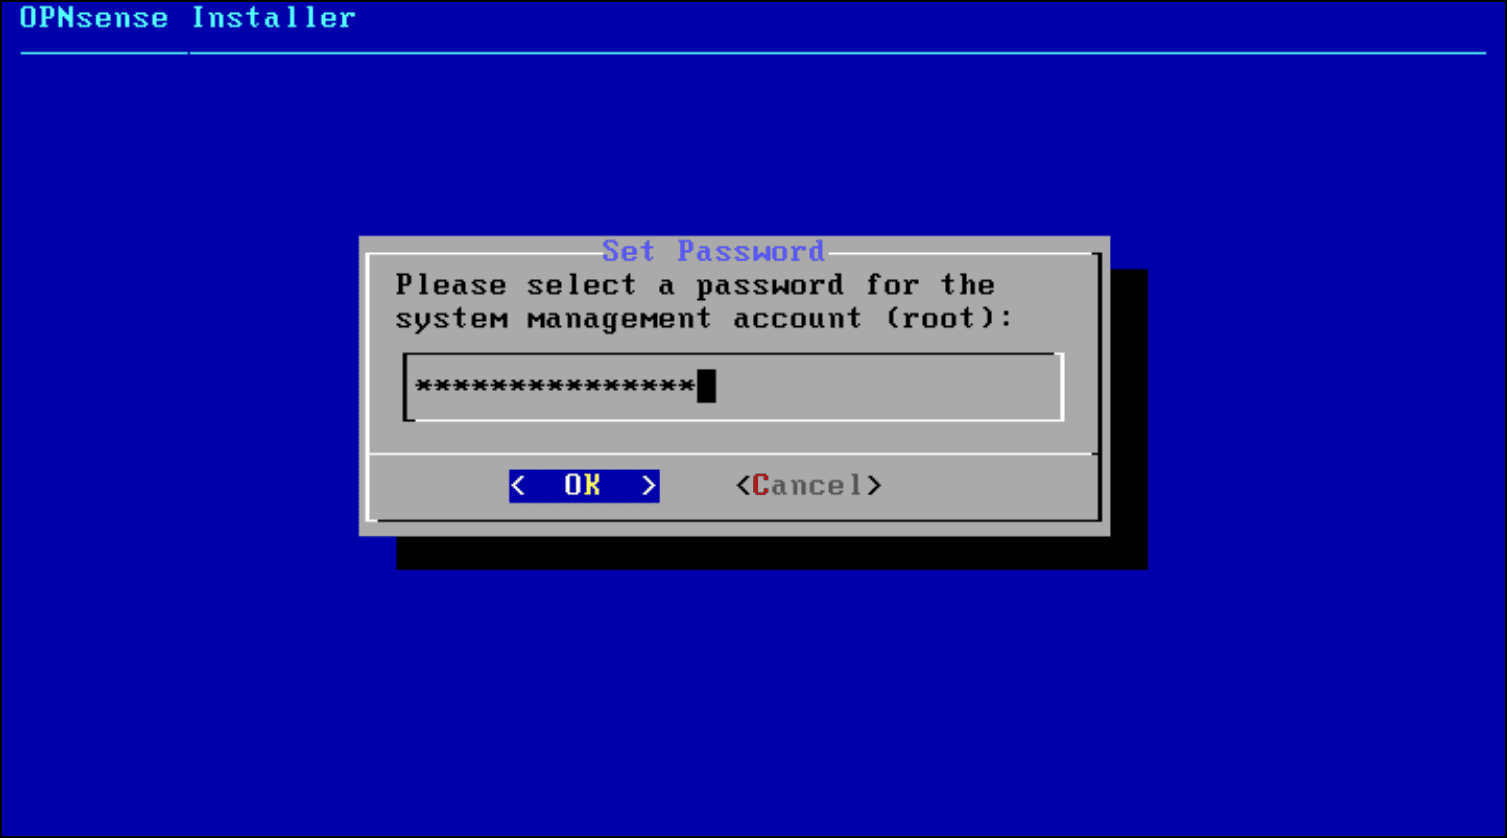
- Enter a new password for the root account in the Set Password pane and select OK.
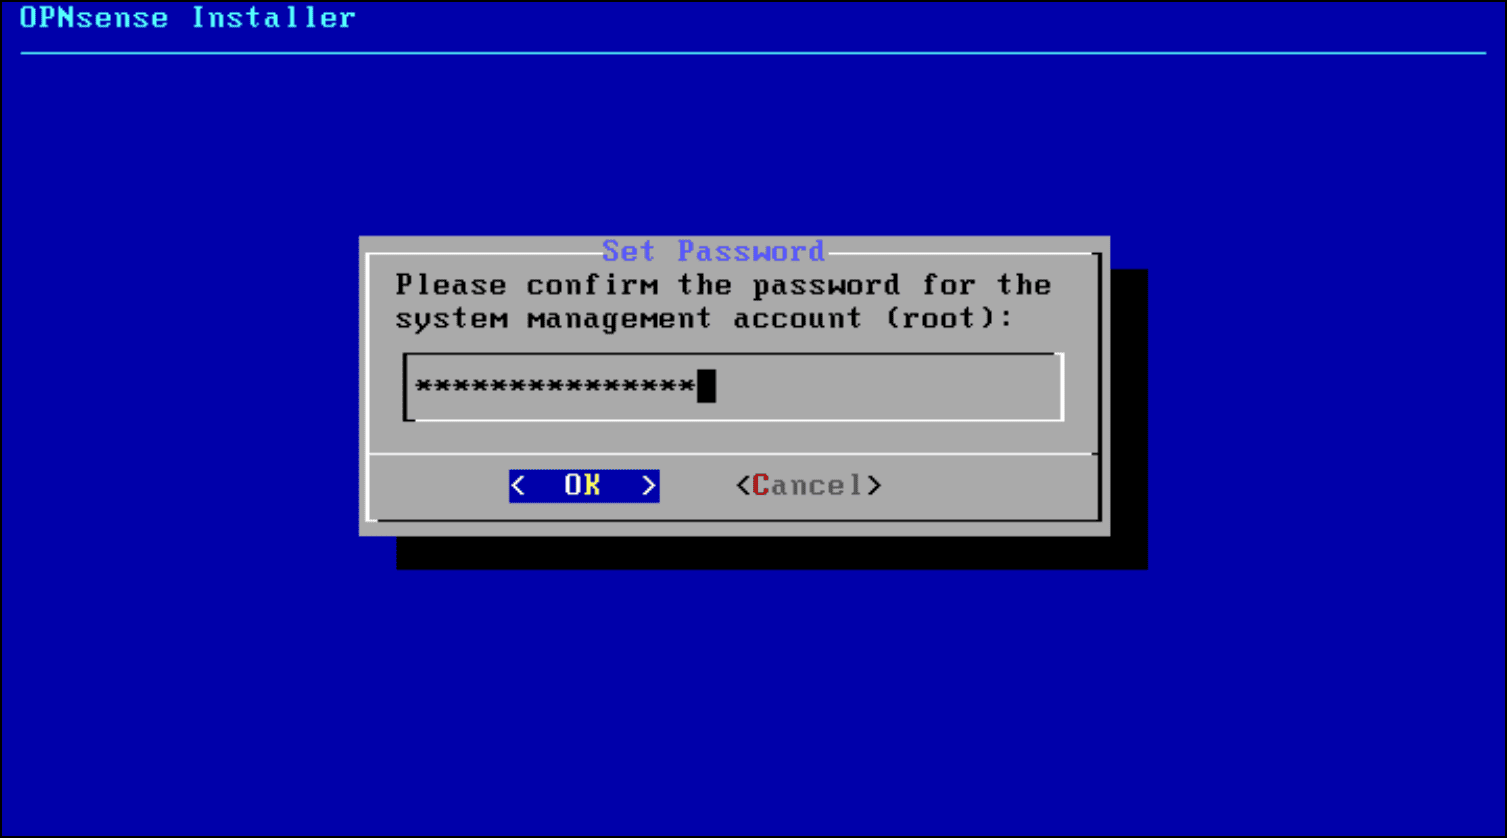
- Re-enter the new root password and select OK.
- Back on the Final Configuration pane, use the down arrow to select Complete Install | Confirm and exit and press
Enterto select OK.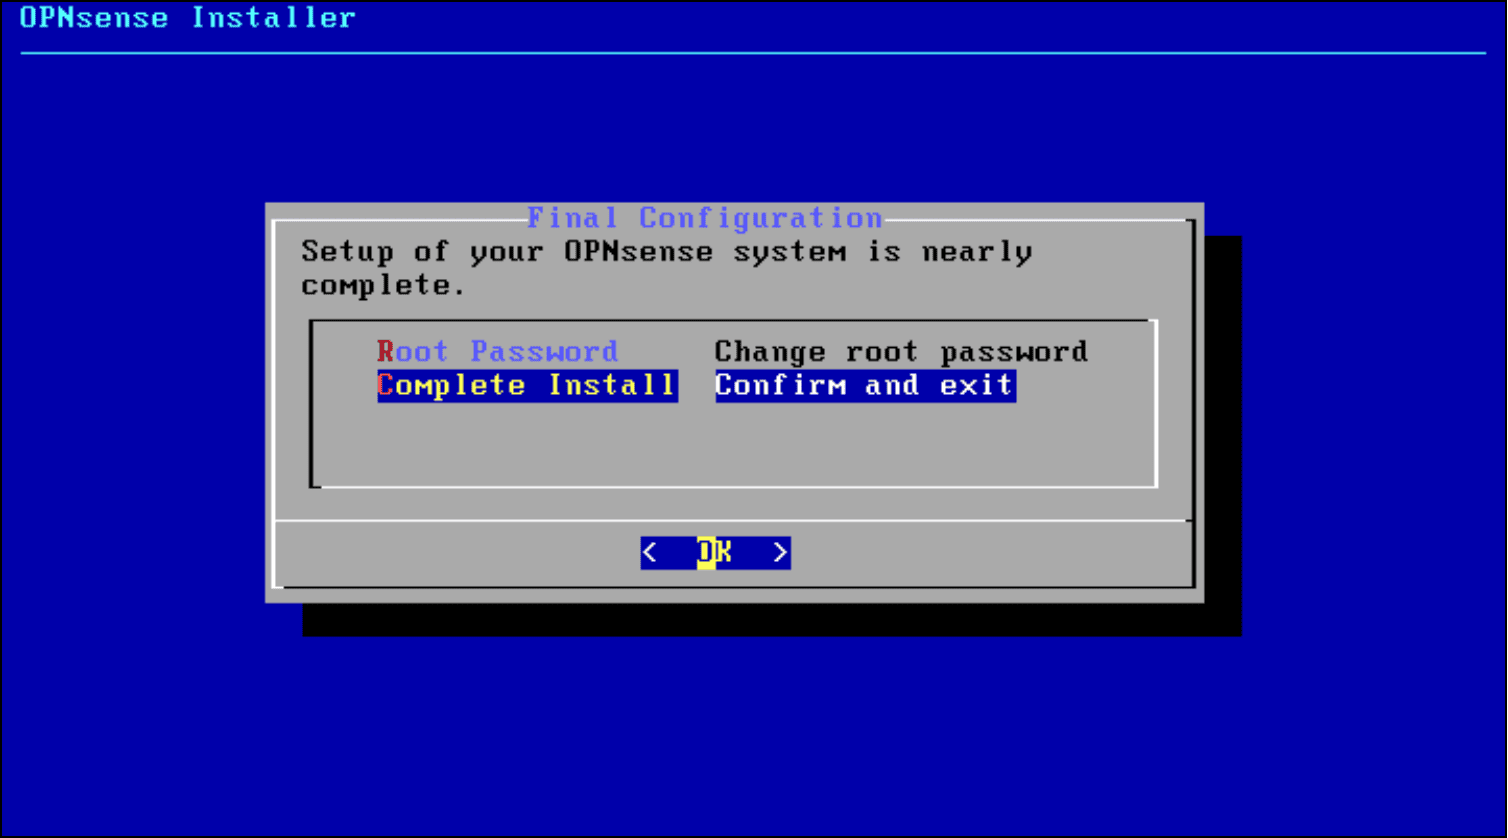
- Use the down arrow to select Halt now | Power down system and press
Enterto select OK.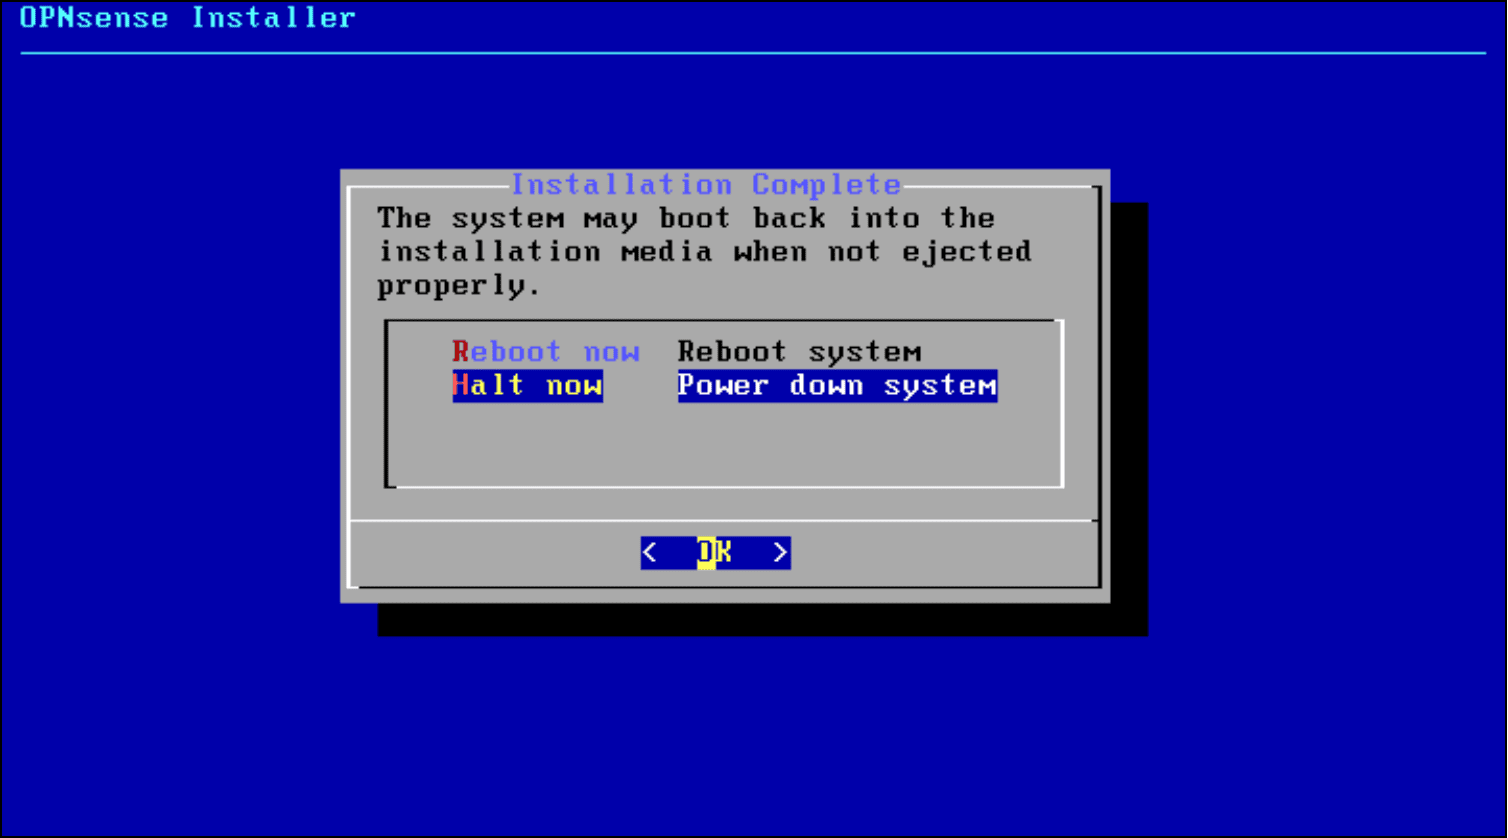
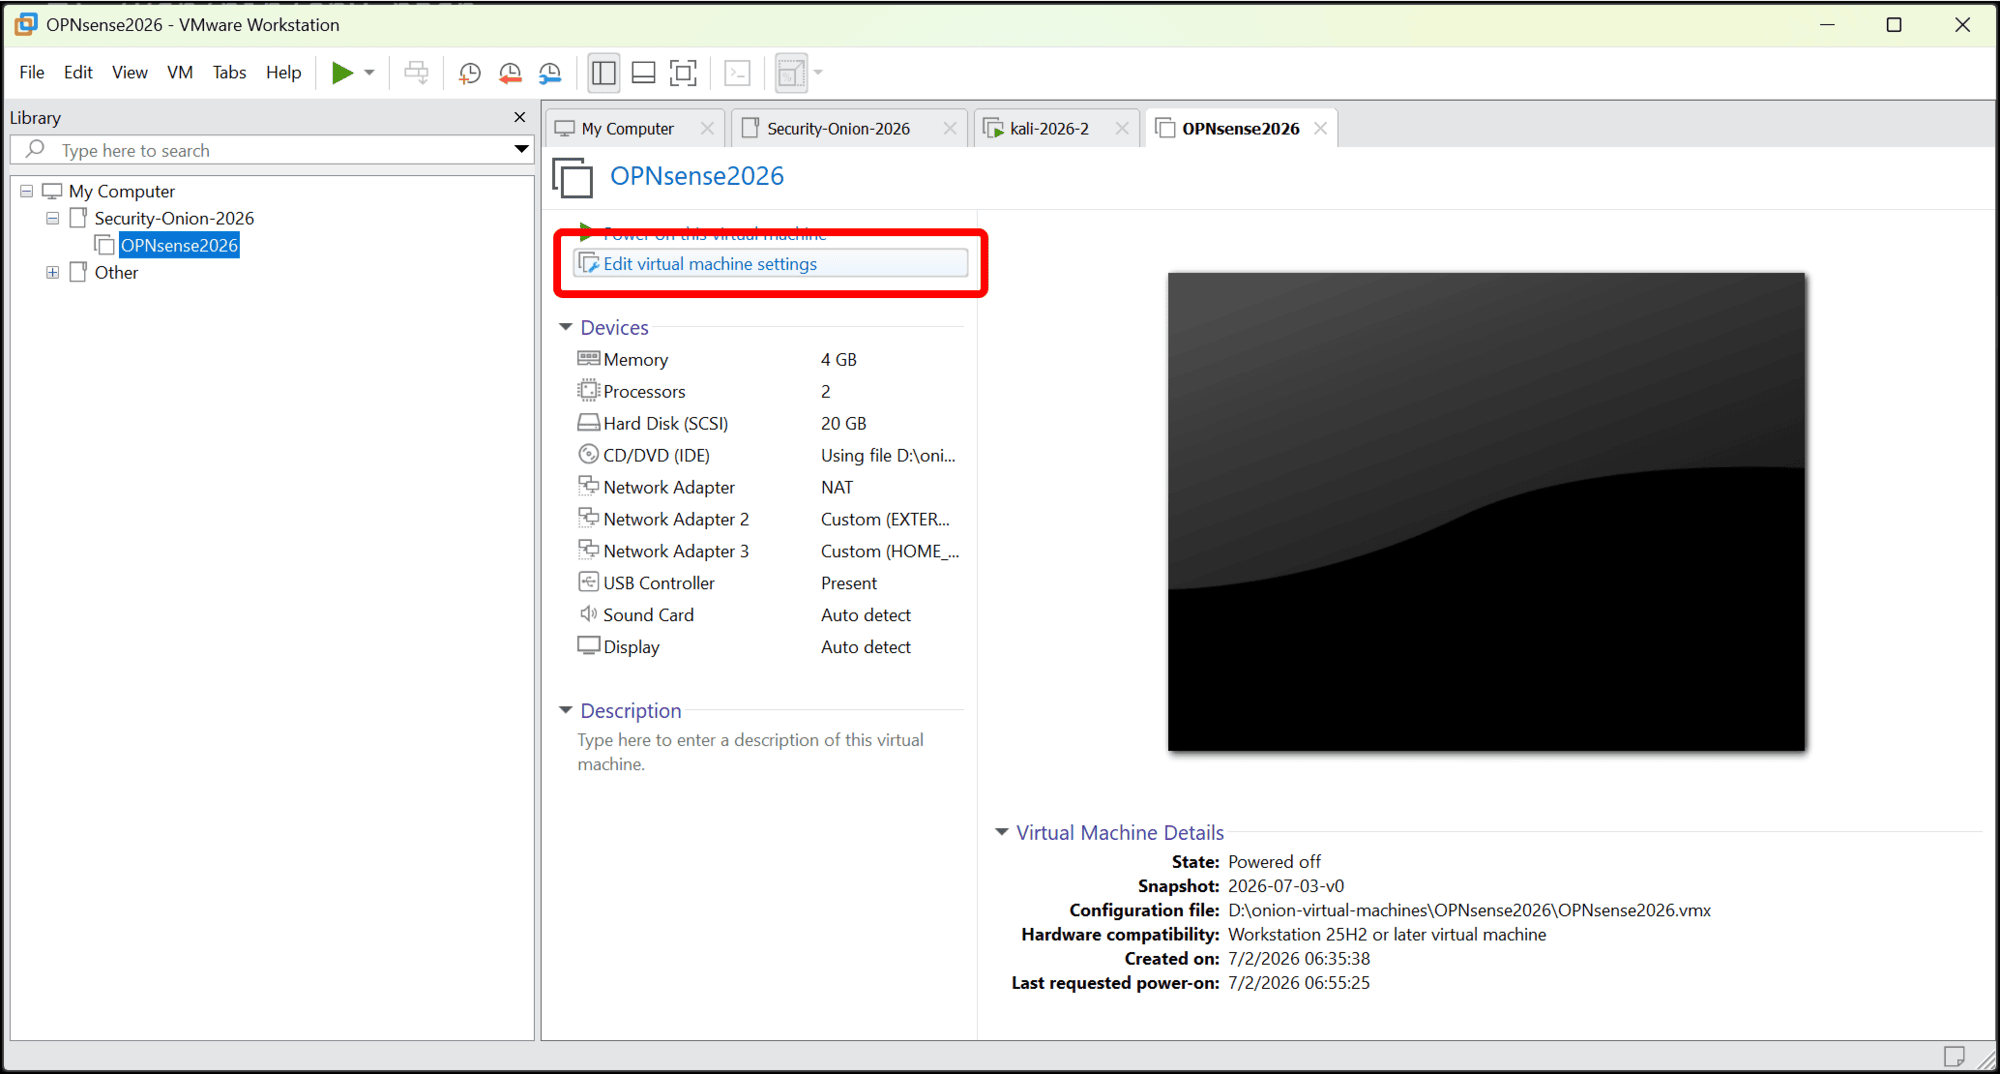
- With the VM powered down, click Edit virtual machine settings.
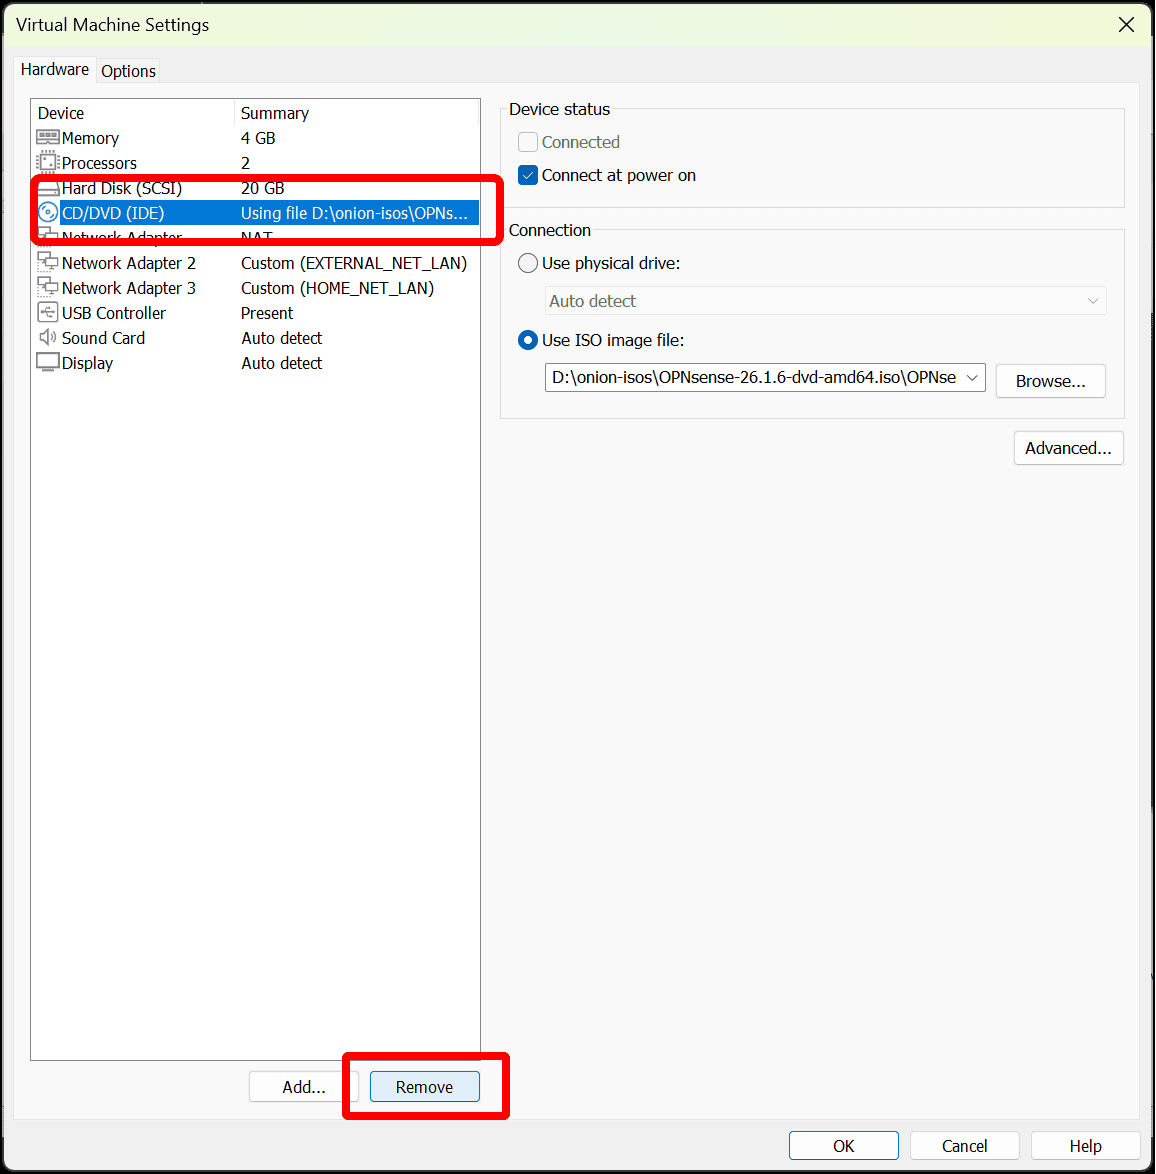
- Select the CD/DVD (IDE) drive on the Device list and click Remove. Now that you have installed the system, you don’t need the drive, and removing it prevents the possibility of it booting from the installation media.
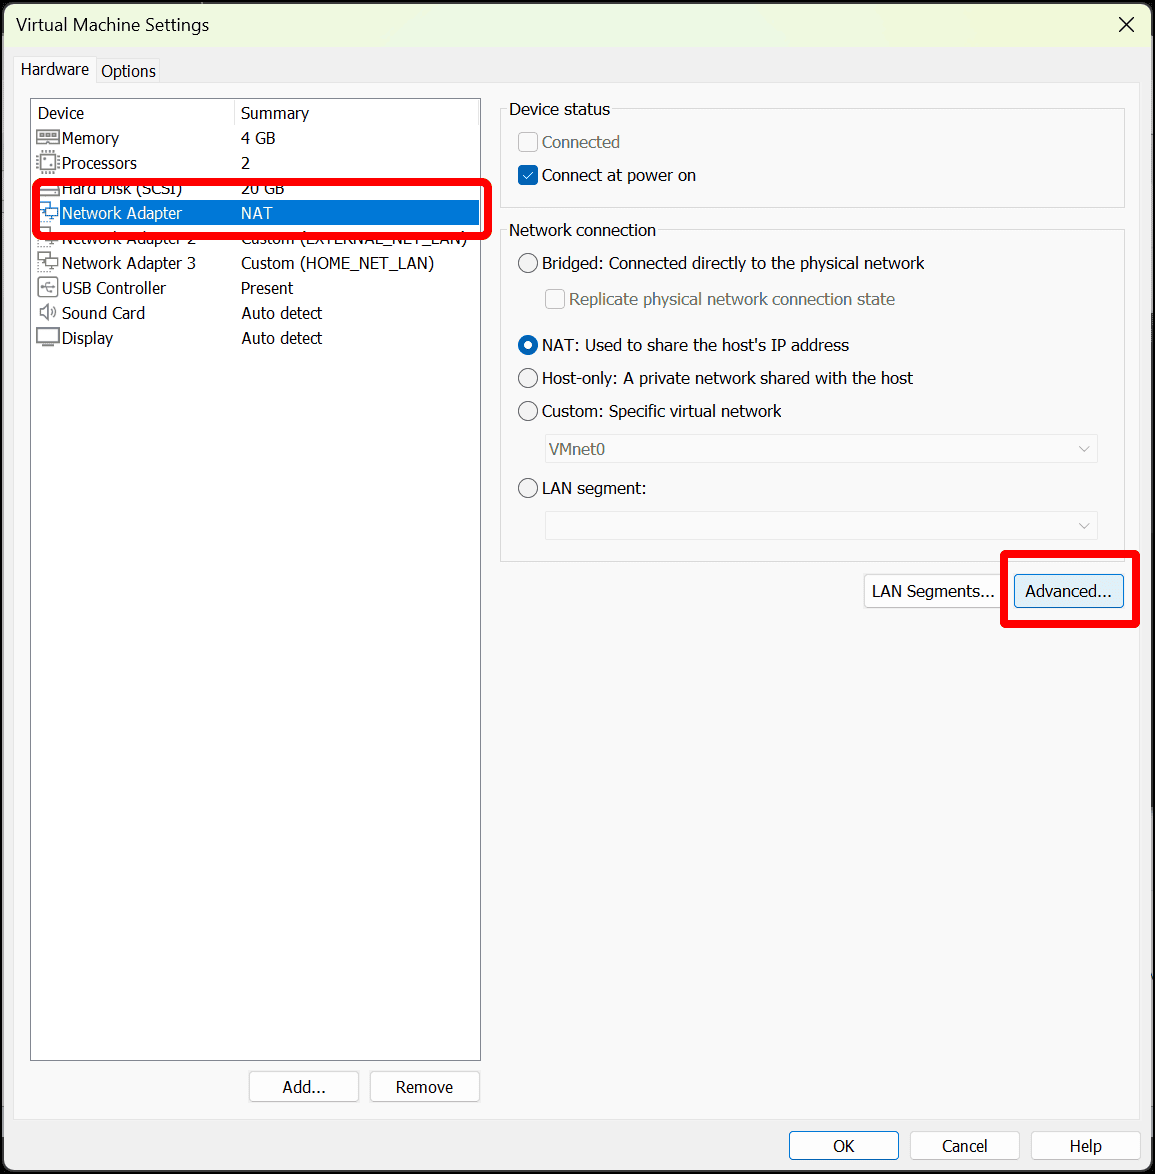
- For the next configuration task, it will be helpful to be able to refer to the MAC addresses of each network adapter when you assign the interfaces of the OPNsense router to the correct virtual networks. Select your first network adapter on the Device list and click Advanced.
- Note the MAC Address of the network adapter, as well as the virtual network to which the adapter is connected.
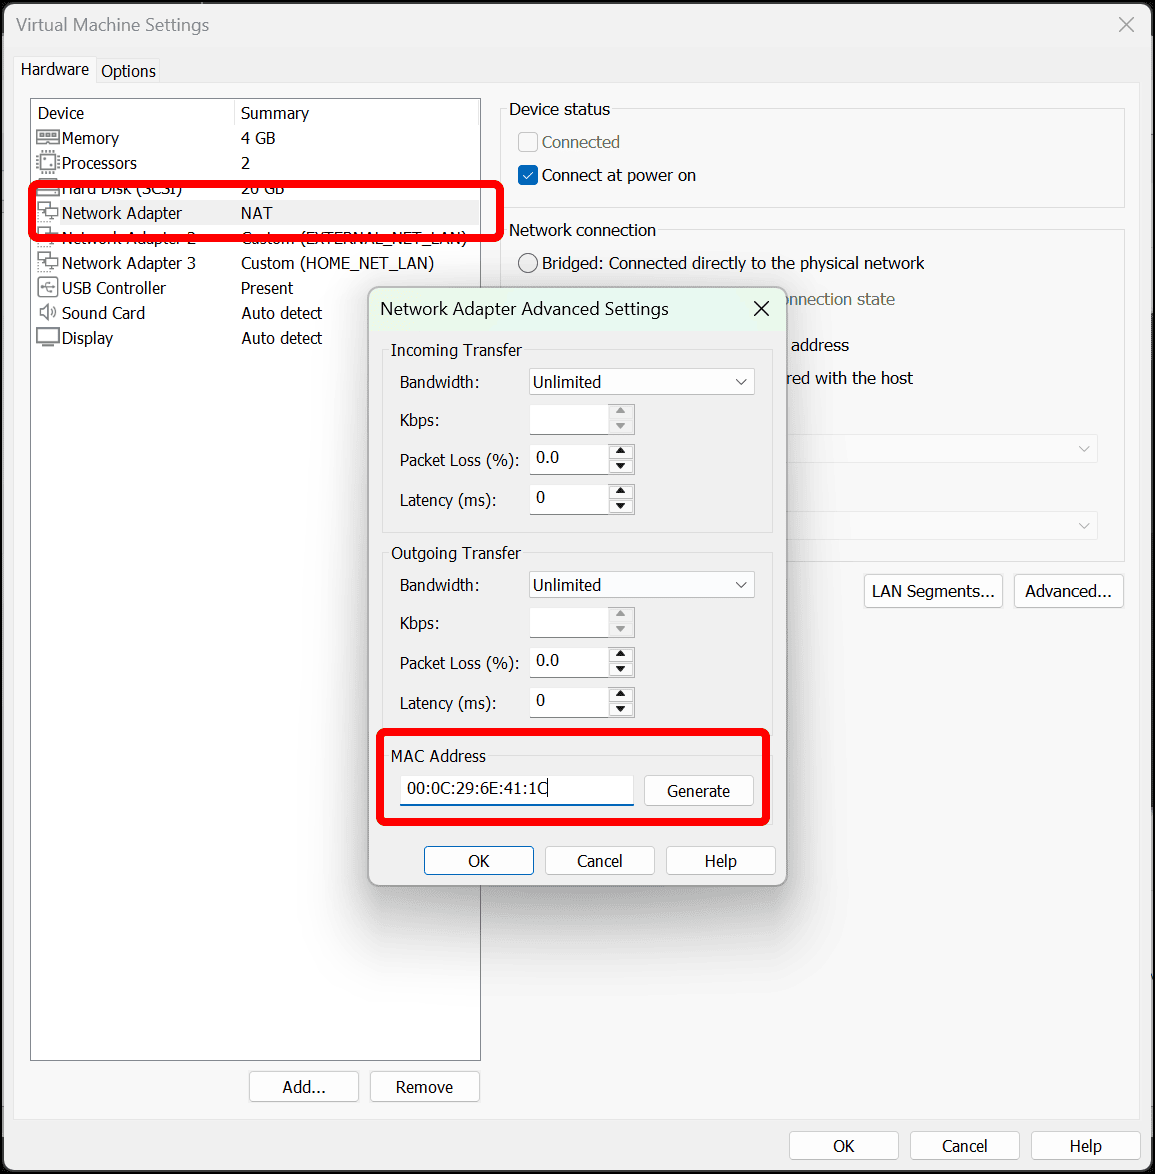
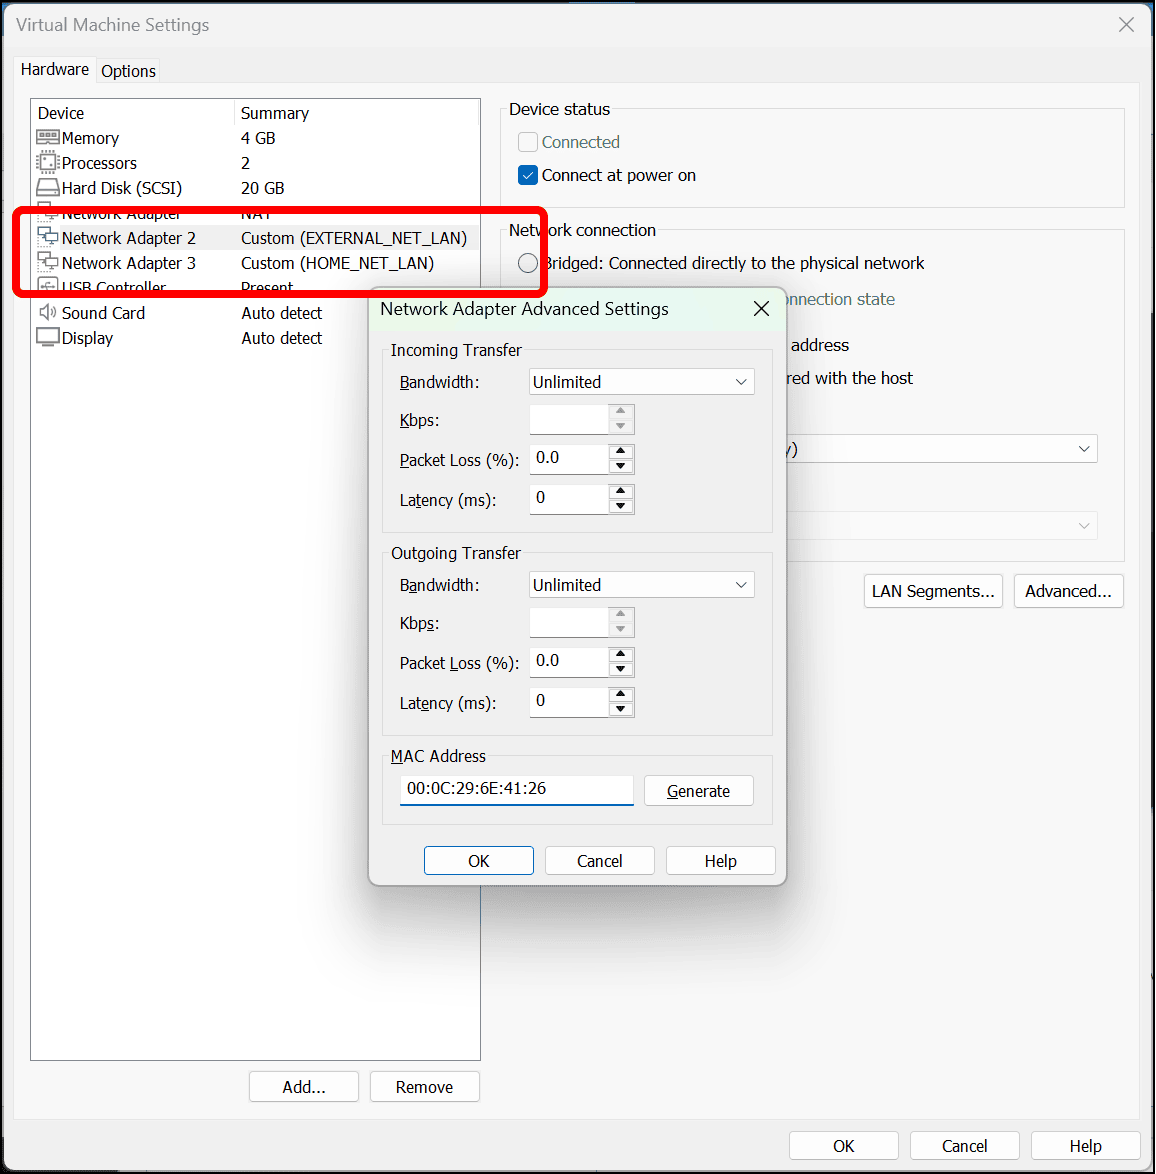
- Repeat the steps for the other two network adapters on the OPNsense router. When you are done close the virtual machines settings.
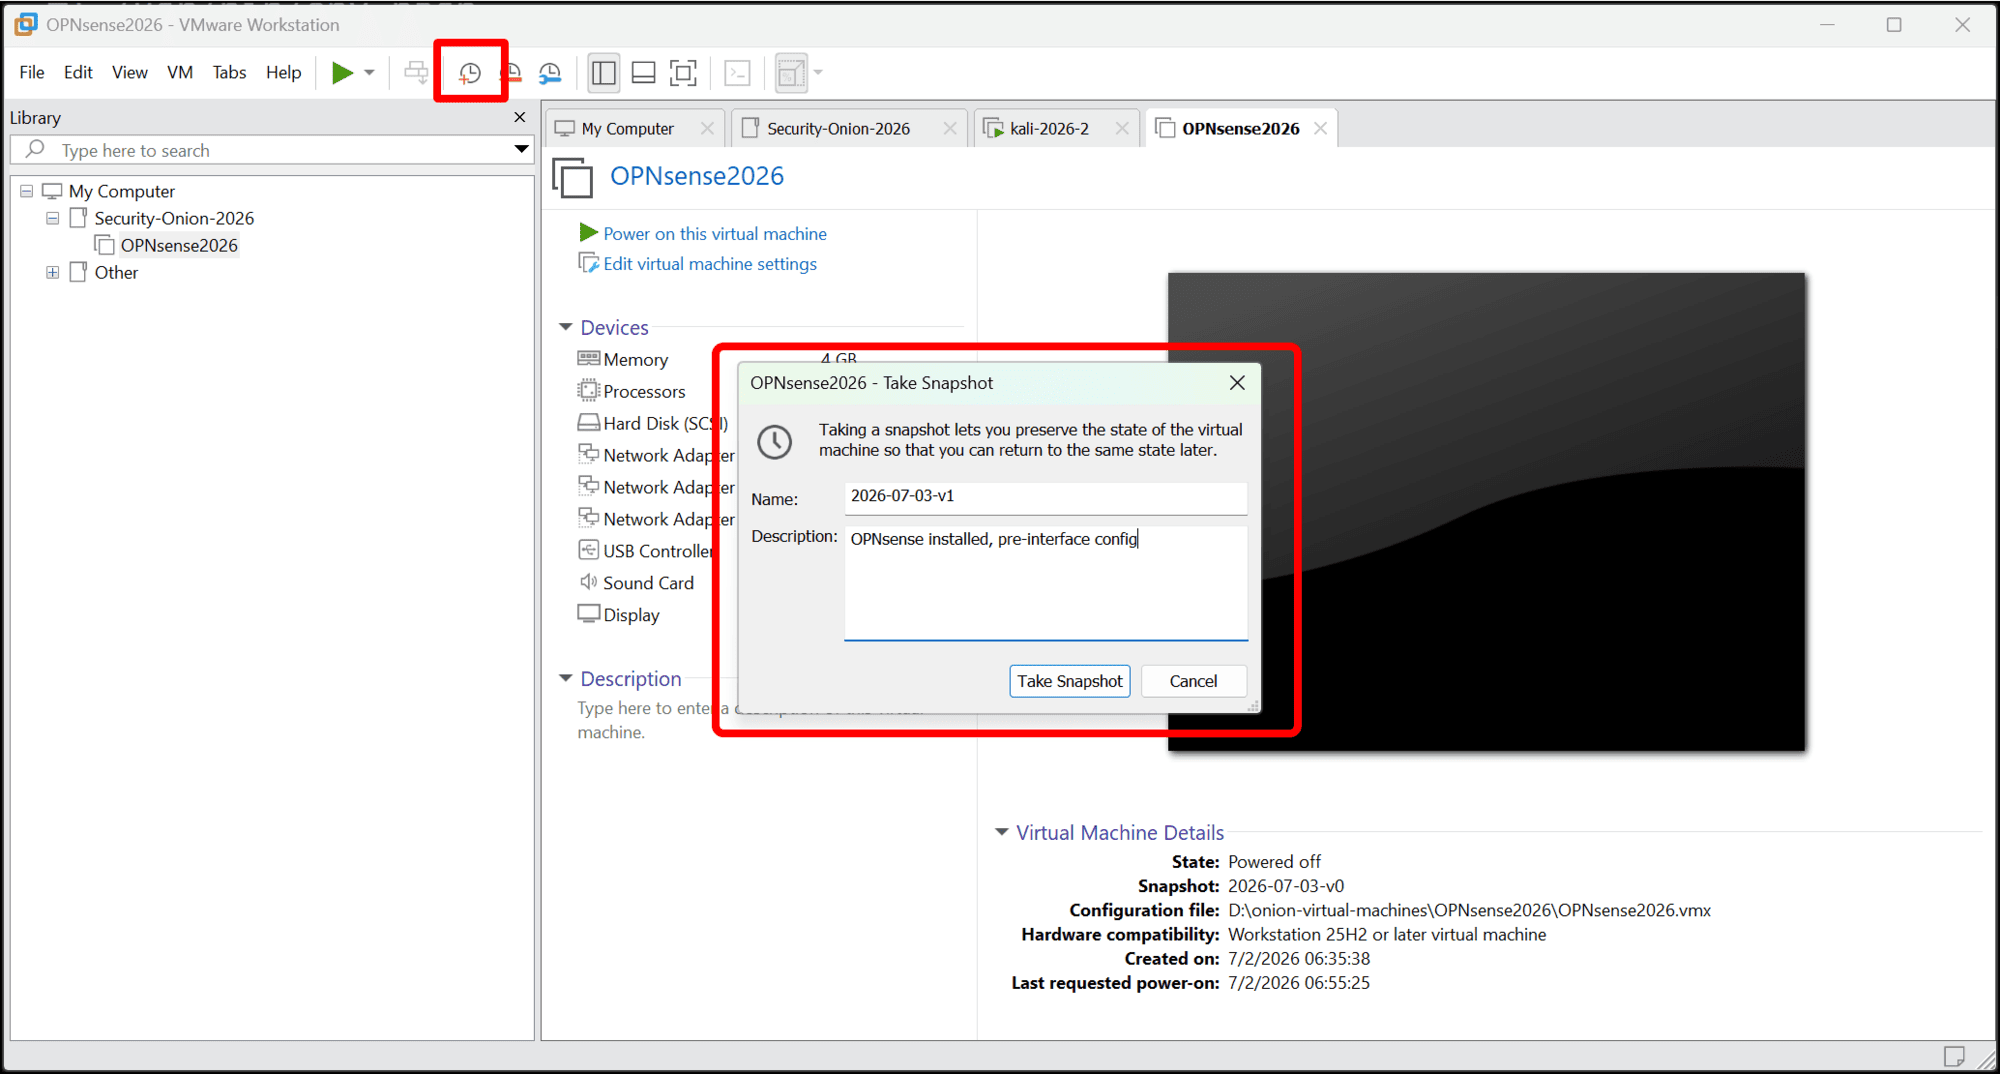
- You also can use this opportunity to take another snapshot of the virtual machine.
Assign Network Interfaces and IP Addresses on the OPNsense Router
With the OPNsense system installed and running, you now need to assign the three virtual network interfaces on the router to the different virtual networks provided by VMware Workstation Pro.
- Click the play icon to run the virtual machine (VM) in the VMware Workstation Pro menu bar. (You can also select the Virtual Machine menu and click Power on this virtual machine.)
- When the
login:prompt displays, enterroot, enter your new password for the root account, and pressEnter.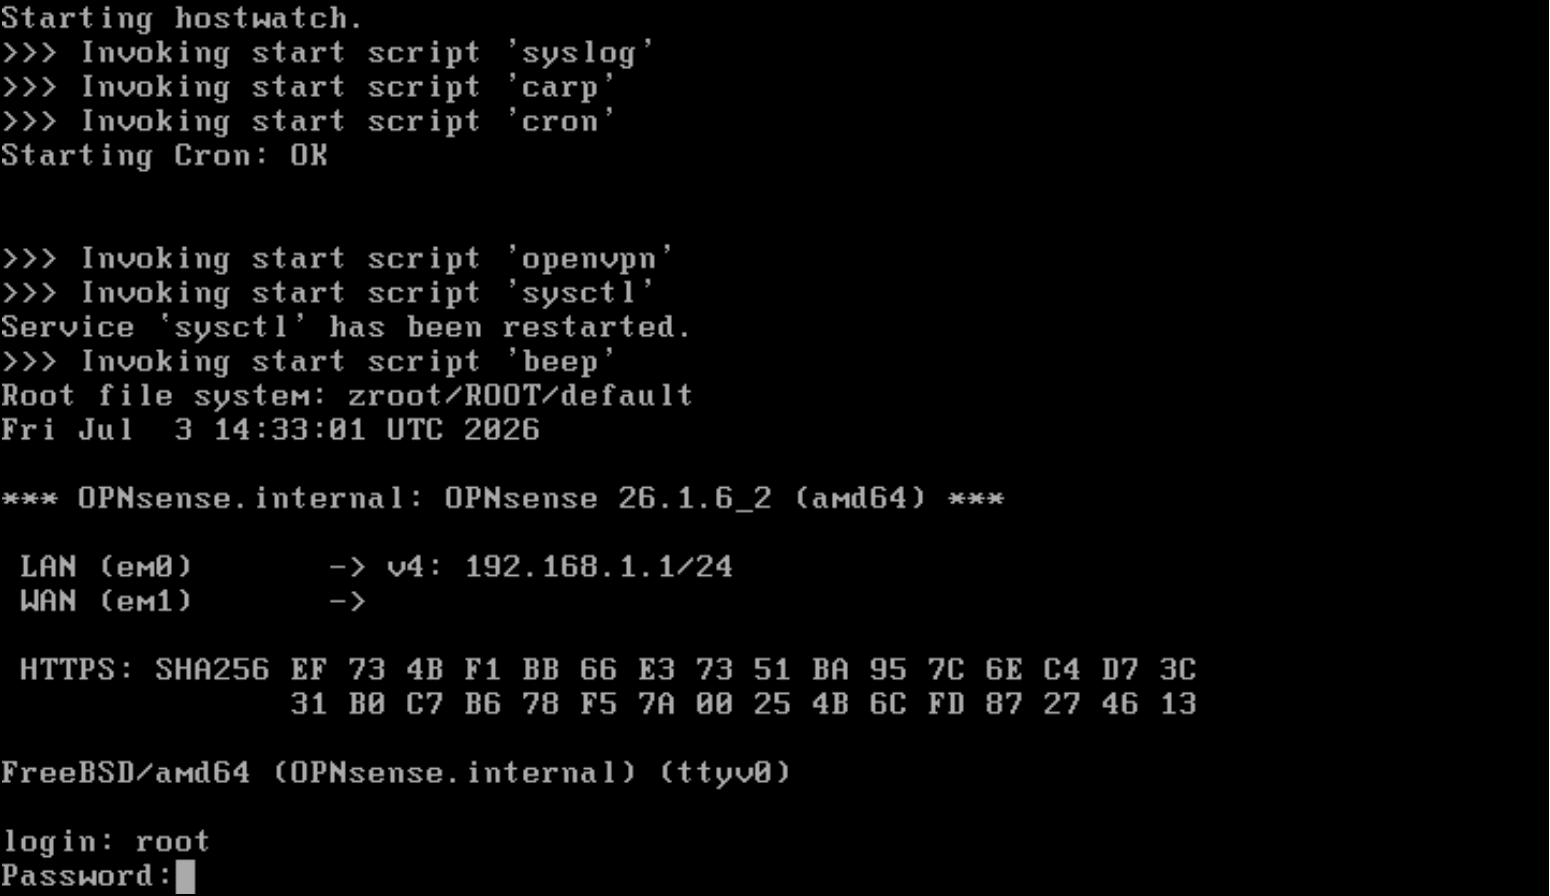
- From the menu, select
1) Assign interfaces.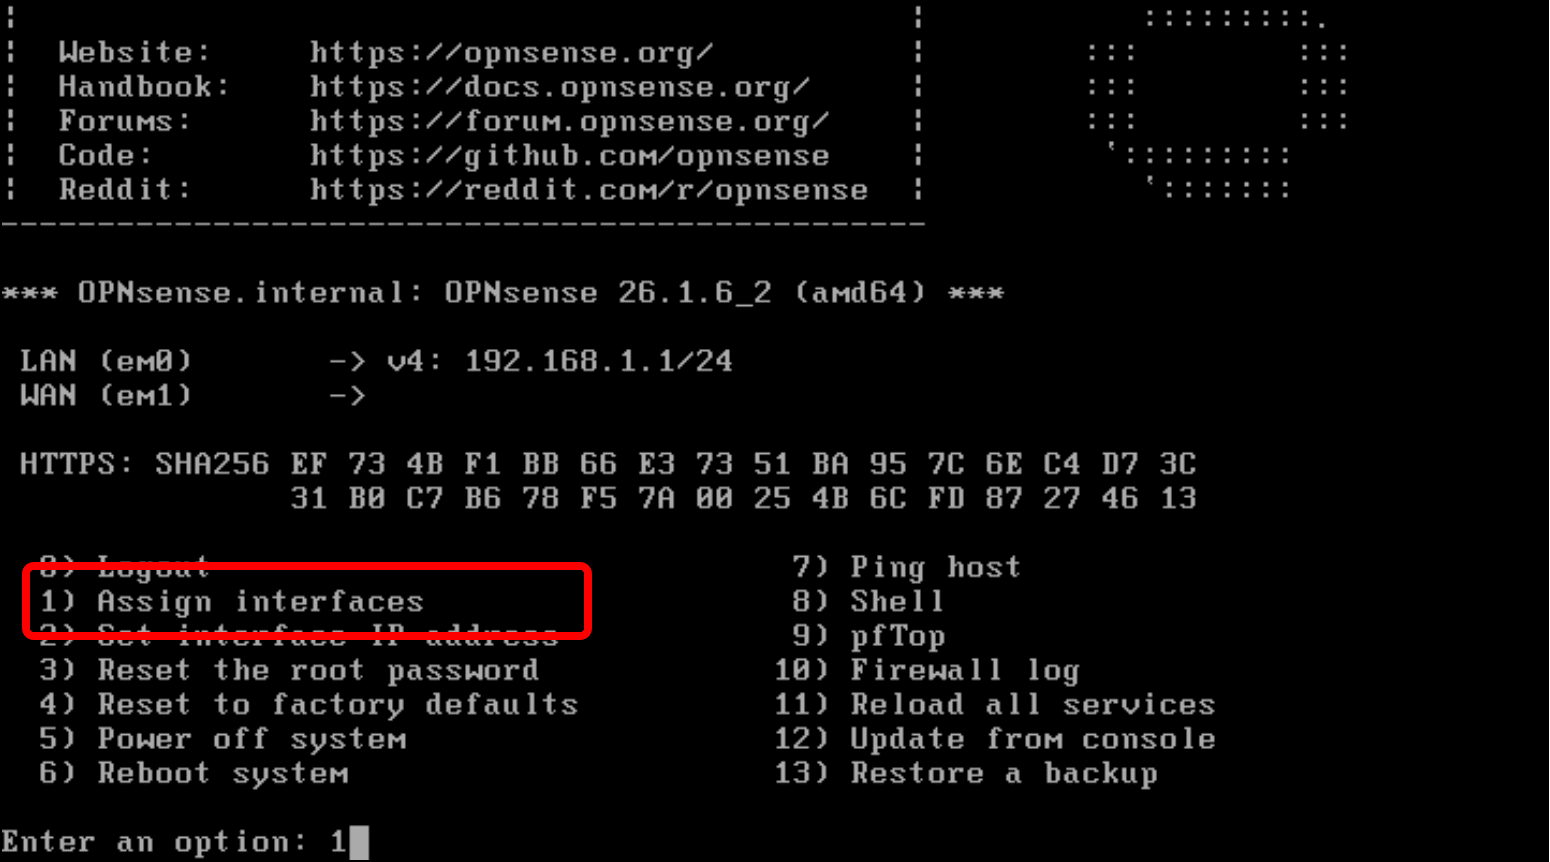
- The next option is
Do you want to configure LAGGs now. Selectnunless you want to configure link aggregation.. - Enter
nforDo you want to configure VLANs now?. - You are prompted to
Enter the WAN interface name. You can choose from three interfaces:em0,em1, andem2, each of which display their MAC address. This is where you will use the MAC addresses you just collected to identify which network adapter MAC address is assigned to which network.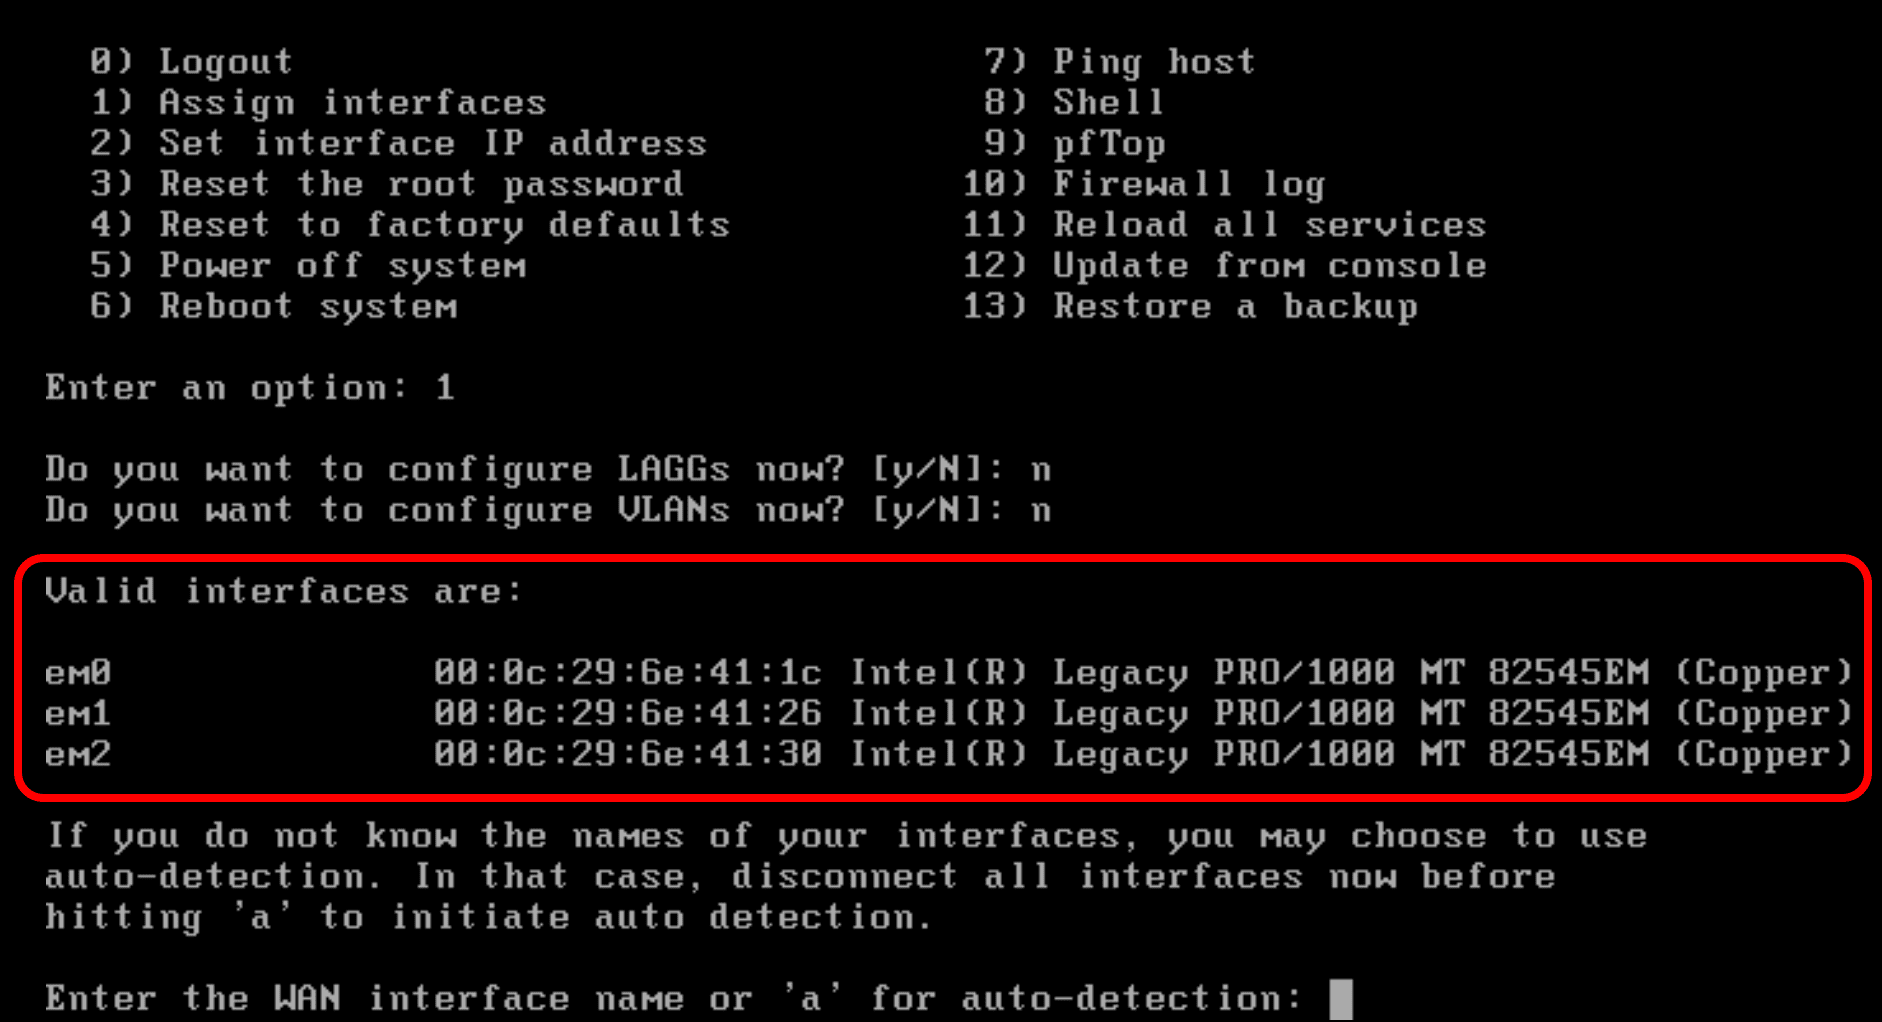
- In this scenario the MAC address displayed for
em0, which ends in41:4c, matches the MAC address for the NAT network that I intend to use to provide access to external networks and the public internet, so this is the network adapter I want to assign as the WAN interface. Typeem0into the command line prompt and pressEnter.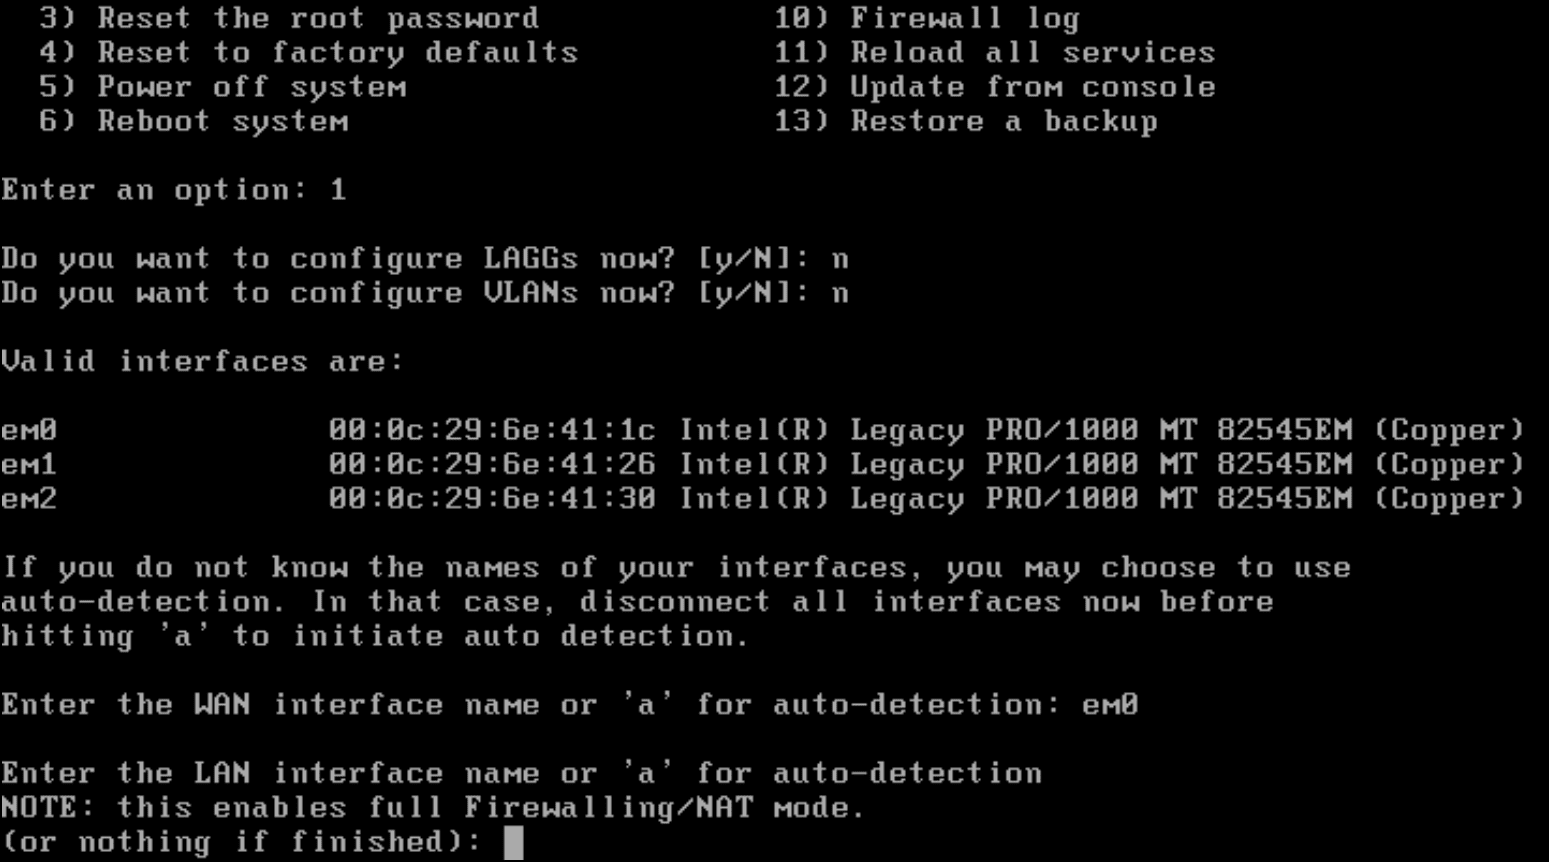
- Next you are prompted to
Enter the LAN interface name. Use the same steps to check the MAC addresses in the VM’s settings. In this example, the VM’s Network Adapter 2, has the same MAC asem1, ending in41:26. This is the interface intended for the LAN and the EXTERNAL_NET_LAN virtual network, so typeem1and pressEnter. - The prompt asks for the name for Optional interface 1. This would be
em2, the interface intended for the HOME_NET_LAN. However, you can set this up through the web management interface, so pressEnterfor nothing. - Type
yand pressEnterwhen promptedDo you want to proceed?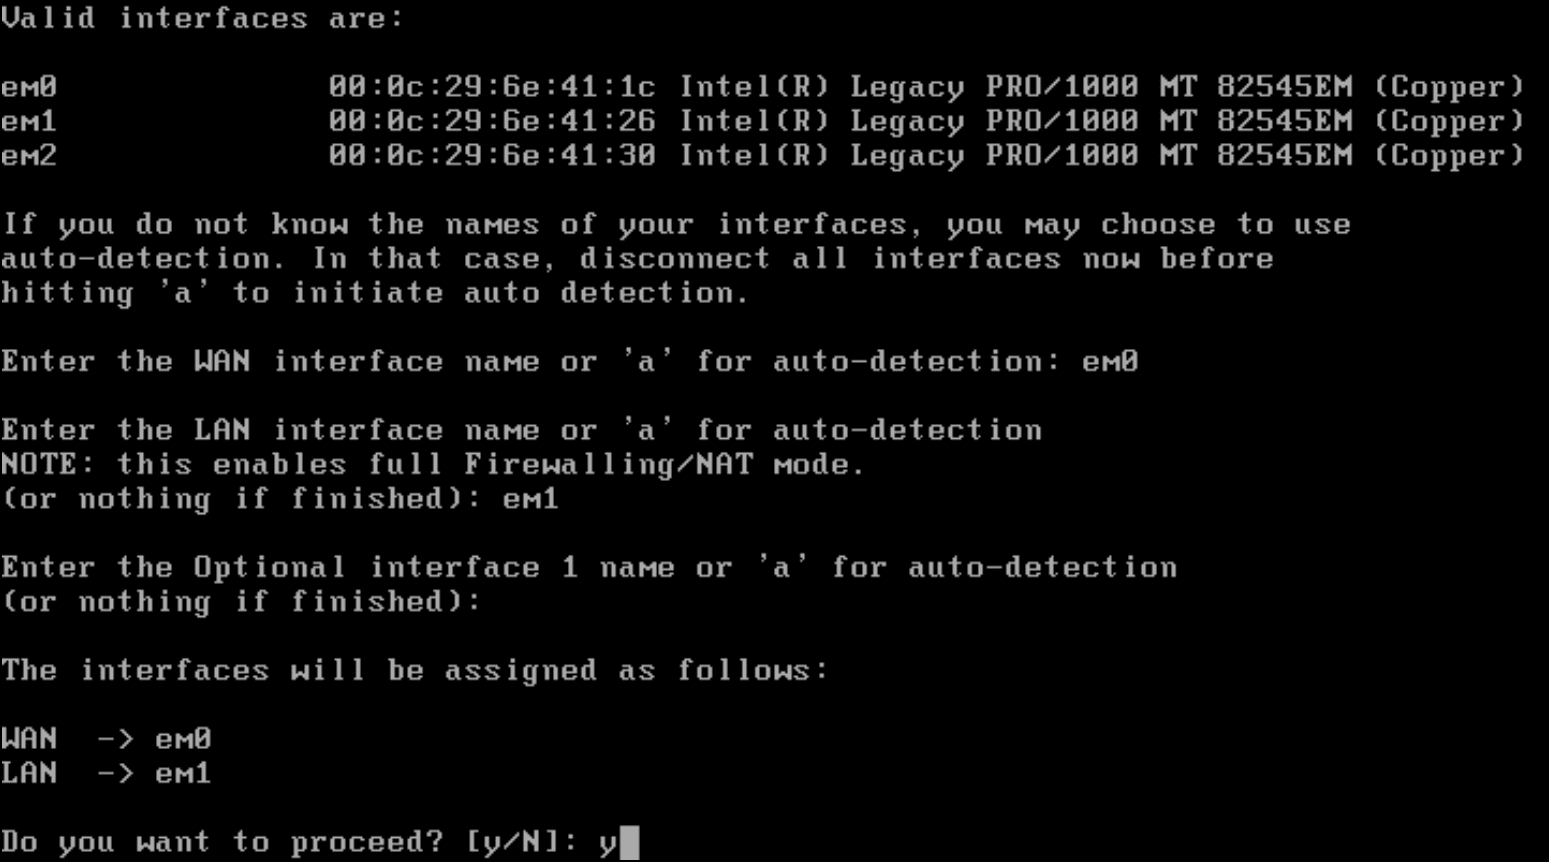
- The OPNsense login prompt reloads, displaying the LAN (em1) and WAN (em0) IP addresses. These have been assigned by default, and the LAN/em1 IP address is incorrect. You need to manually configure the IP addressing for the LAN interface. Press
2) to Set interface IP addressand then pressEnter.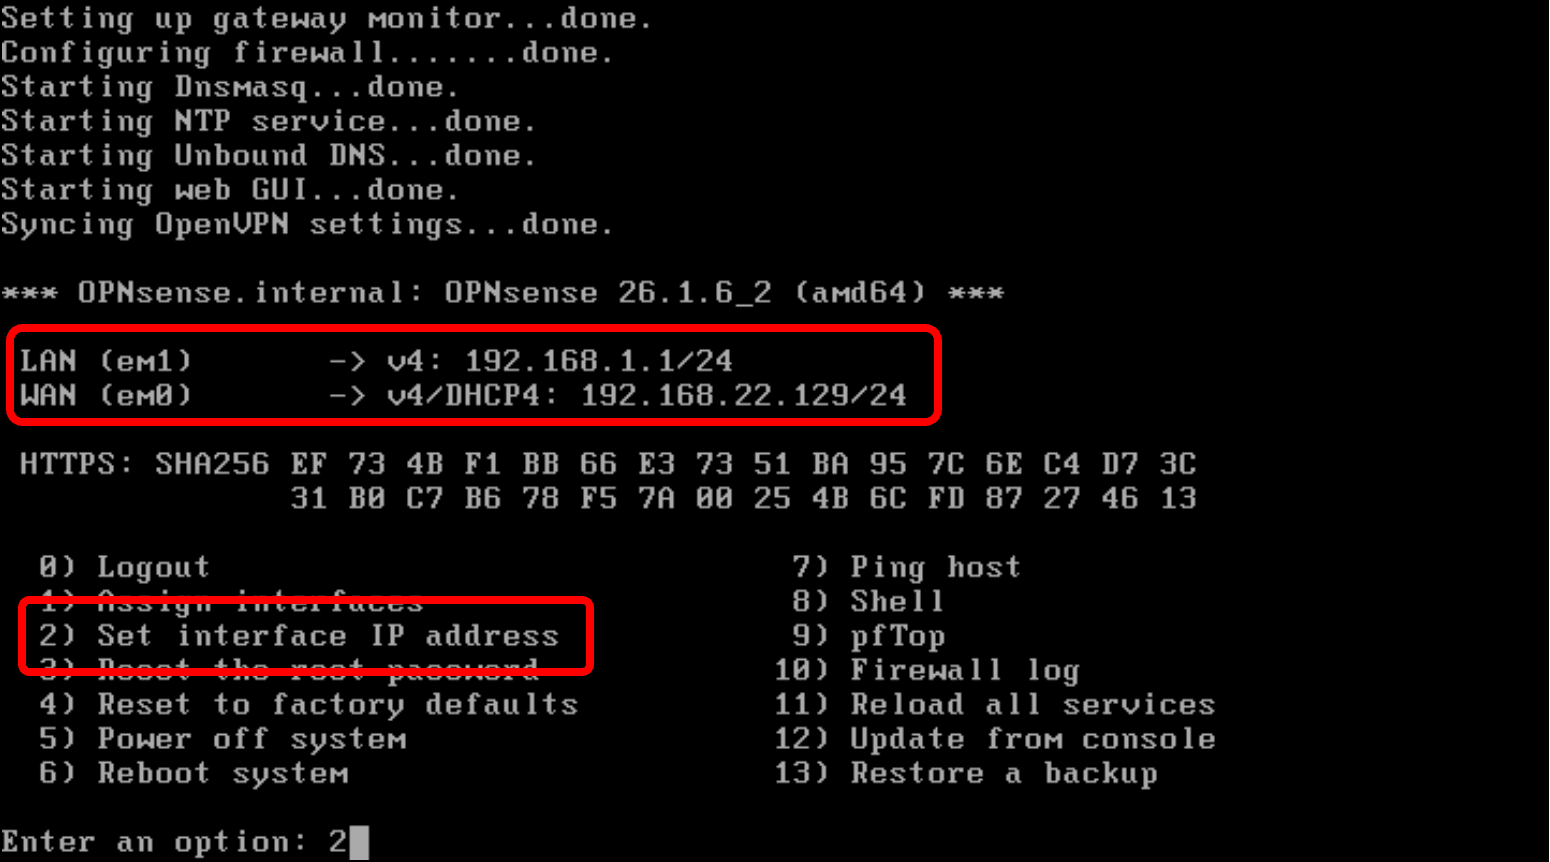
- To assign the IP address for the LAN interface, enter
1for1 - LANforem1. (The WAN IP has already been assigned by the DHCP service for the VMware NAT private virtual network.) - Enter
nforConfigure IPv4 address LAN interface via DHCP?. (You want to assign a static IP address). - Enter the
new LAN IPv4 address. This example uses10.10.9.1. - Enter
24as theLAN IPv4 subnet. - Since this is for the LAN, press
Enterfor no upstream gateway address. - Enter
nforConfigure IPv6 address... via WAN tracking. - Enter
nforConfigure IPv6 address... via DHCP6. - Press
Enterfor noLAN IPv6 address. - Enter
ytoenable the DHCP server on LAN.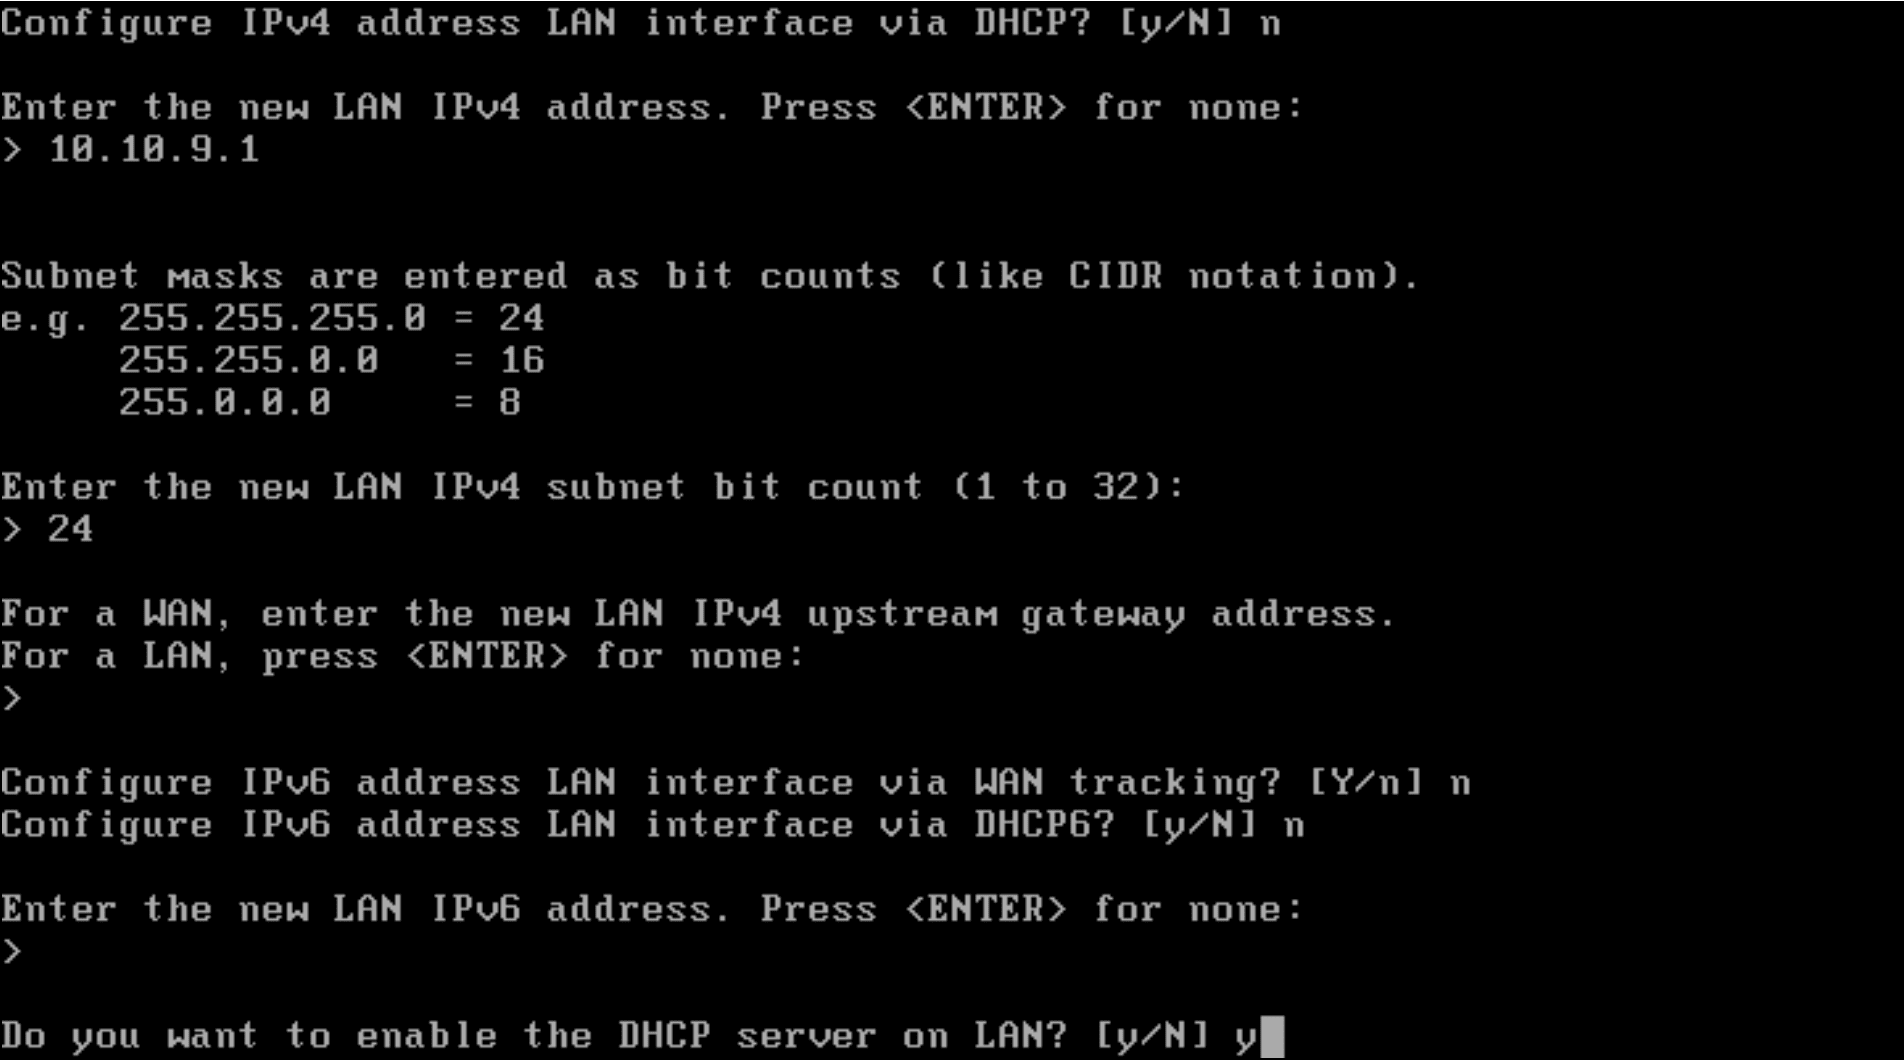
- For the
start address for IPv4 client address range, enter10.10.9.2. - Enter
10.10.9.254for theend address for IPv4 client address range. - Enter
nforDo you want to revert to HTTP as the web GUI protocol? - Enter
nsince there is no needto generate a new self-signed web GUI certificate. - Since there is no need to
Restore web GUI access defaults, entern.
- The output shows the banner. It says you can access the web GUI at
https://10.10.9.1, the address I statically assigned to the OPNsense VM on the LAN. It also shows a LAN IP address of10.10.9.1and a WAN IP of192.168.22.129.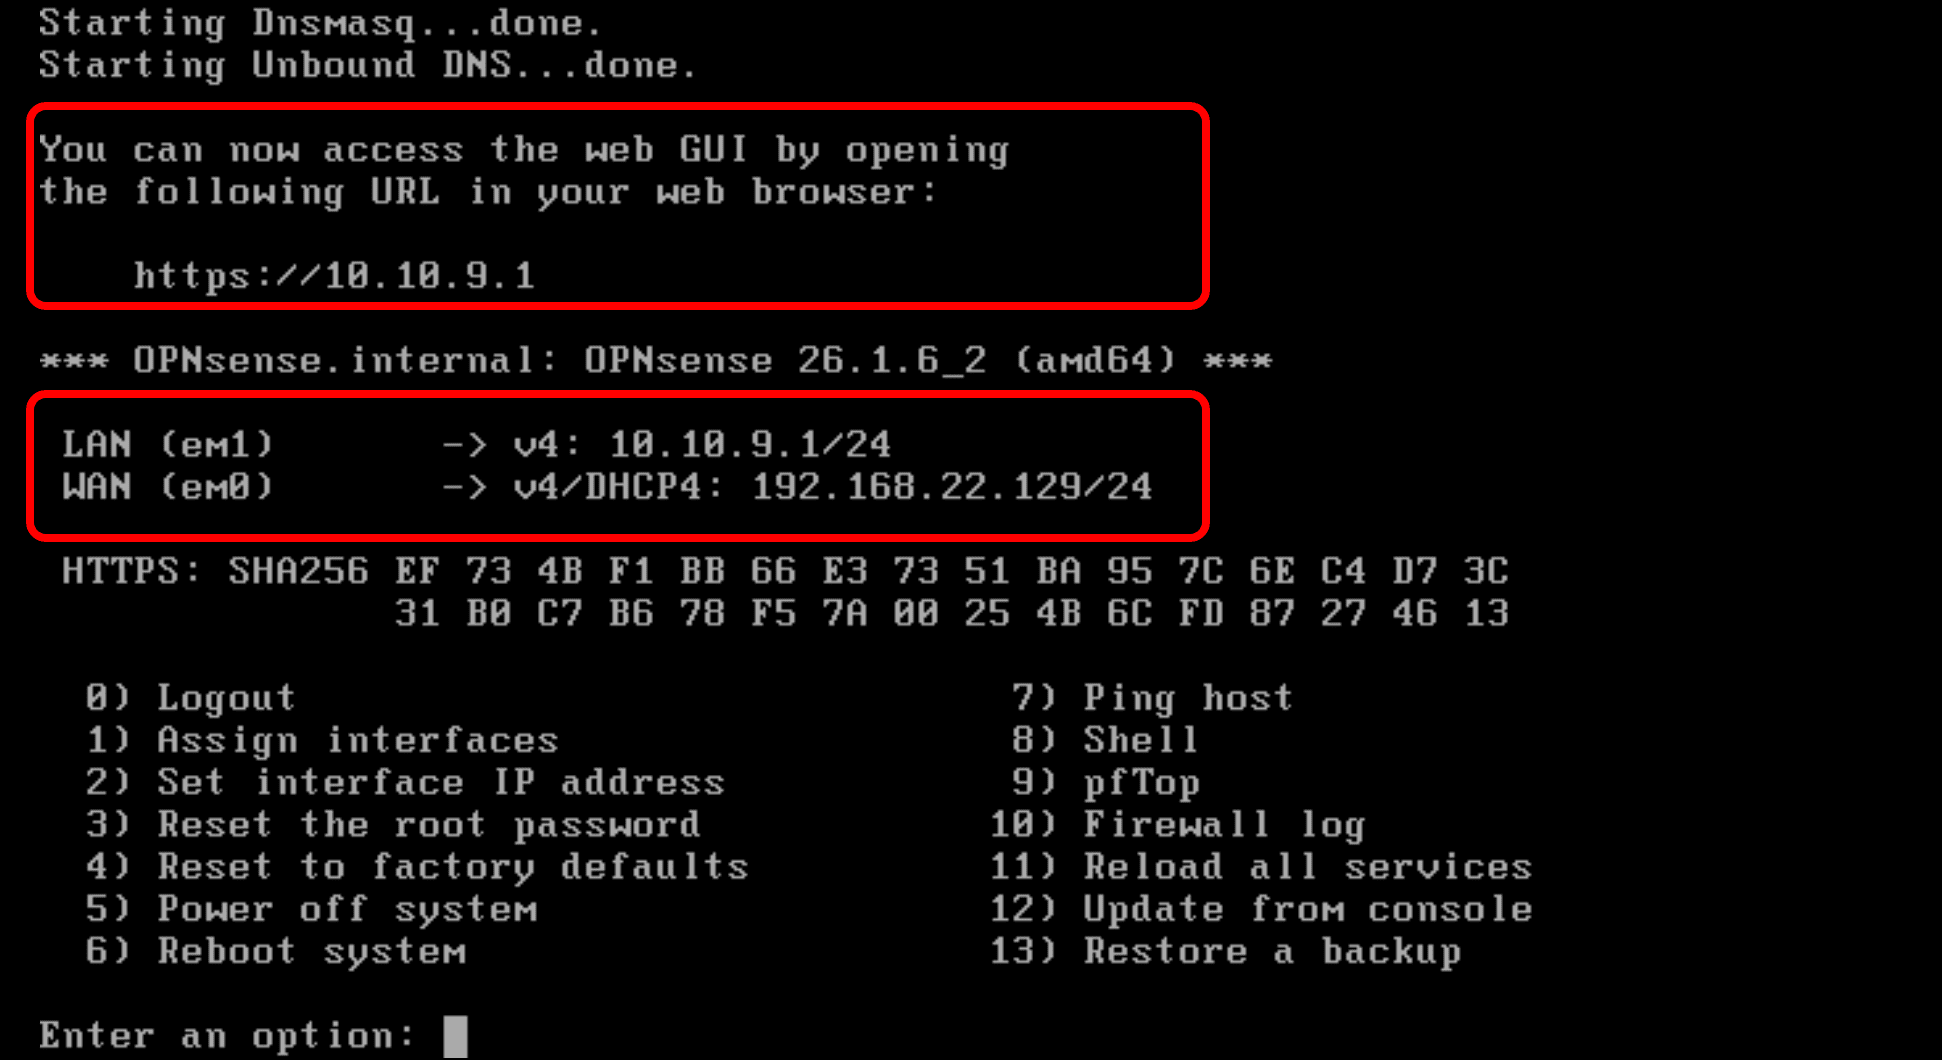
Now that the WAN and LAN interfaces are assigned and you can access the web graphical user interface (GUI), also known as a web management user interface (web UI), it’s time to get another virtual machine and log into that web UI.
Log in to the OPNsense Web GUI and Complete Networking Configuration
Use a Separate VM to Log in to OPNsense and Complete the System Configuration Wizard
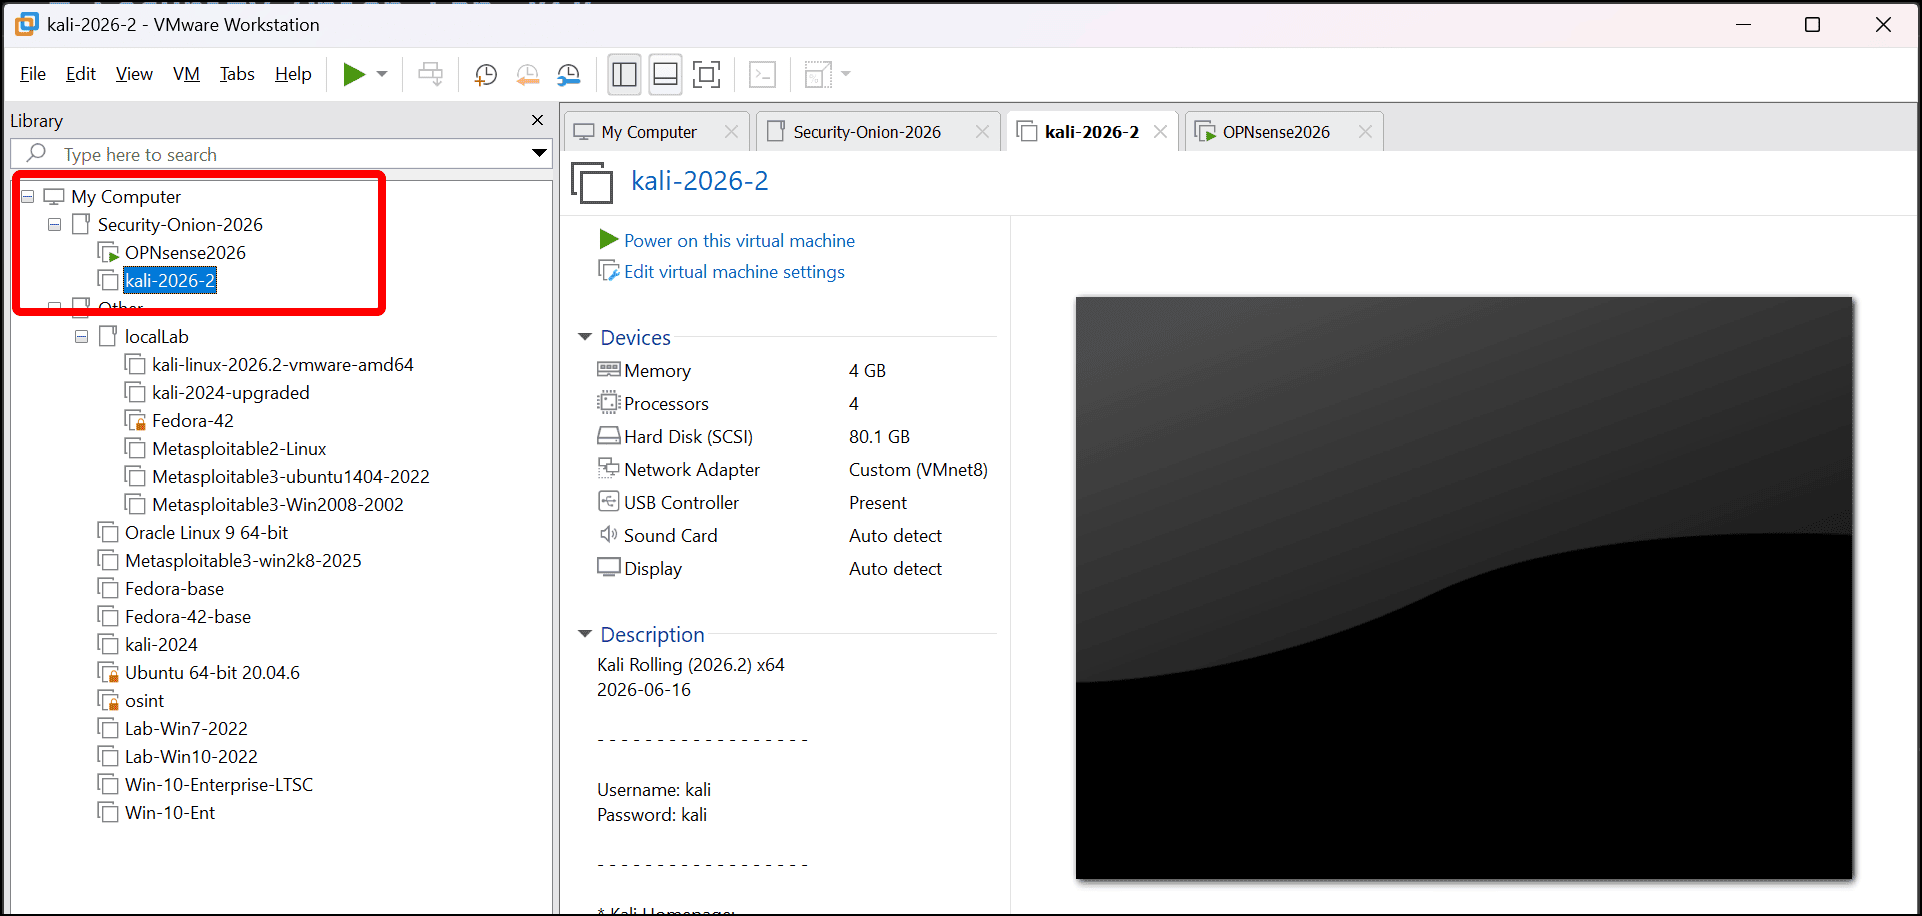
- At this point, you need another VM to connect to the OPNsense router’s Web GUI. Since I already have a Kali VM that I will be using as part of this series of tutorials, I drag that into my Security-Onion-2026 folder.
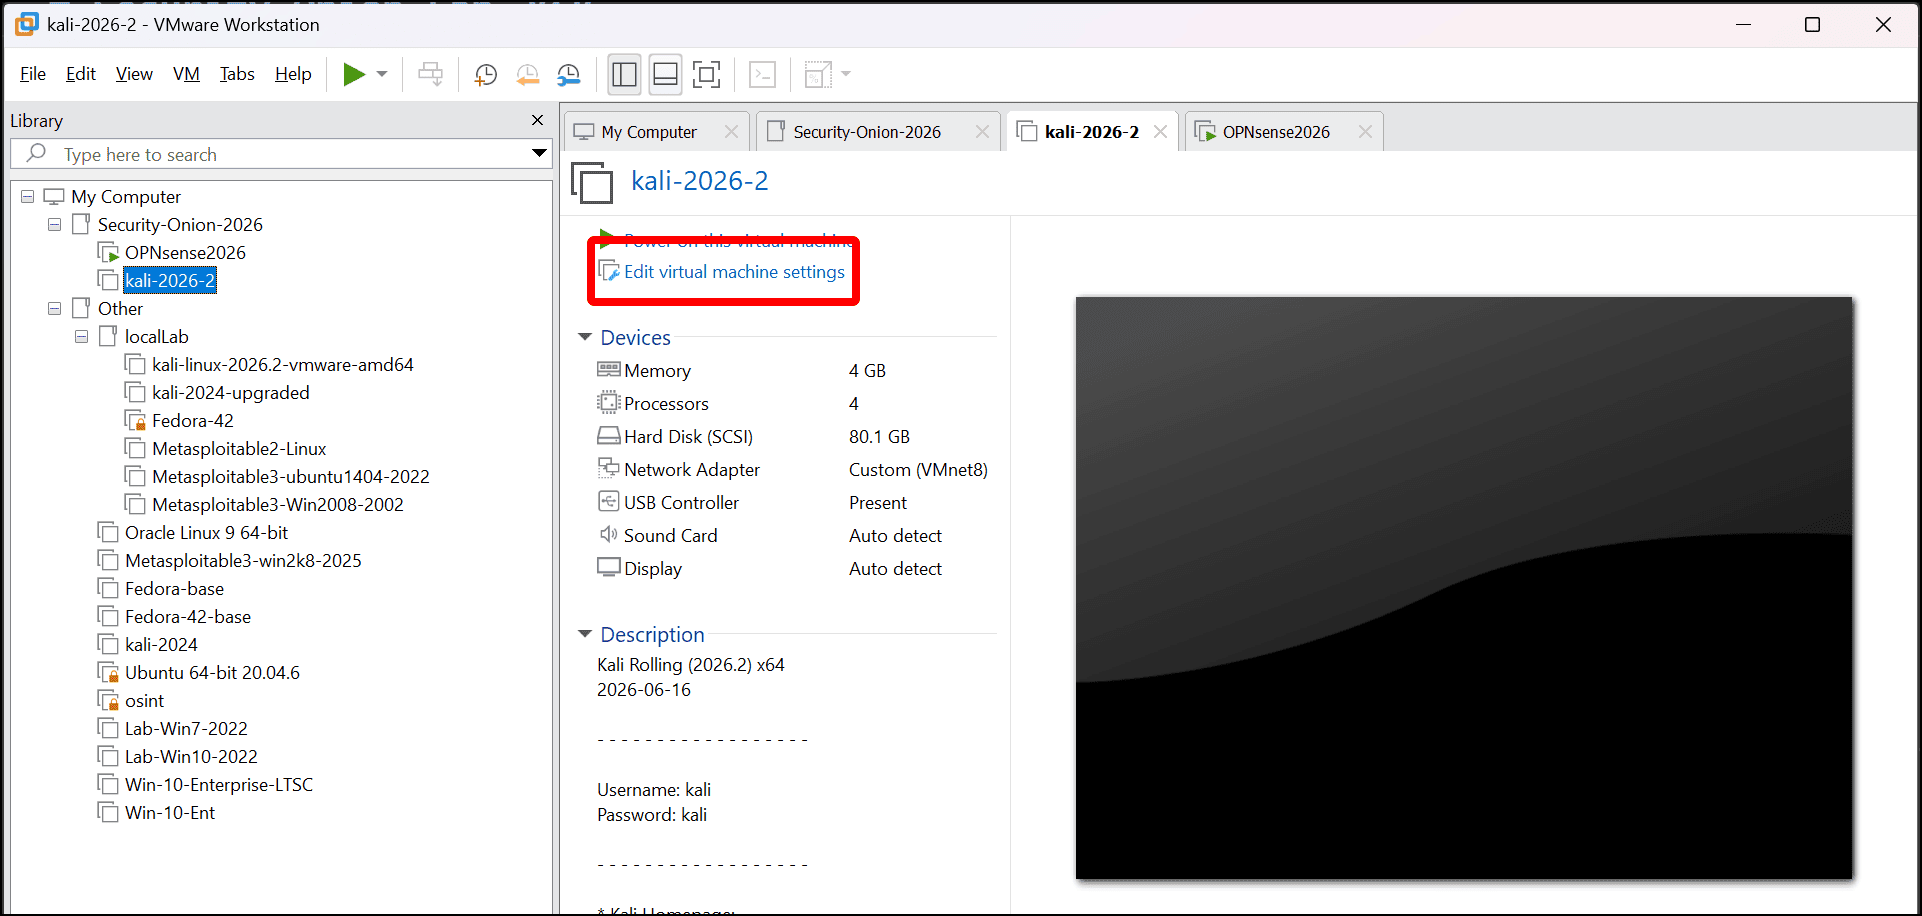
- Click Edit virtual machine settings for the Kali VM.
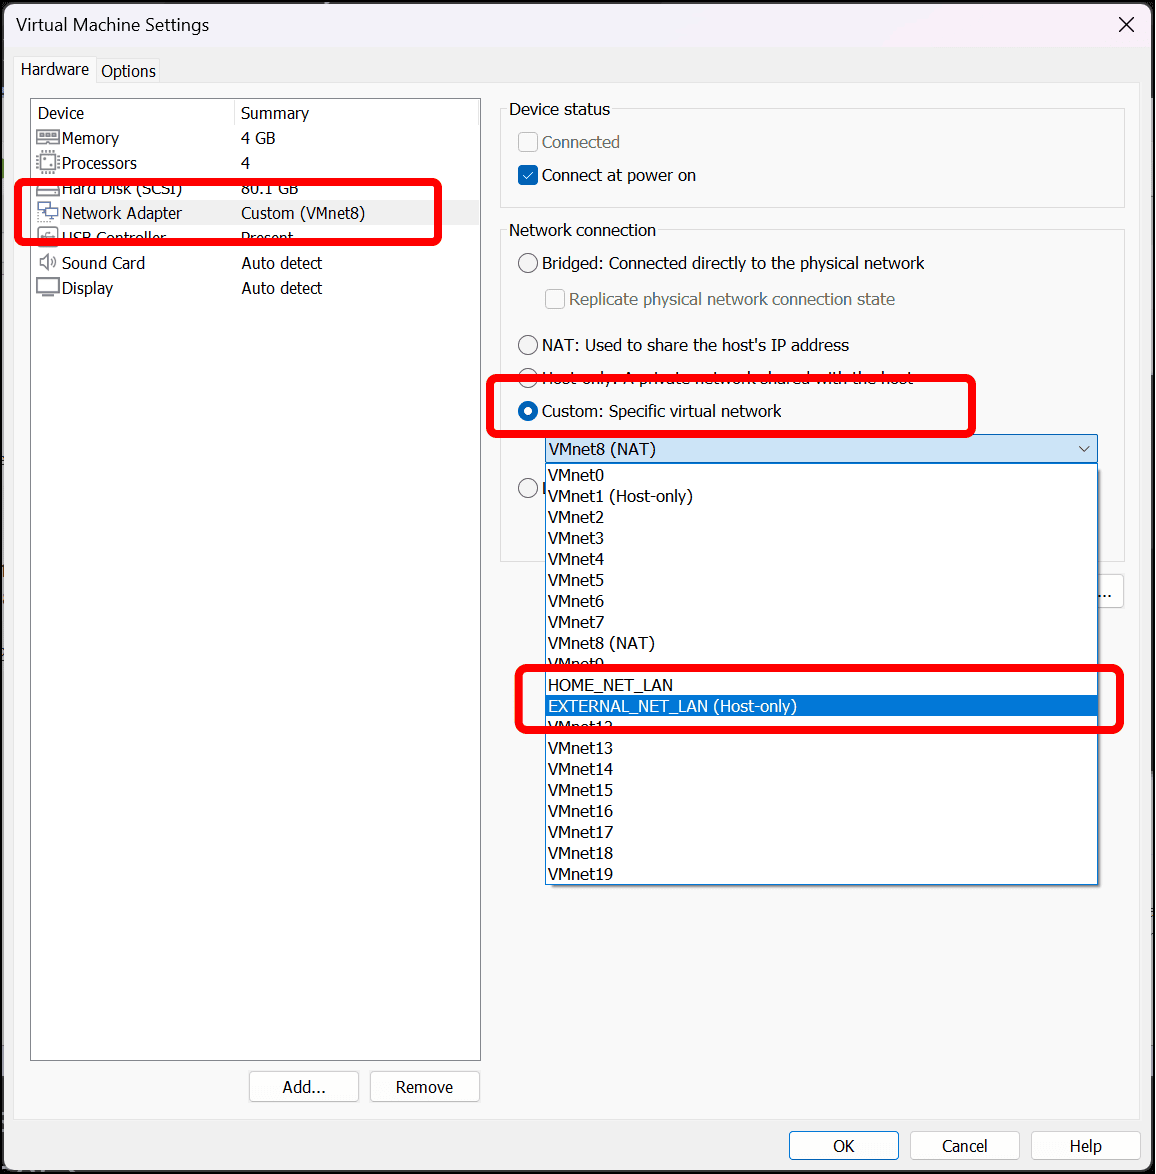
- Click network adapter in the Device list, then select the Custom: Specific virtual network radio button, then click the drop-down menu and select EXTERNAL_NET_LAN from the list of VMnets and close the Virtual Machine Settings dialog.
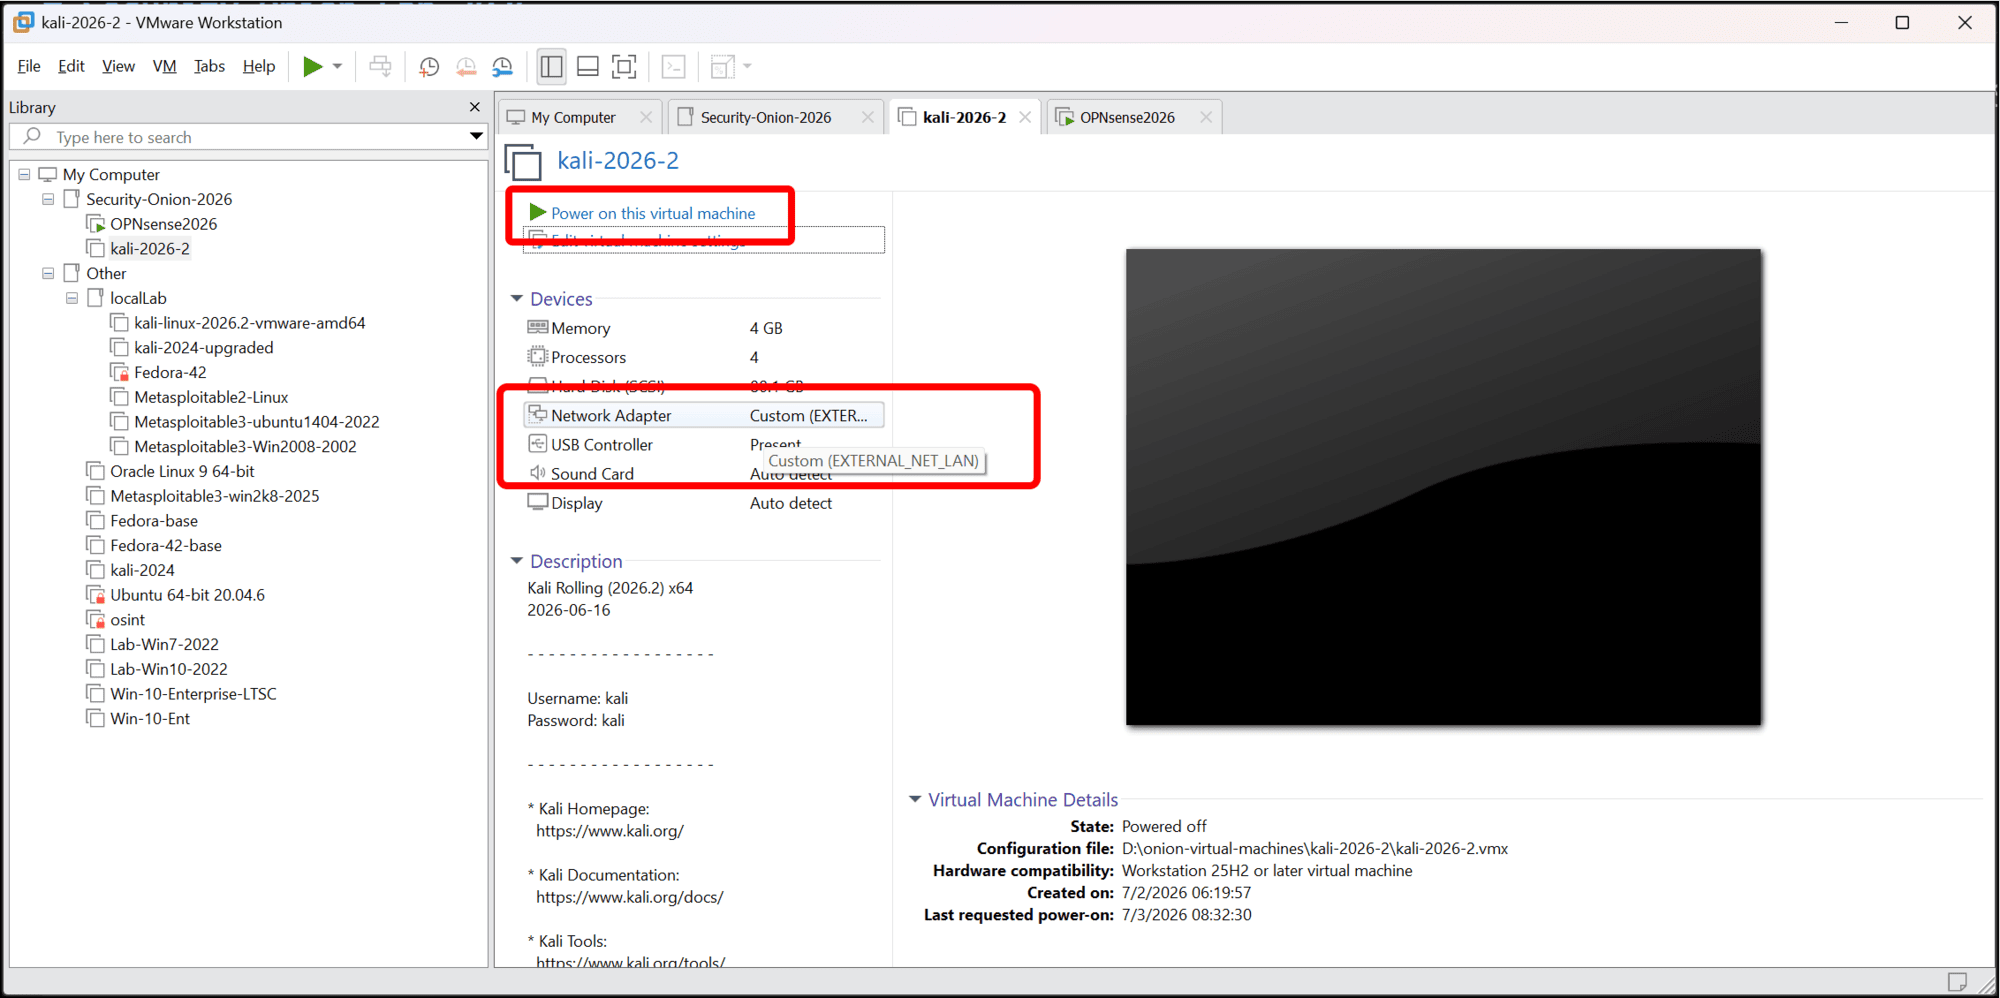
- After confirming that you assigned the network adapter to the EXTERNAL_NET_LAN, start the Kali VM.
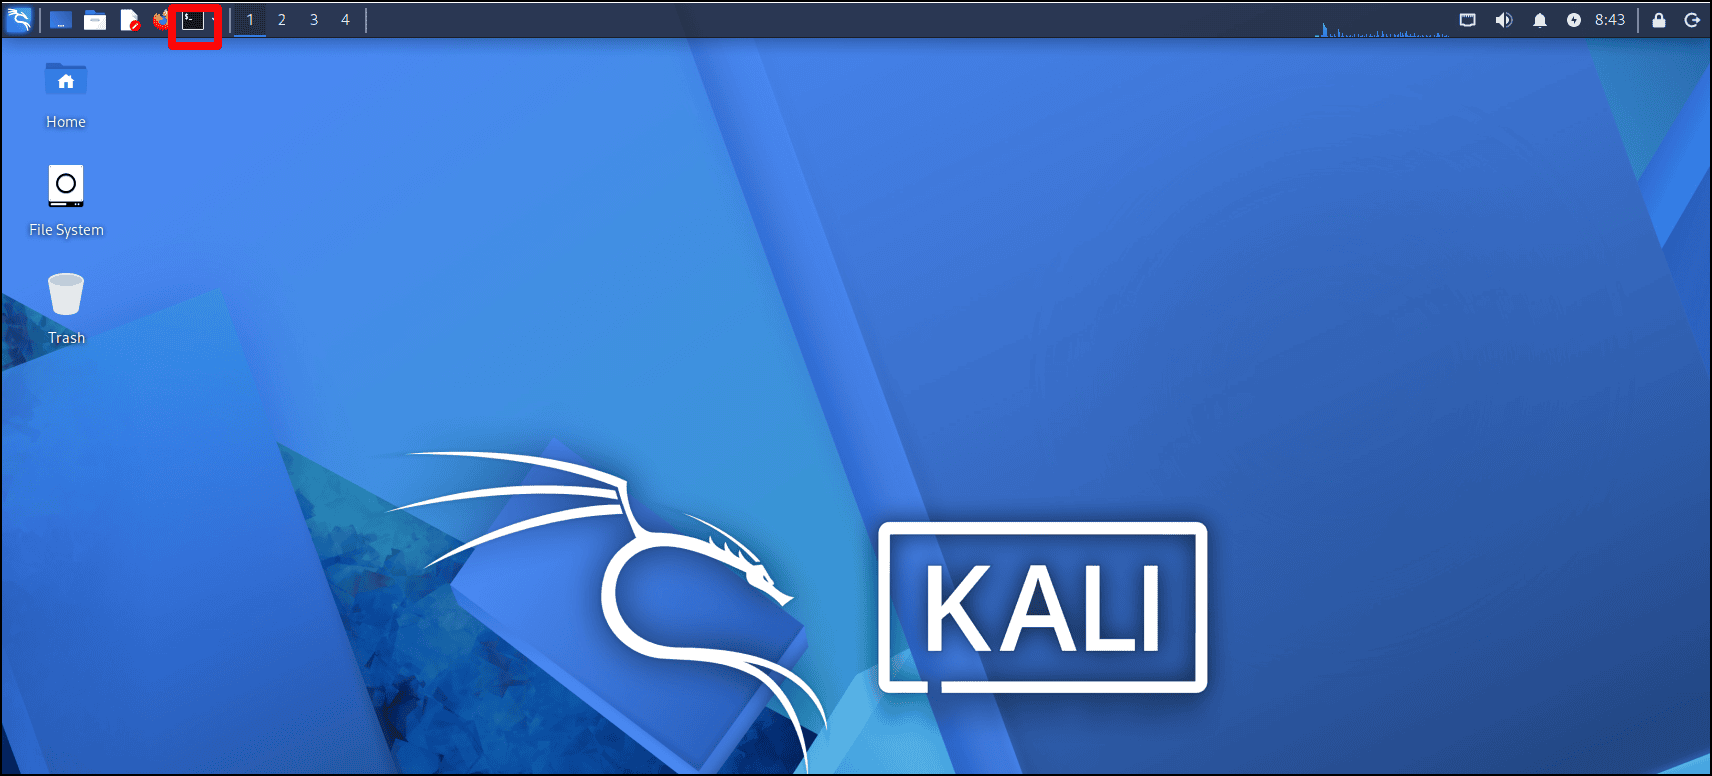
- Once you have logged in to the Kali VM, launch the Terminal.
-
Here are some commands to check basic networking and connectivity:
-
The output of
ip afor the network interfaceeth0displays an IP address on the EXTERNAL_NET_LAN network,10.10.9.17, which is within the IP address range set for OPNsense’s DHCP service.$ ip a 2: eth0: <BROADCAST,MULTICAST,UP,LOWER_UP> mtu 1500 qdisc fq_codel state UP group default qlen 1000 link/ether 00:0c:29:22:62:71 brd ff:ff:ff:ff:ff:ff inet 10.10.9.17/24 brd 10.10.9.255 scope global dynamic noprefixroute eth0 valid_lft 86159sec preferred_lft 86159sec inet6 fe80::4fcc:cc5f:bd8f:f59c/64 scope link noprefixroute valid_lft forever preferred_lft forever -
The
arp -acommand shows that there is another host on the network, the OPNsense router at 10.10.9.1, which is the static IP assigned to it earlier.$ arp -a OPNsense.internal (10.10.9.1) at 00:0c:29:6e:41:26 [ether] on eth0 -
You can ping the OPNsense router at that IP address with
ping -c 4 10.10.9.1.$ ping -c 4 10.10.9.1 PING 10.10.9.1 (10.10.9.1) 56(84) bytes of data. 64 bytes from 10.10.9.1: icmp_seq=1 ttl=64 time=1.09 ms 64 bytes from 10.10.9.1: icmp_seq=2 ttl=64 time=1.88 ms 64 bytes from 10.10.9.1: icmp_seq=3 ttl=64 time=1.84 ms 64 bytes from 10.10.9.1: icmp_seq=4 ttl=64 time=1.70 ms --- 10.10.9.1 ping statistics --- 4 packets transmitted, 4 received, 0% packet loss, time 3005ms rtt min/avg/max/mdev = 1.092/1.628/1.876/0.316 ms -
$ ping -c 4 google.com: The output indicates that the Kali VM can connect to the public internet and that DNS is working.$ ping -c 4 google.com PING google.com (142.251.211.78) 56(84) bytes of data. 64 bytes from pnlgaa-av-in-f14.1e100.net (142.251.211.78): icmp_seq=1 ttl=127 time=17.0 ms 64 bytes from pnlgaa-av-in-f14.1e100.net (142.251.211.78): icmp_seq=2 ttl=127 time=12.0 ms 64 bytes from pnlgaa-av-in-f14.1e100.net (142.251.211.78): icmp_seq=3 ttl=127 time=17.0 ms 64 bytes from pnlgaa-av-in-f14.1e100.net (142.251.211.78): icmp_seq=4 ttl=127 time=12.1 ms --- google.com ping statistics --- 4 packets transmitted, 4 received, 0% packet loss, time 2999ms rtt min/avg/max/mdev = 12.033/14.531/17.038/2.473 ms
-
- Now open a browser in the Kali VM and navigate to
https://10.10.9.1, the web interface for the OPNsense router.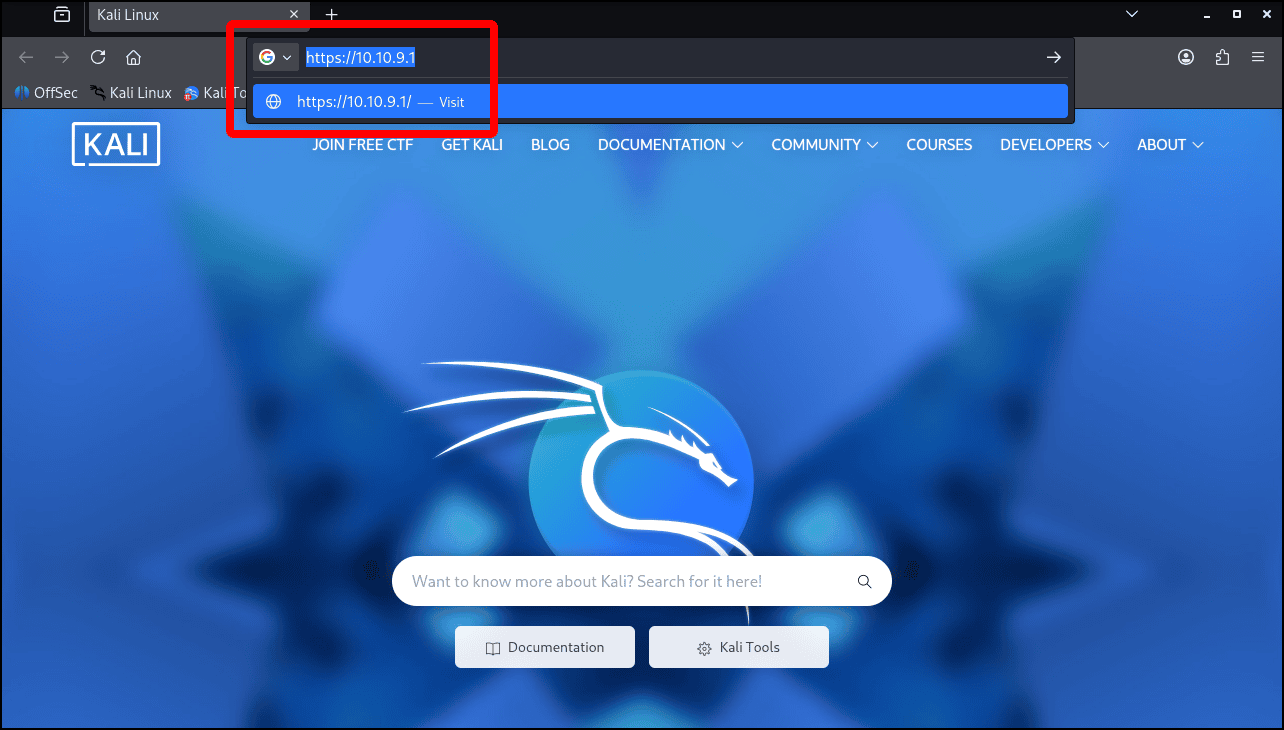
- You get a self-signed certificate warning. Click Advanced.
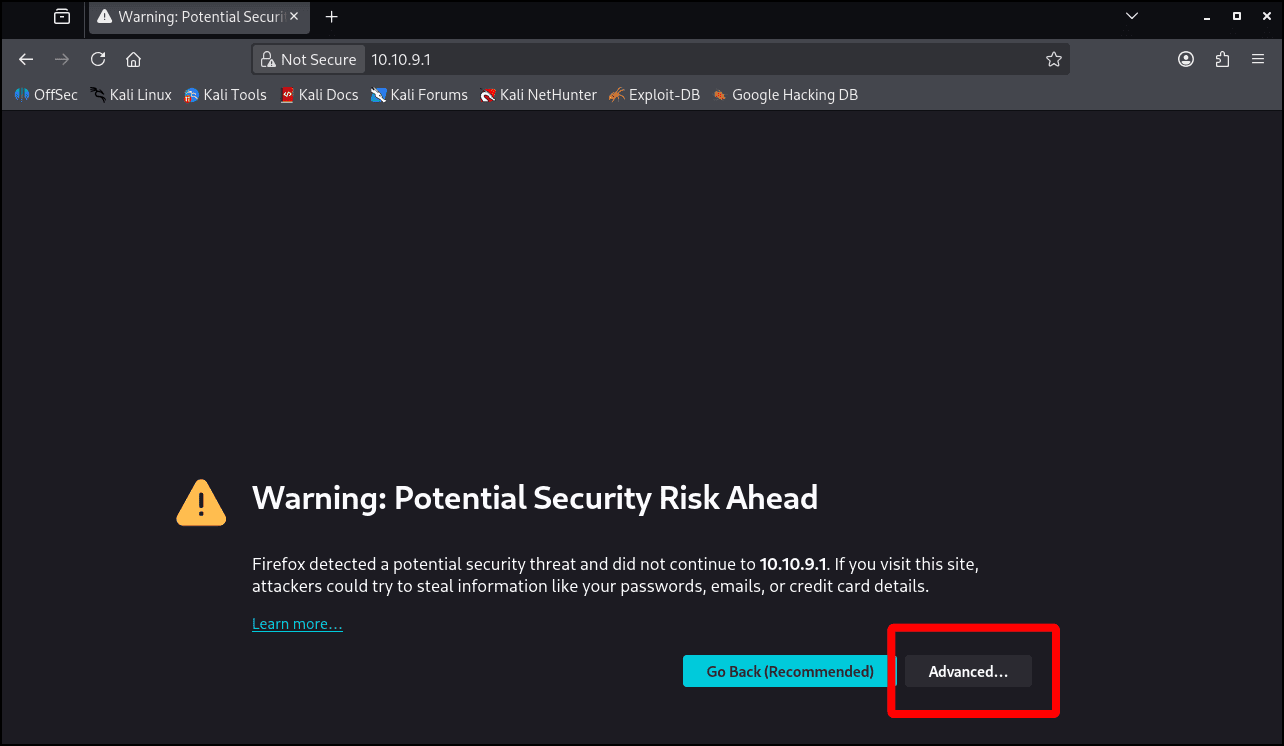
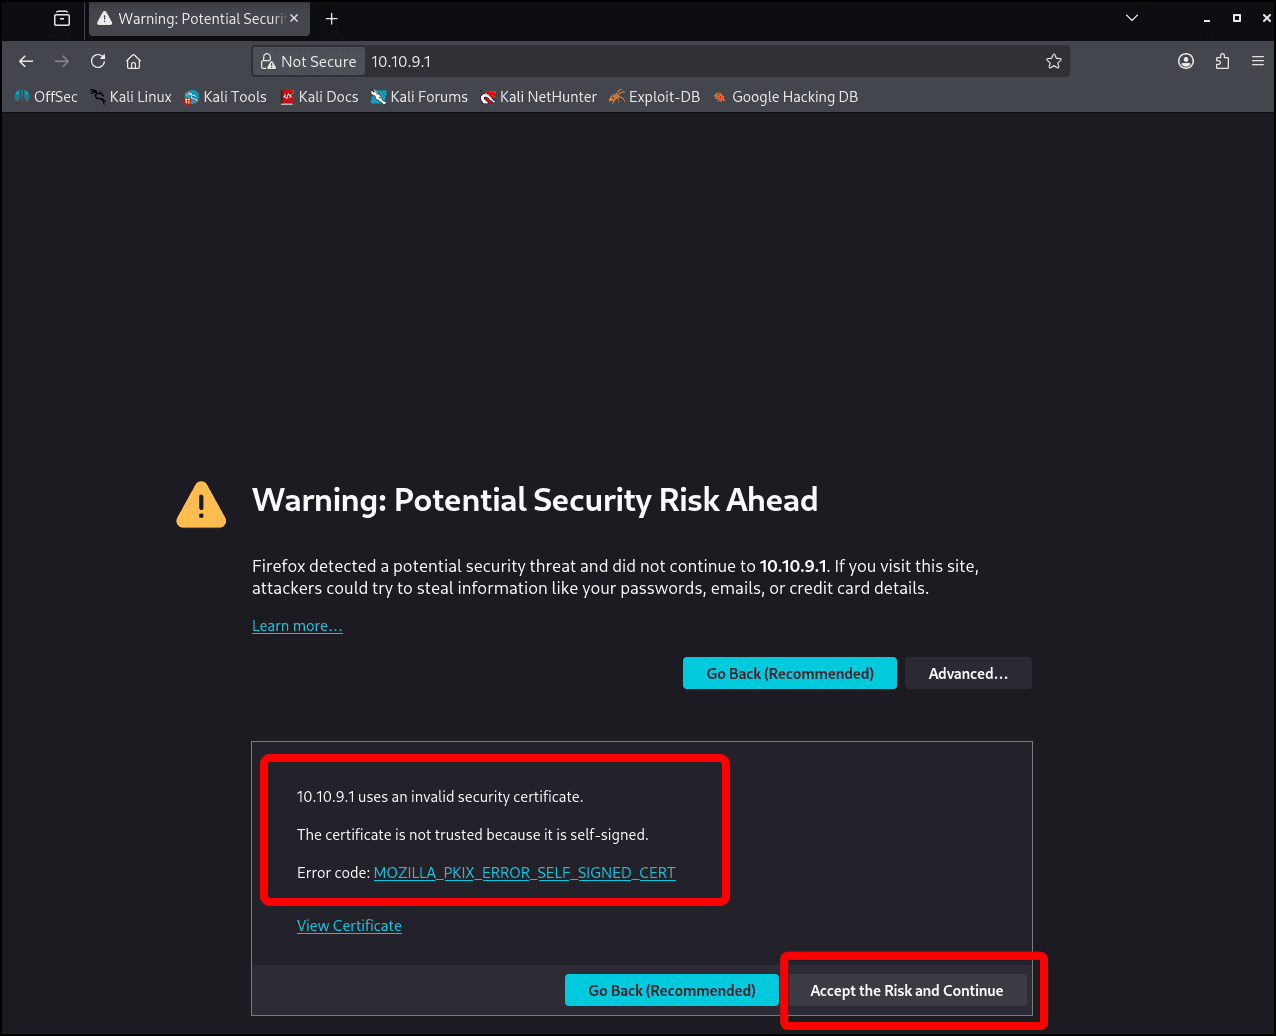
- If you read the warning, it will indicate that the Firefox browser does not trust the OPNsense’s web user interface’s self-signed certificate. Click Accept the Risk and Continue.
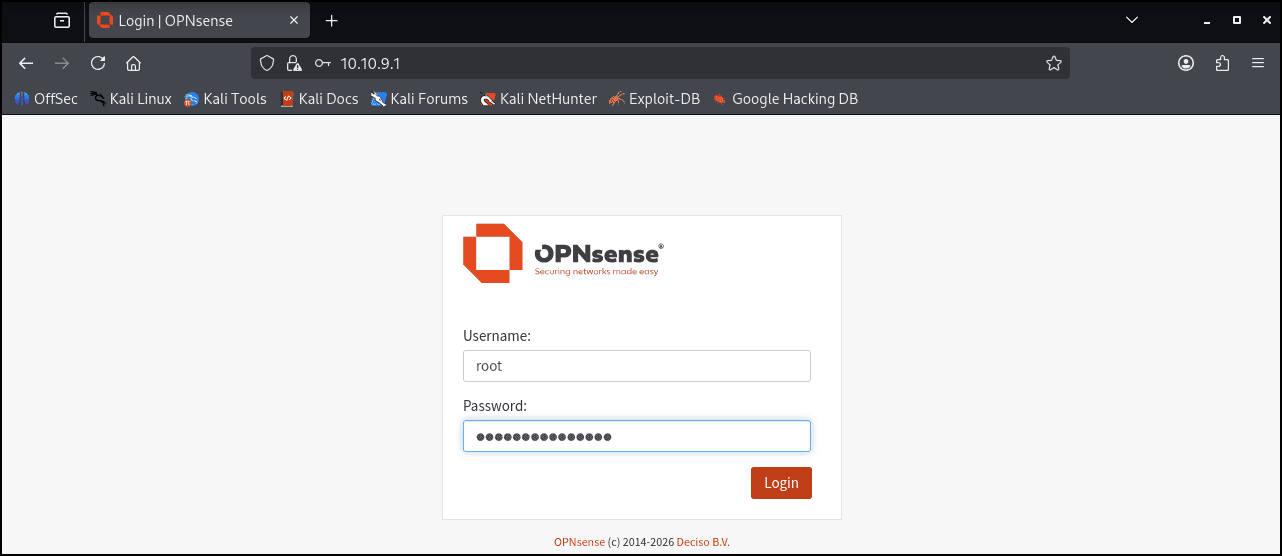
- On the Login | OPNsense page, enter your root credentials and click Login.
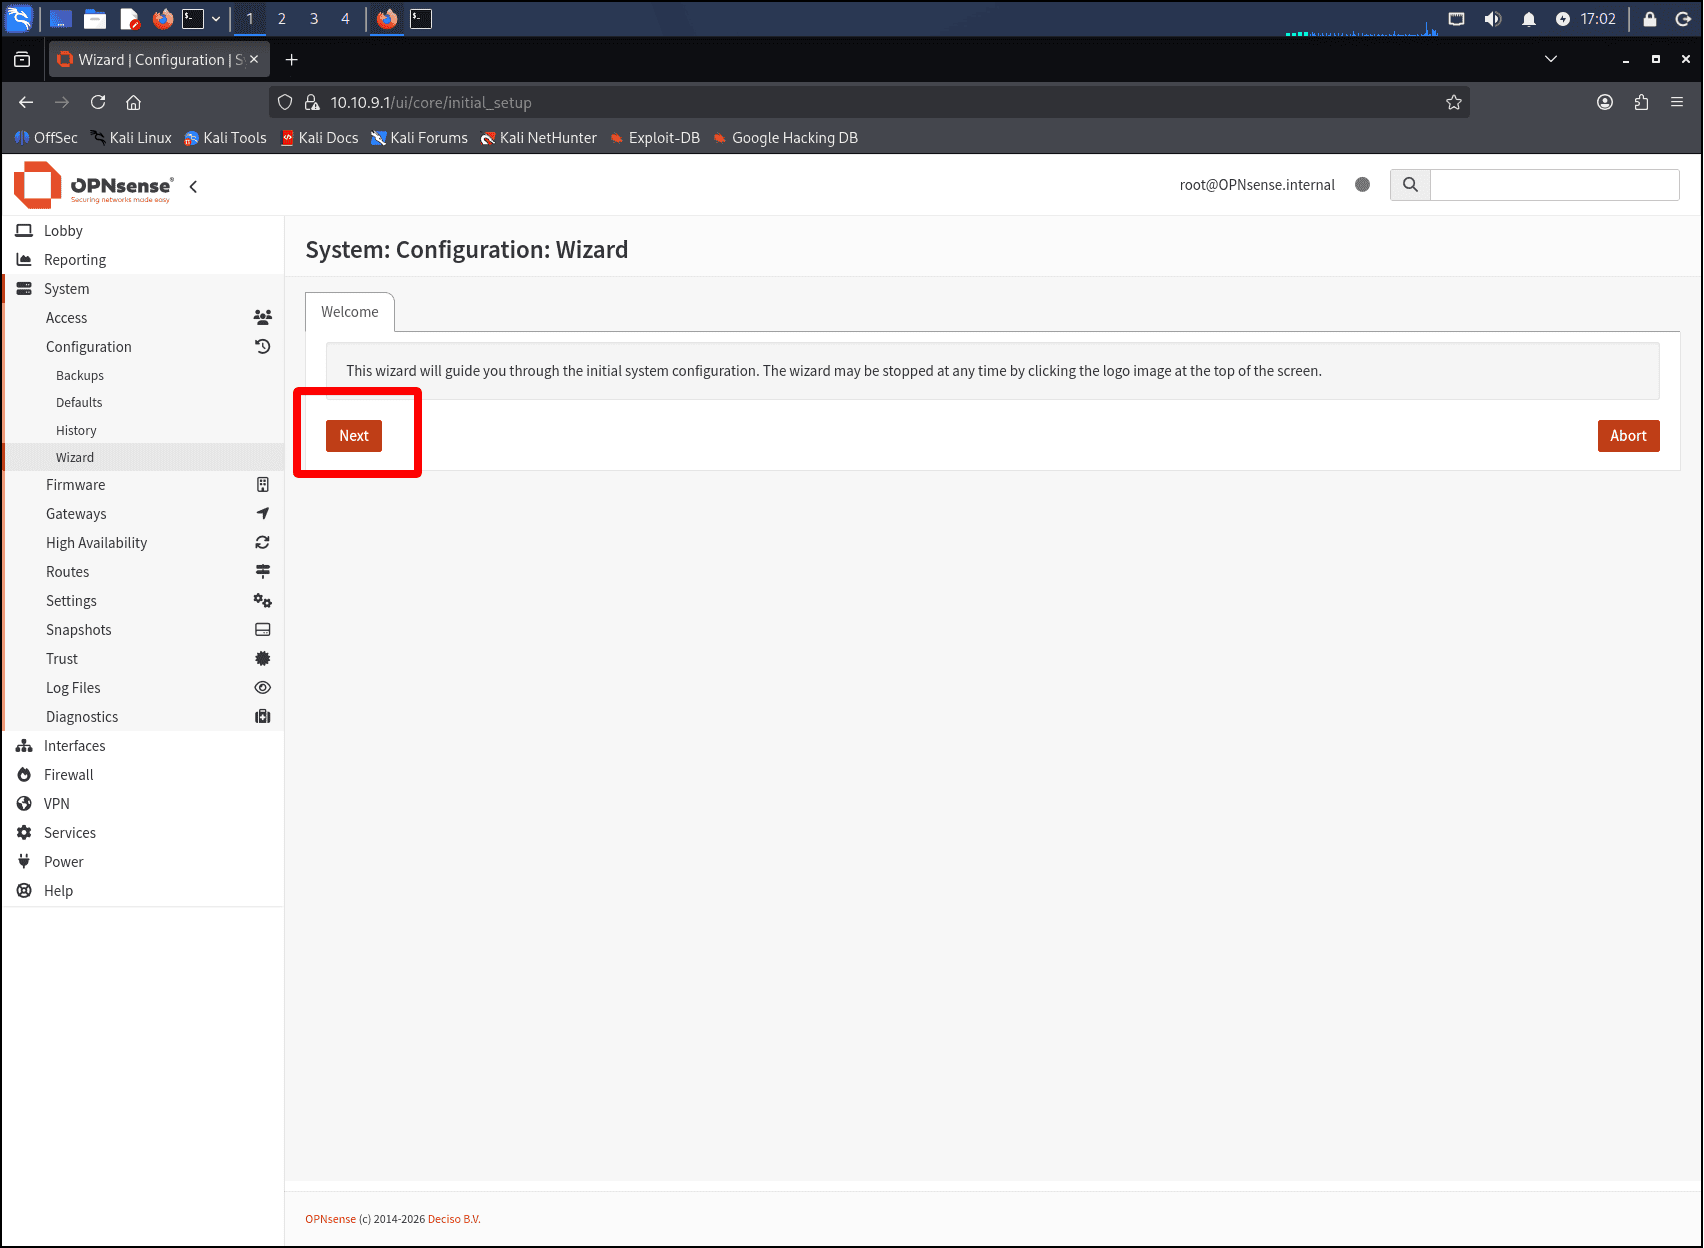
- By default, the System Configuration Wizard is the first page that you see. Click Next to start to complete the wizard.
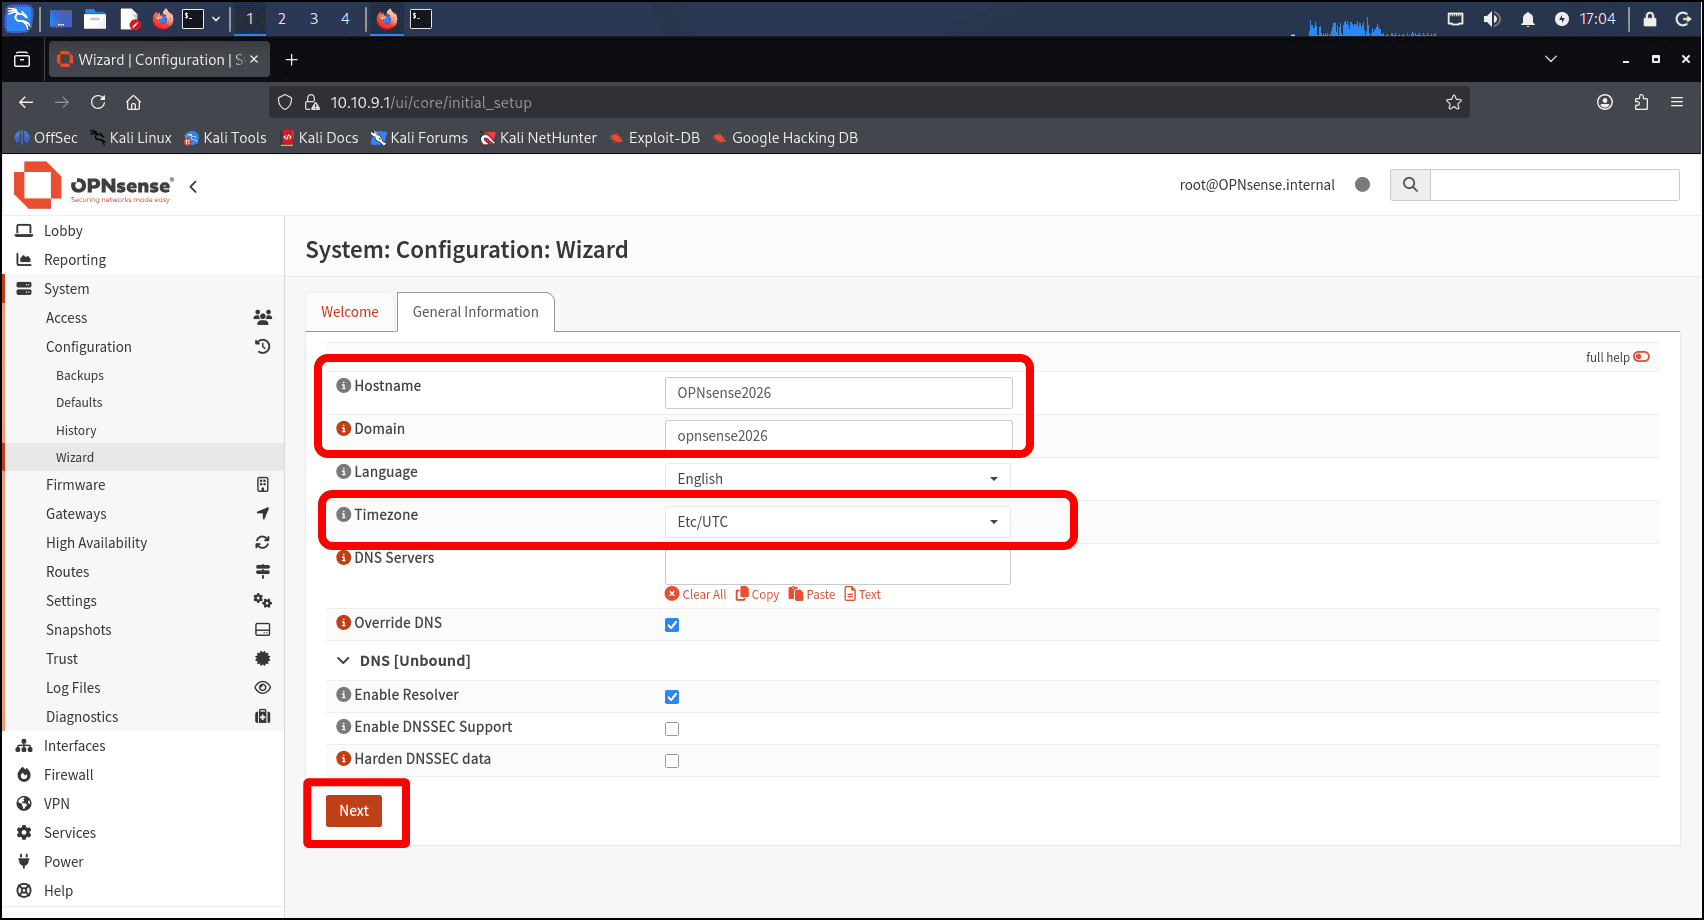
- On the General Information tab, you can change the OPNsense Hostname and also the local Domain name. You can also change the time zone. Click Next when you are done.
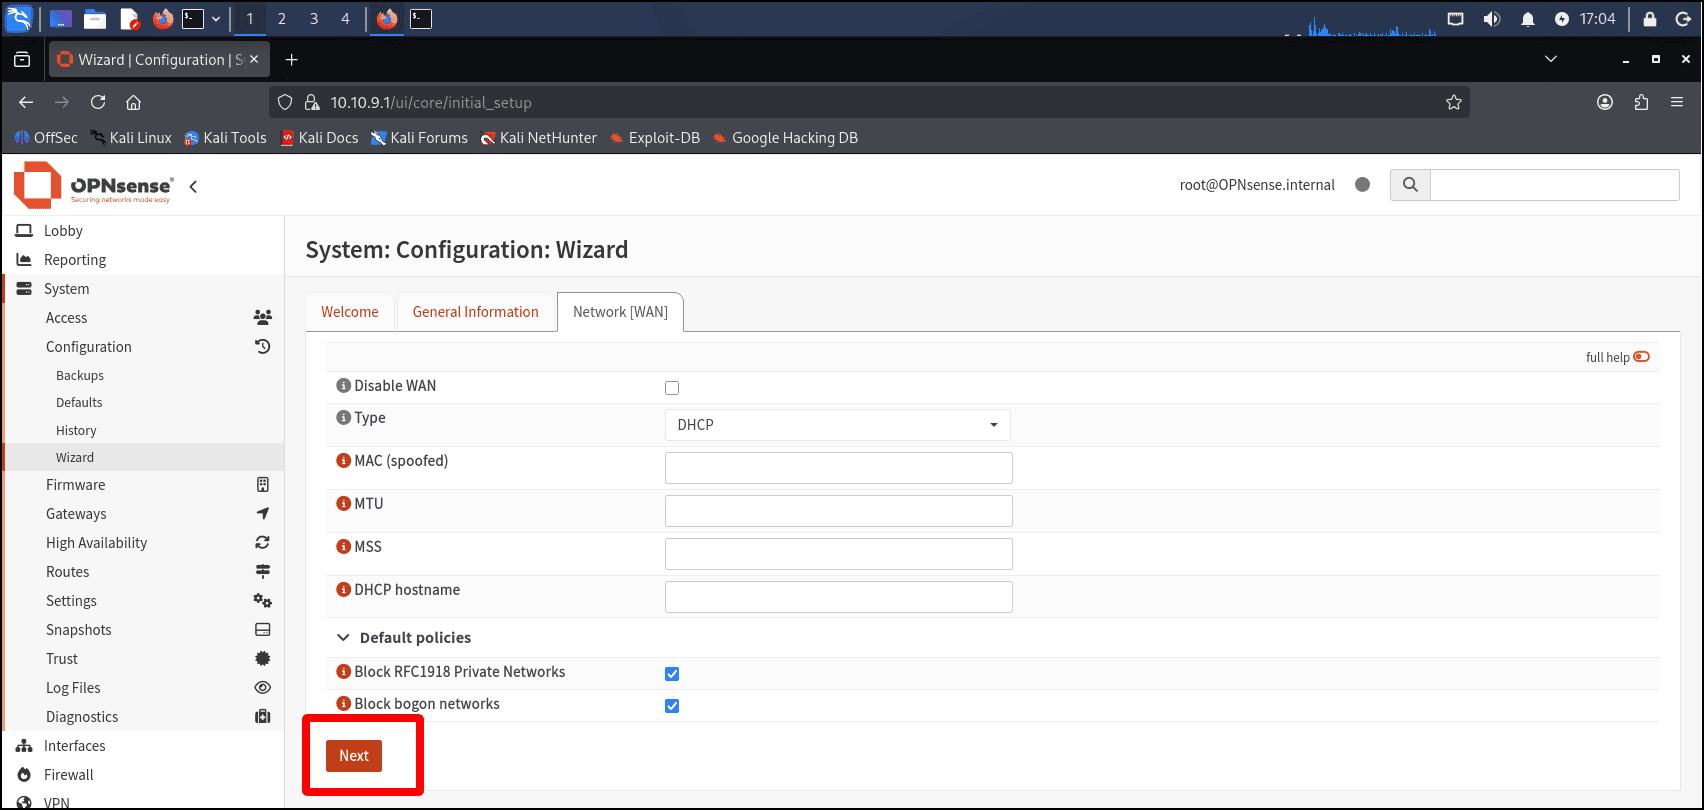
- Leave the Network (WAN) tab alone and clicked Next.
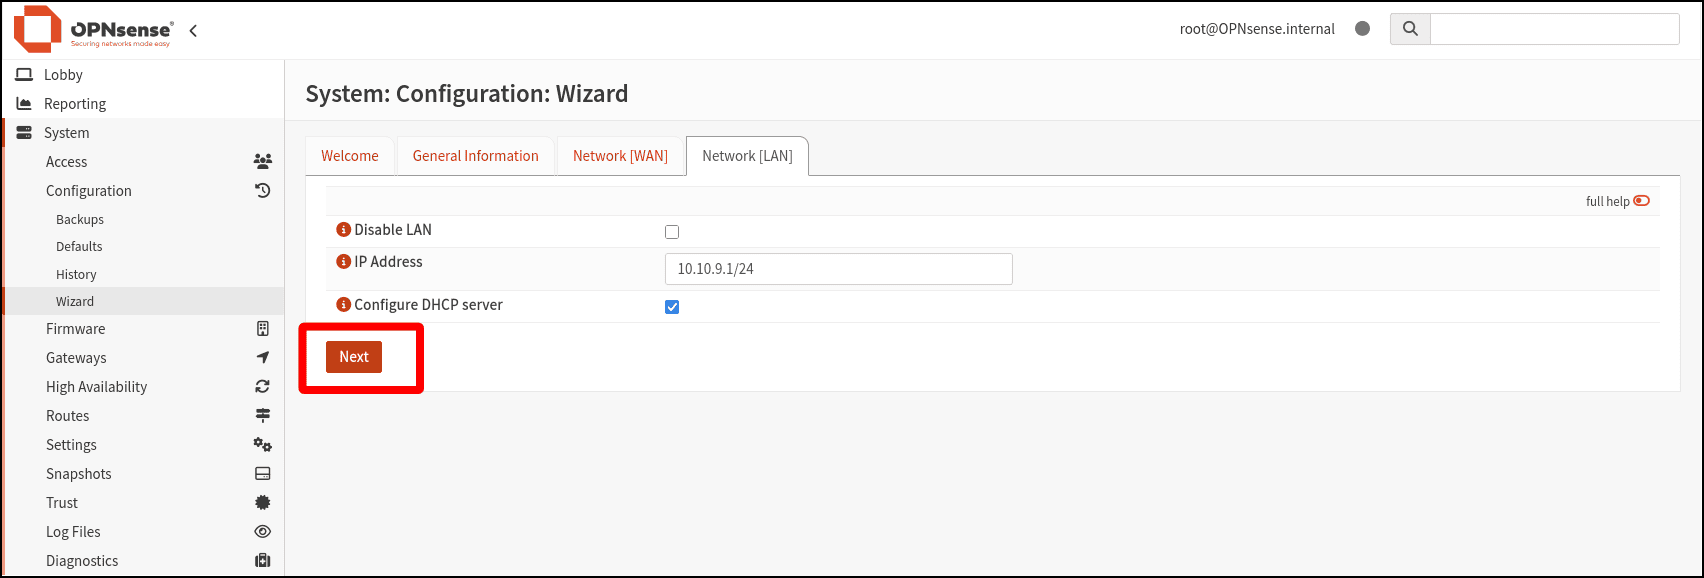
- Do not make changes to the Network (LAN) and click Next.
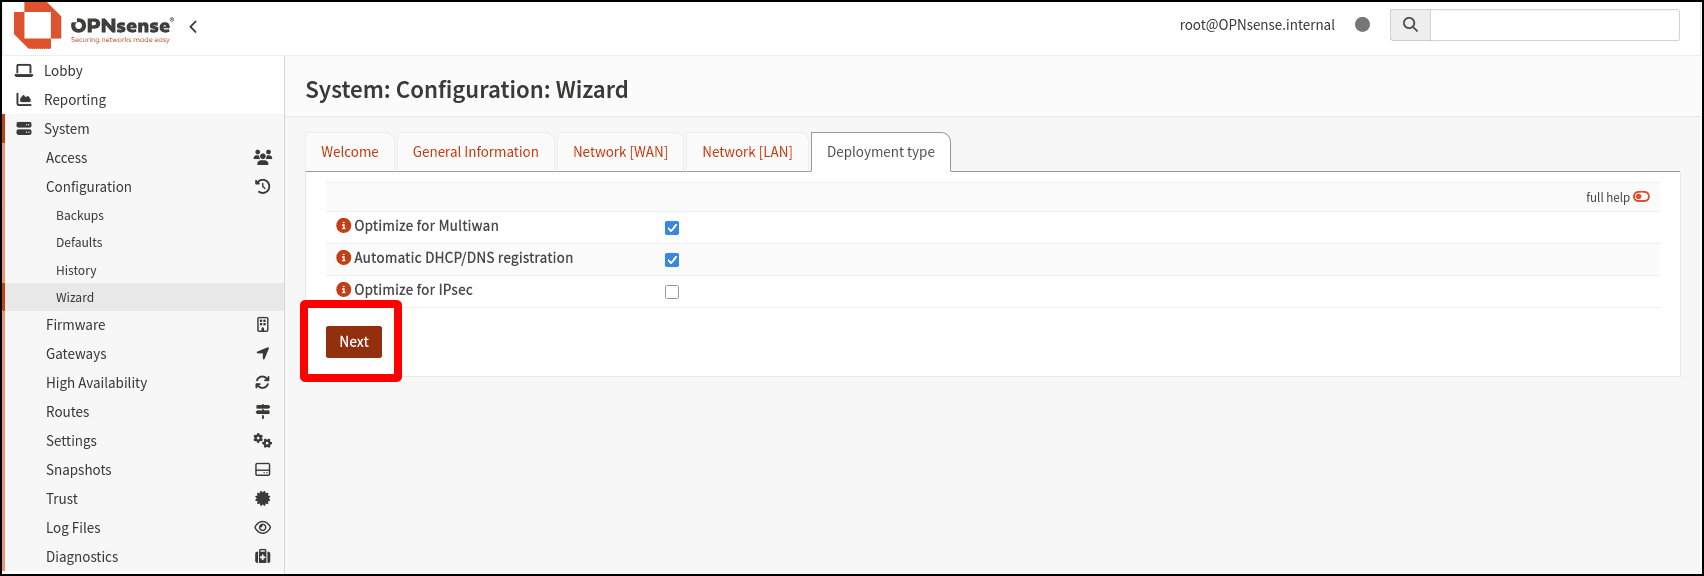
- Leave the Deployment type settings alone and click Next.
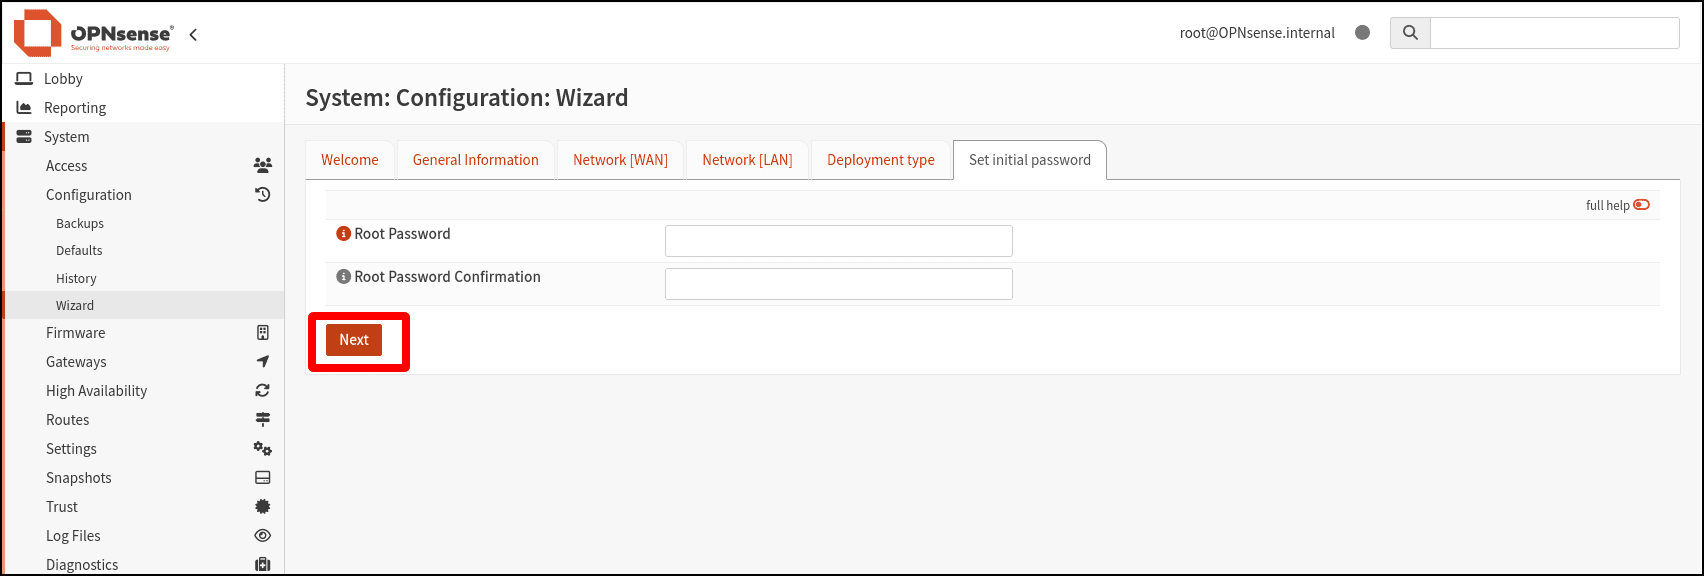
- You should have already changed the default root password, so unless you want to change the password again, click Next on the Set initial password tab.
- Click the Apply button on the Finish tab to complete the configuration wizard.

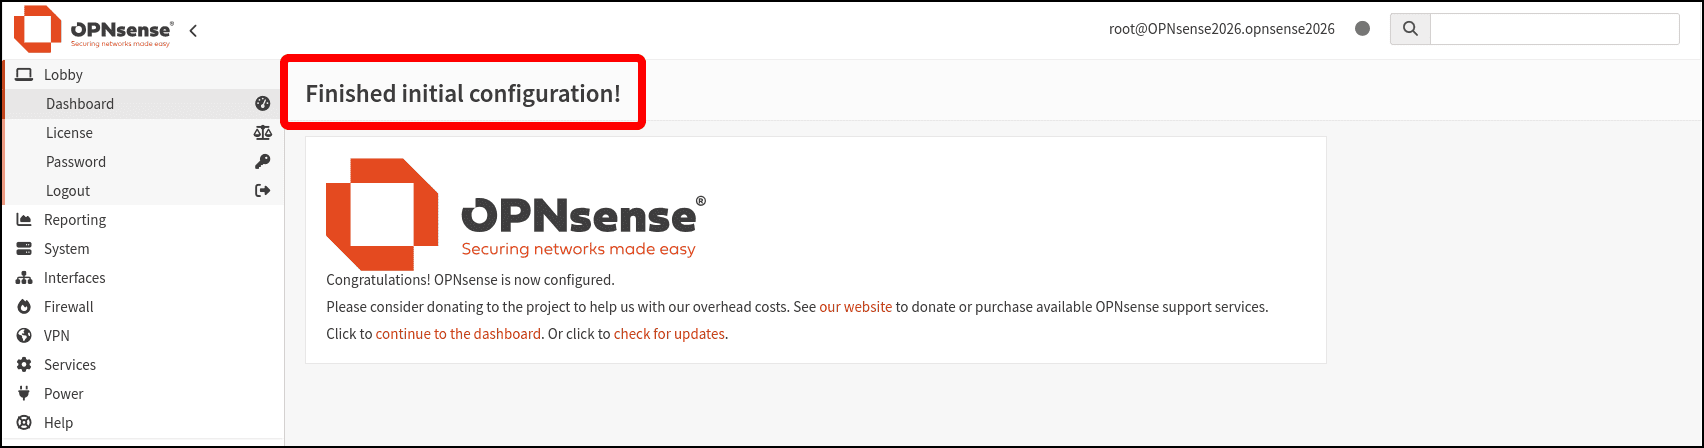
- You will see a Finished initial configuration! message on the Lobby page.
Complete Interface Assignment
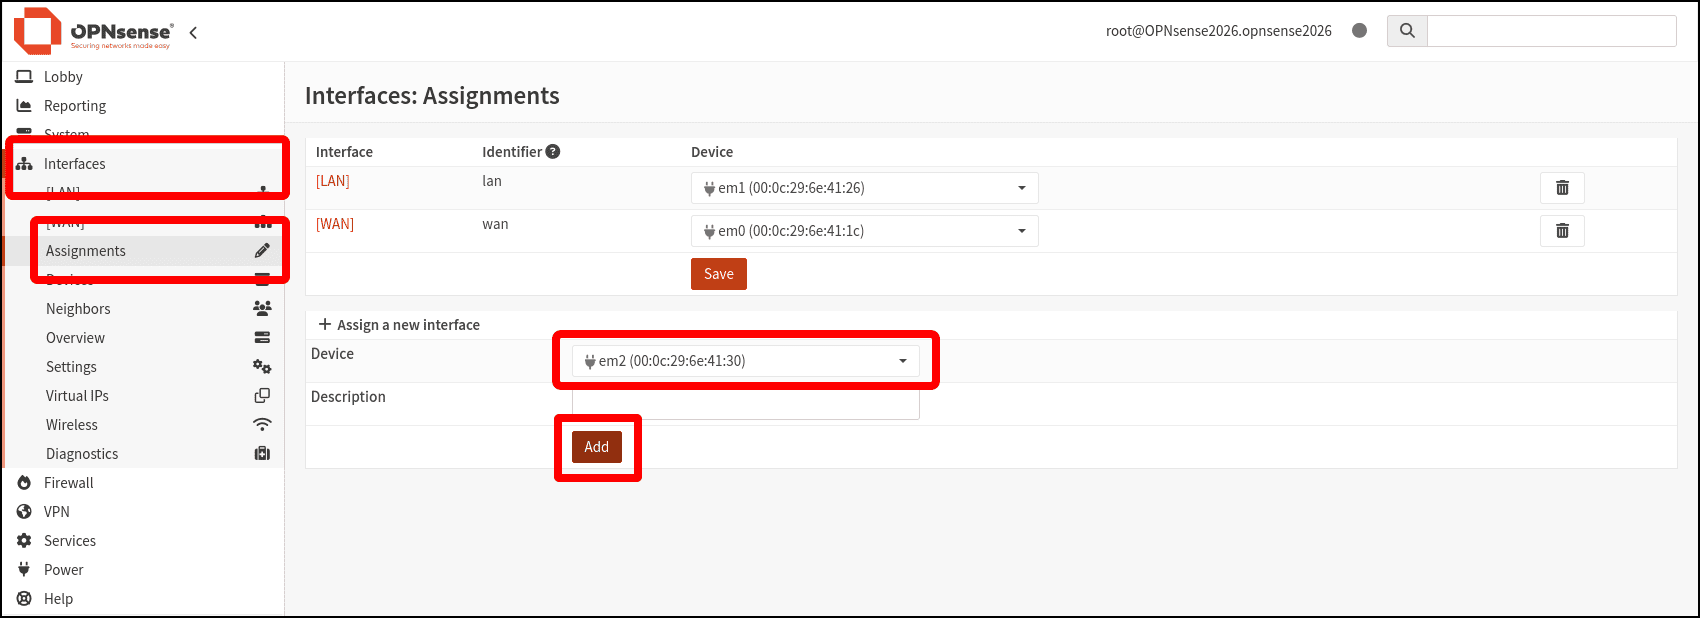
- Click Interfaces in the left sidebar, then click Assignments. The Interfaces: Assignments page loads. The third interface, em2, which you can recognize by its MAC address, which you got from the VMware Virtual Machine Settings dialog, displays under Assign a new interface. Click the Add button.
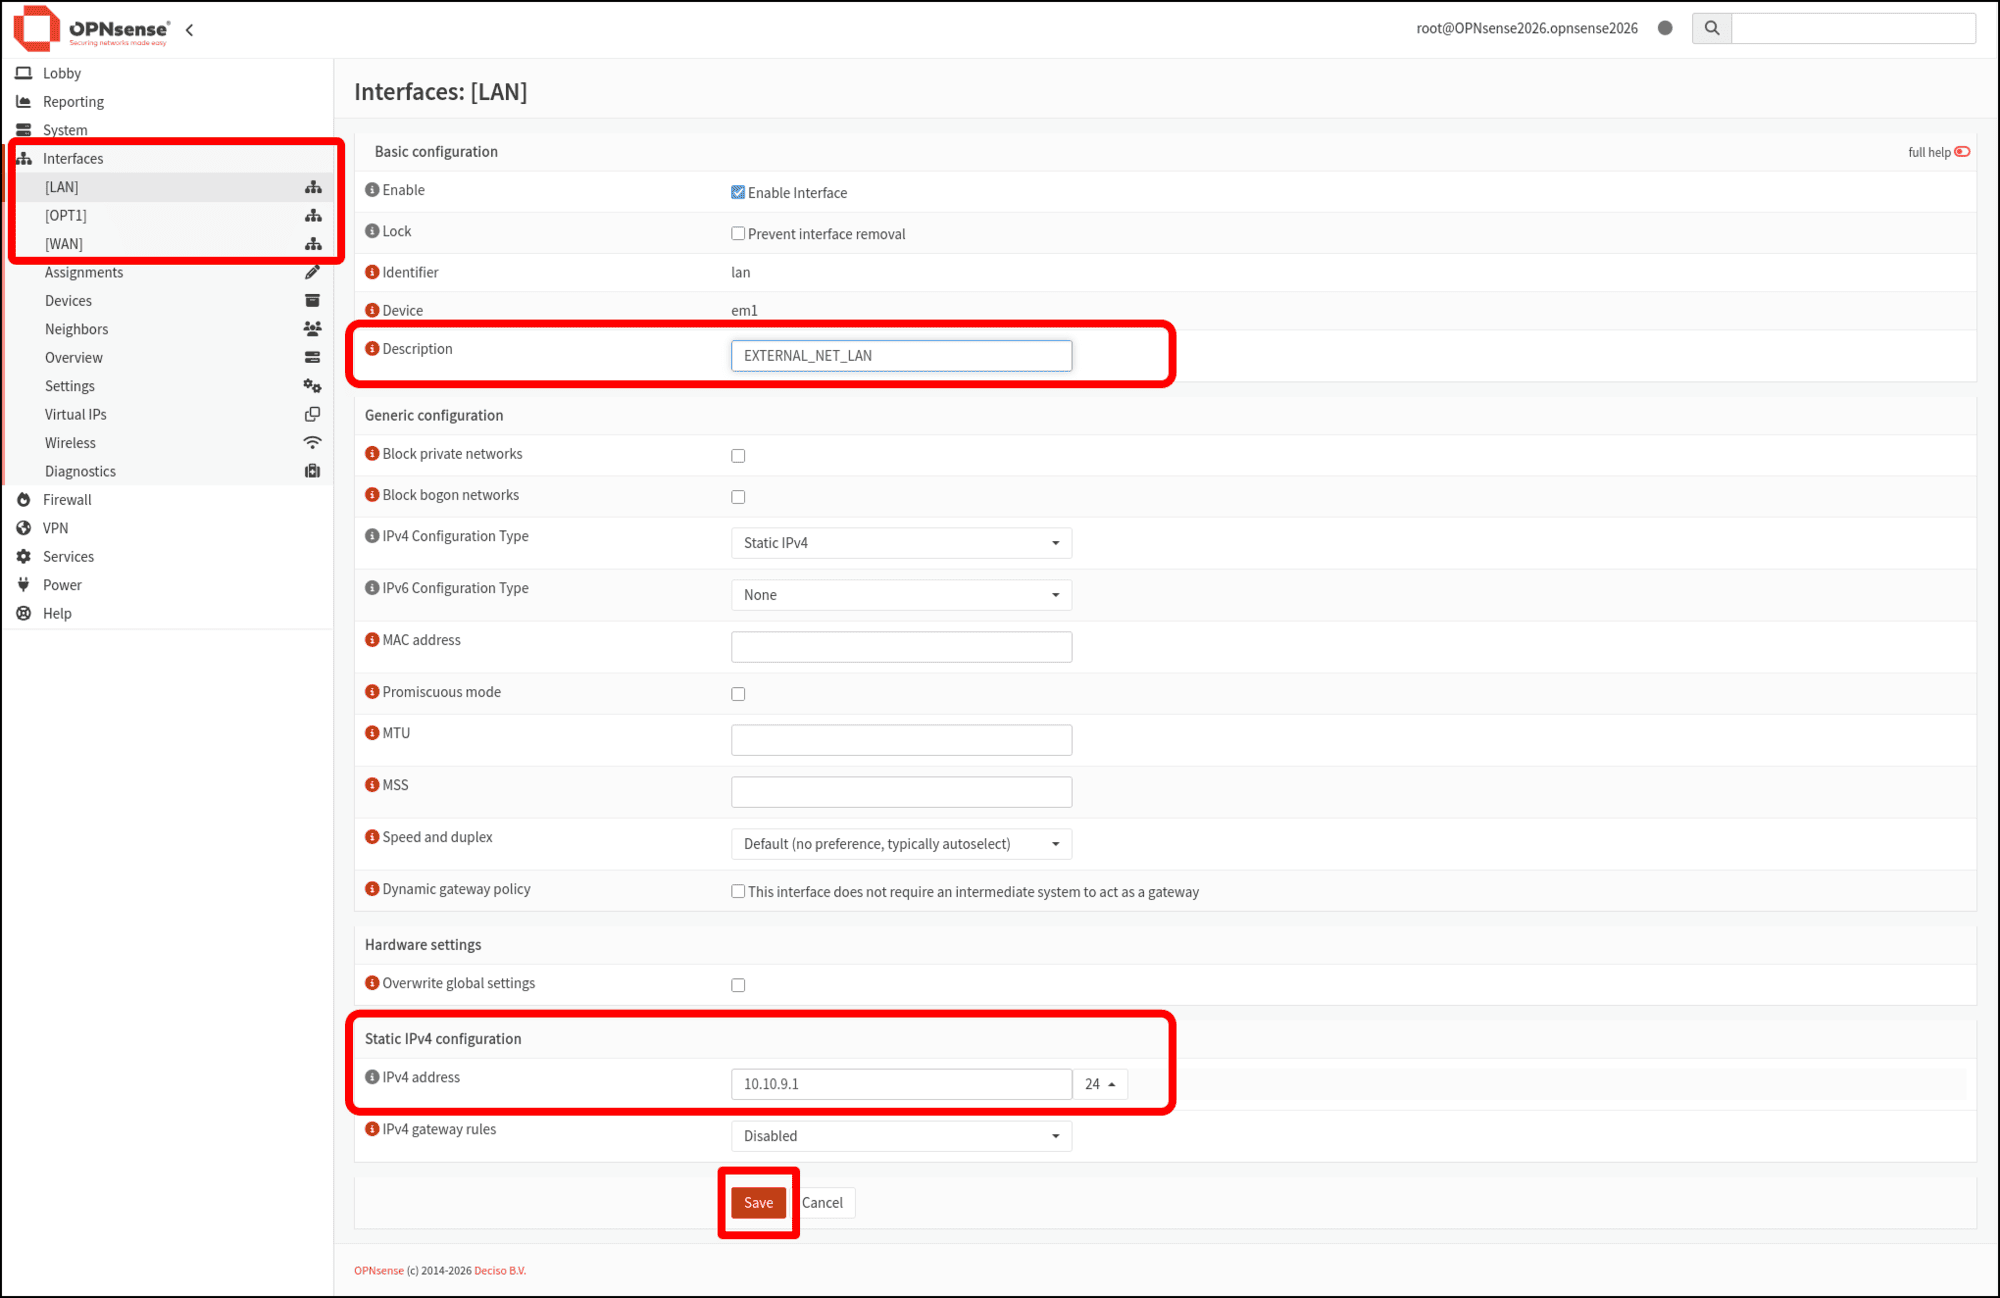
- Next, rename each interface with a more friendly name. Start by clicking the link for [LAN] in the left sidebar under Interfaces. In the Description field for the LAN interface, enter EXTERNAL_NET_LAN and scroll down to the bottom of the page and click the Save button. You will also notice that it is configured for the static IPv4 addressing and has been assigned the static IP address 10.10.9.1.
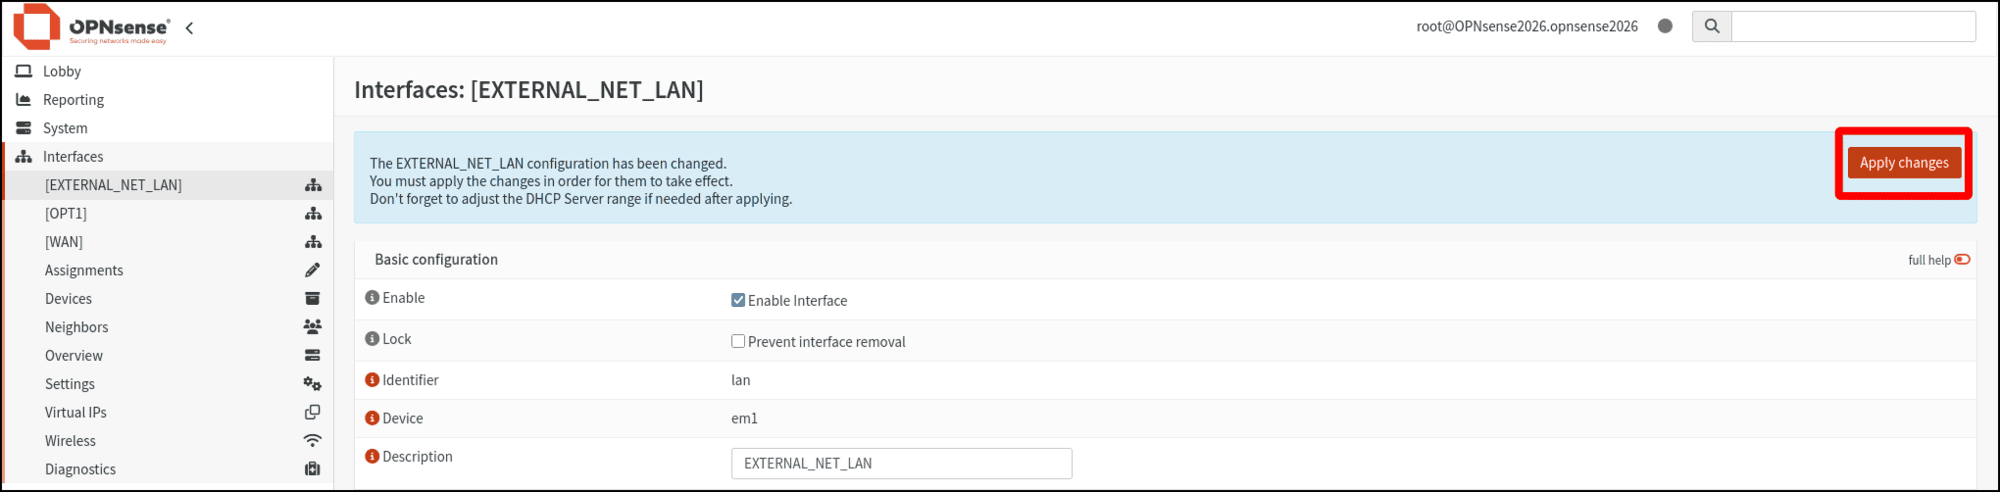
- A banner displays at the top of the page explaining that the new changes need to be applied. Click Apply changes so that your new description can take effect.
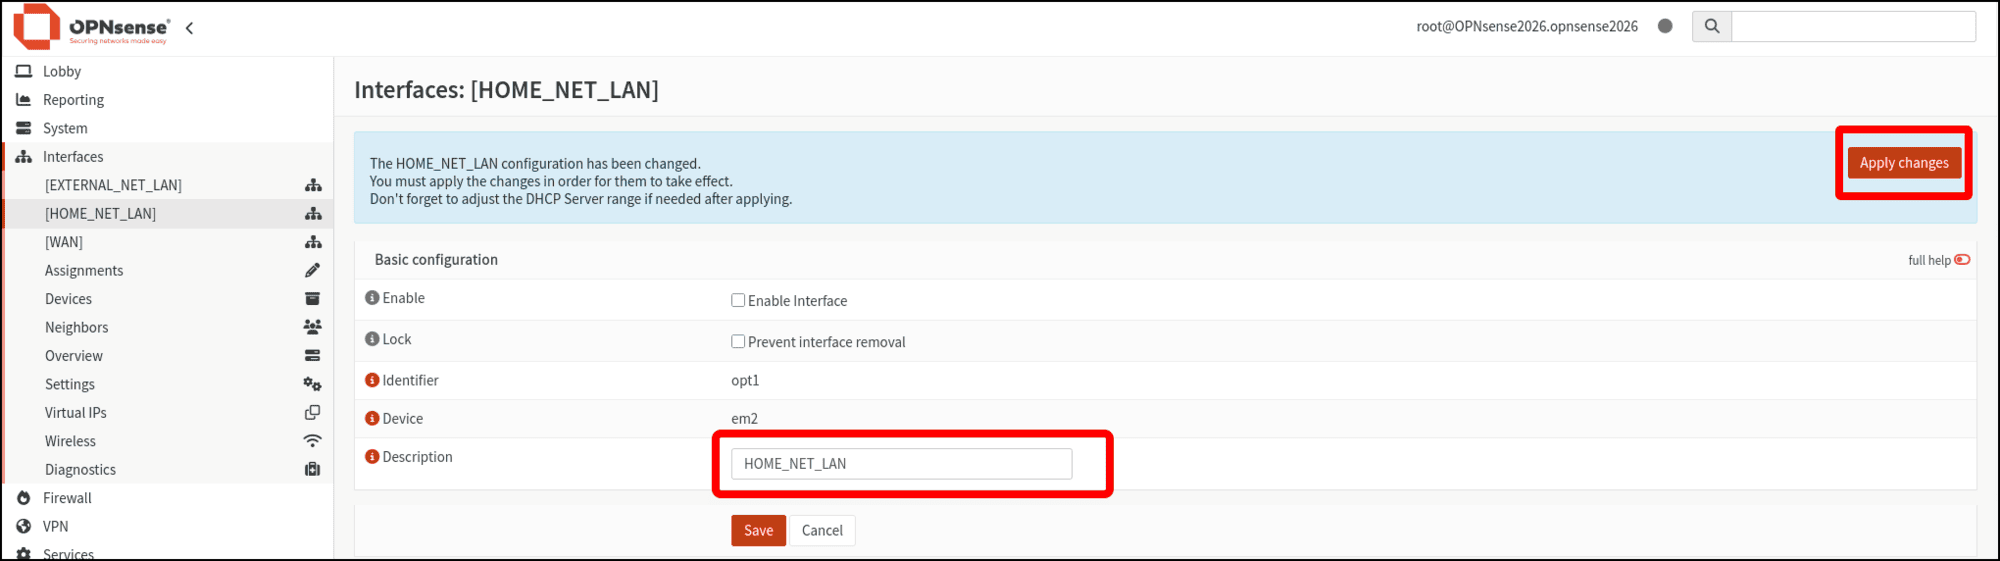
- Repeat the process for the [OPT1] interface: enter HOME_NET_LAN as the Description, click Save, then click Apply changes when the page reloads.
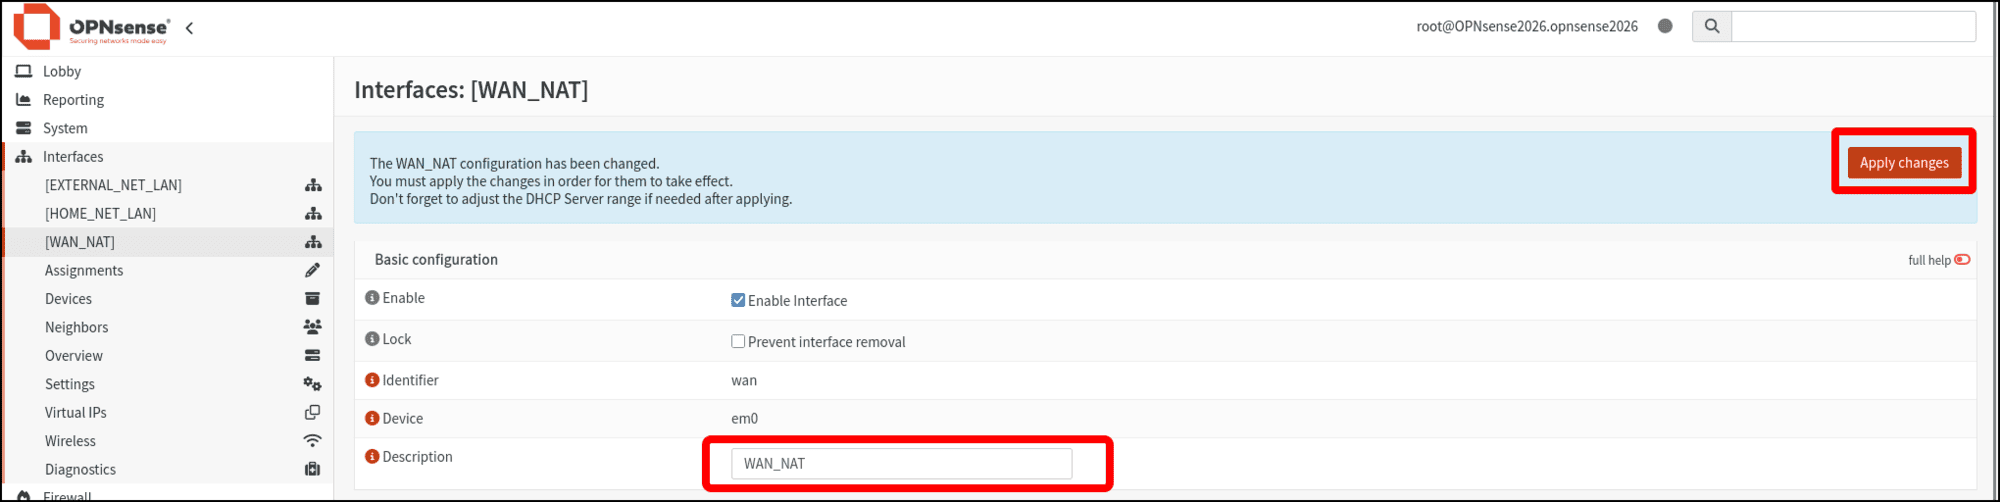
- Rename the WAN interface, too: enter WAN_NAT as the Description, click Save, then click Apply changes when the page reloads.
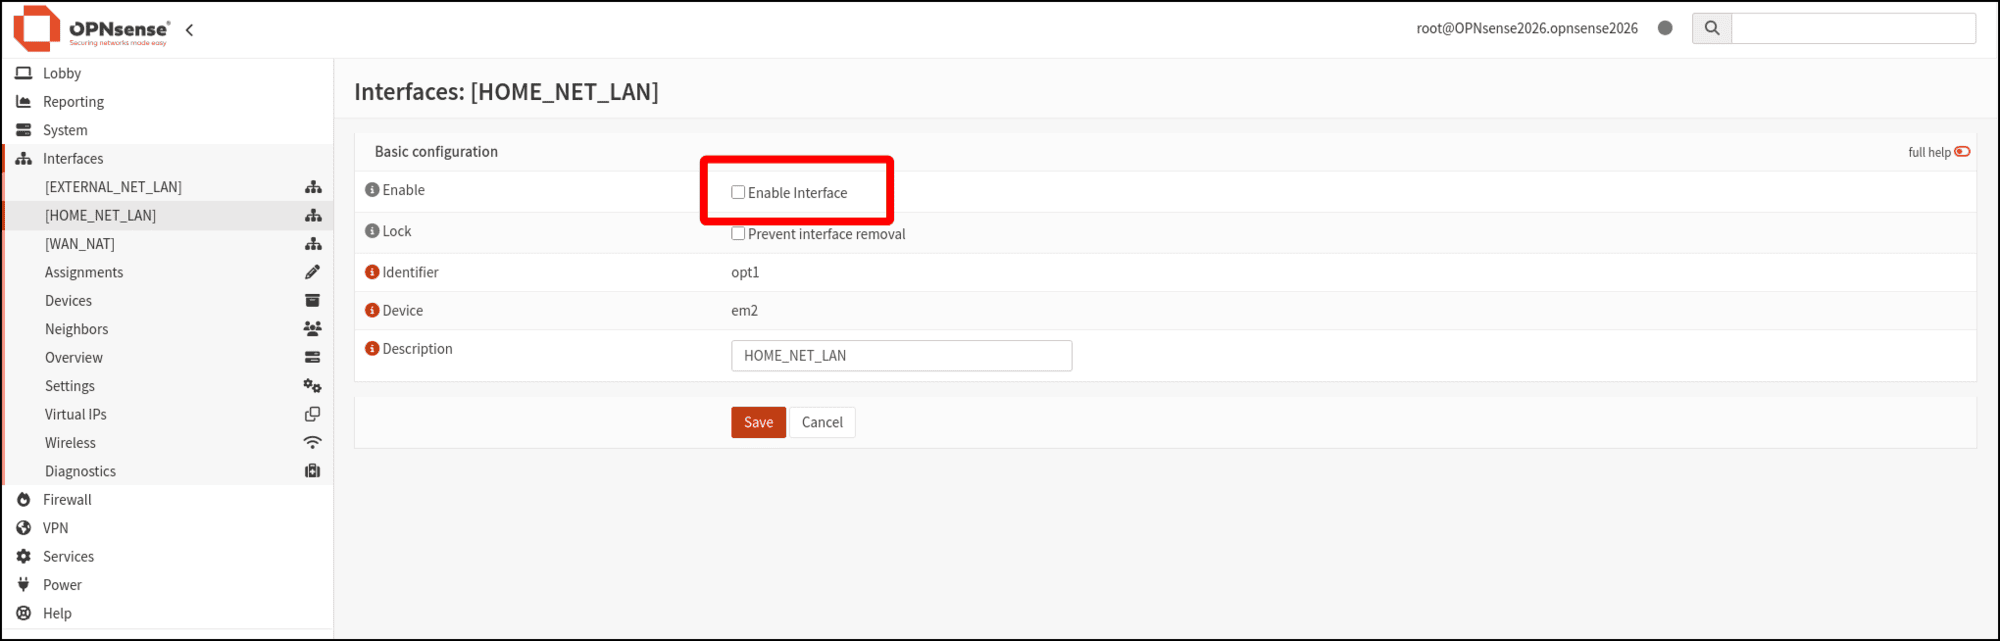
- Click [HOME_NET_LAN] in the left sidebar. When the Interfaces: HOME_NET_LAN page loads, you will notice that there are not a lot of options. That’s because the interface has not been enabled, so select the Enable interface checkbox.
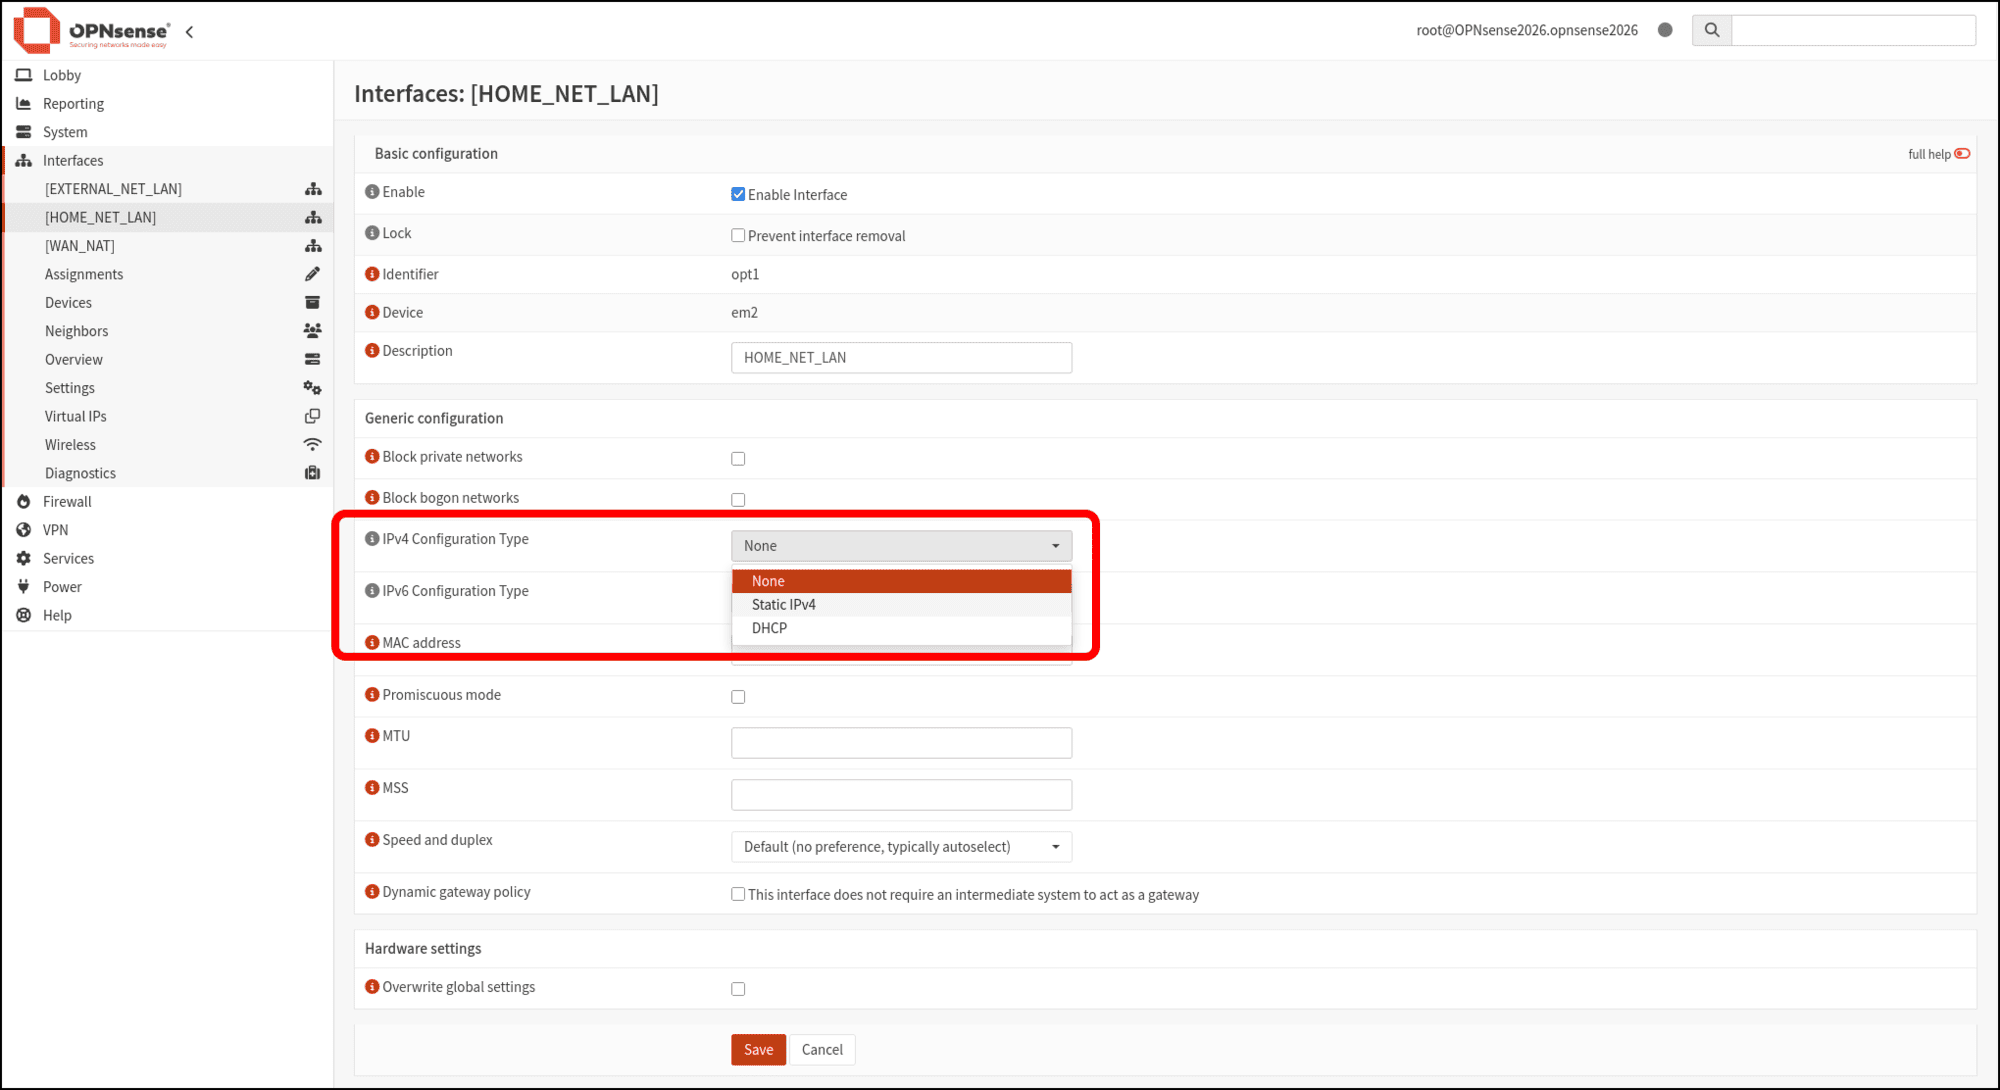
- Scroll down to the Generic configuration section and click the IPv4 Configuration Type drop-down menu and select Static IPv4 so that you can assign a static IP address to the HOME_NET_LAN interface.
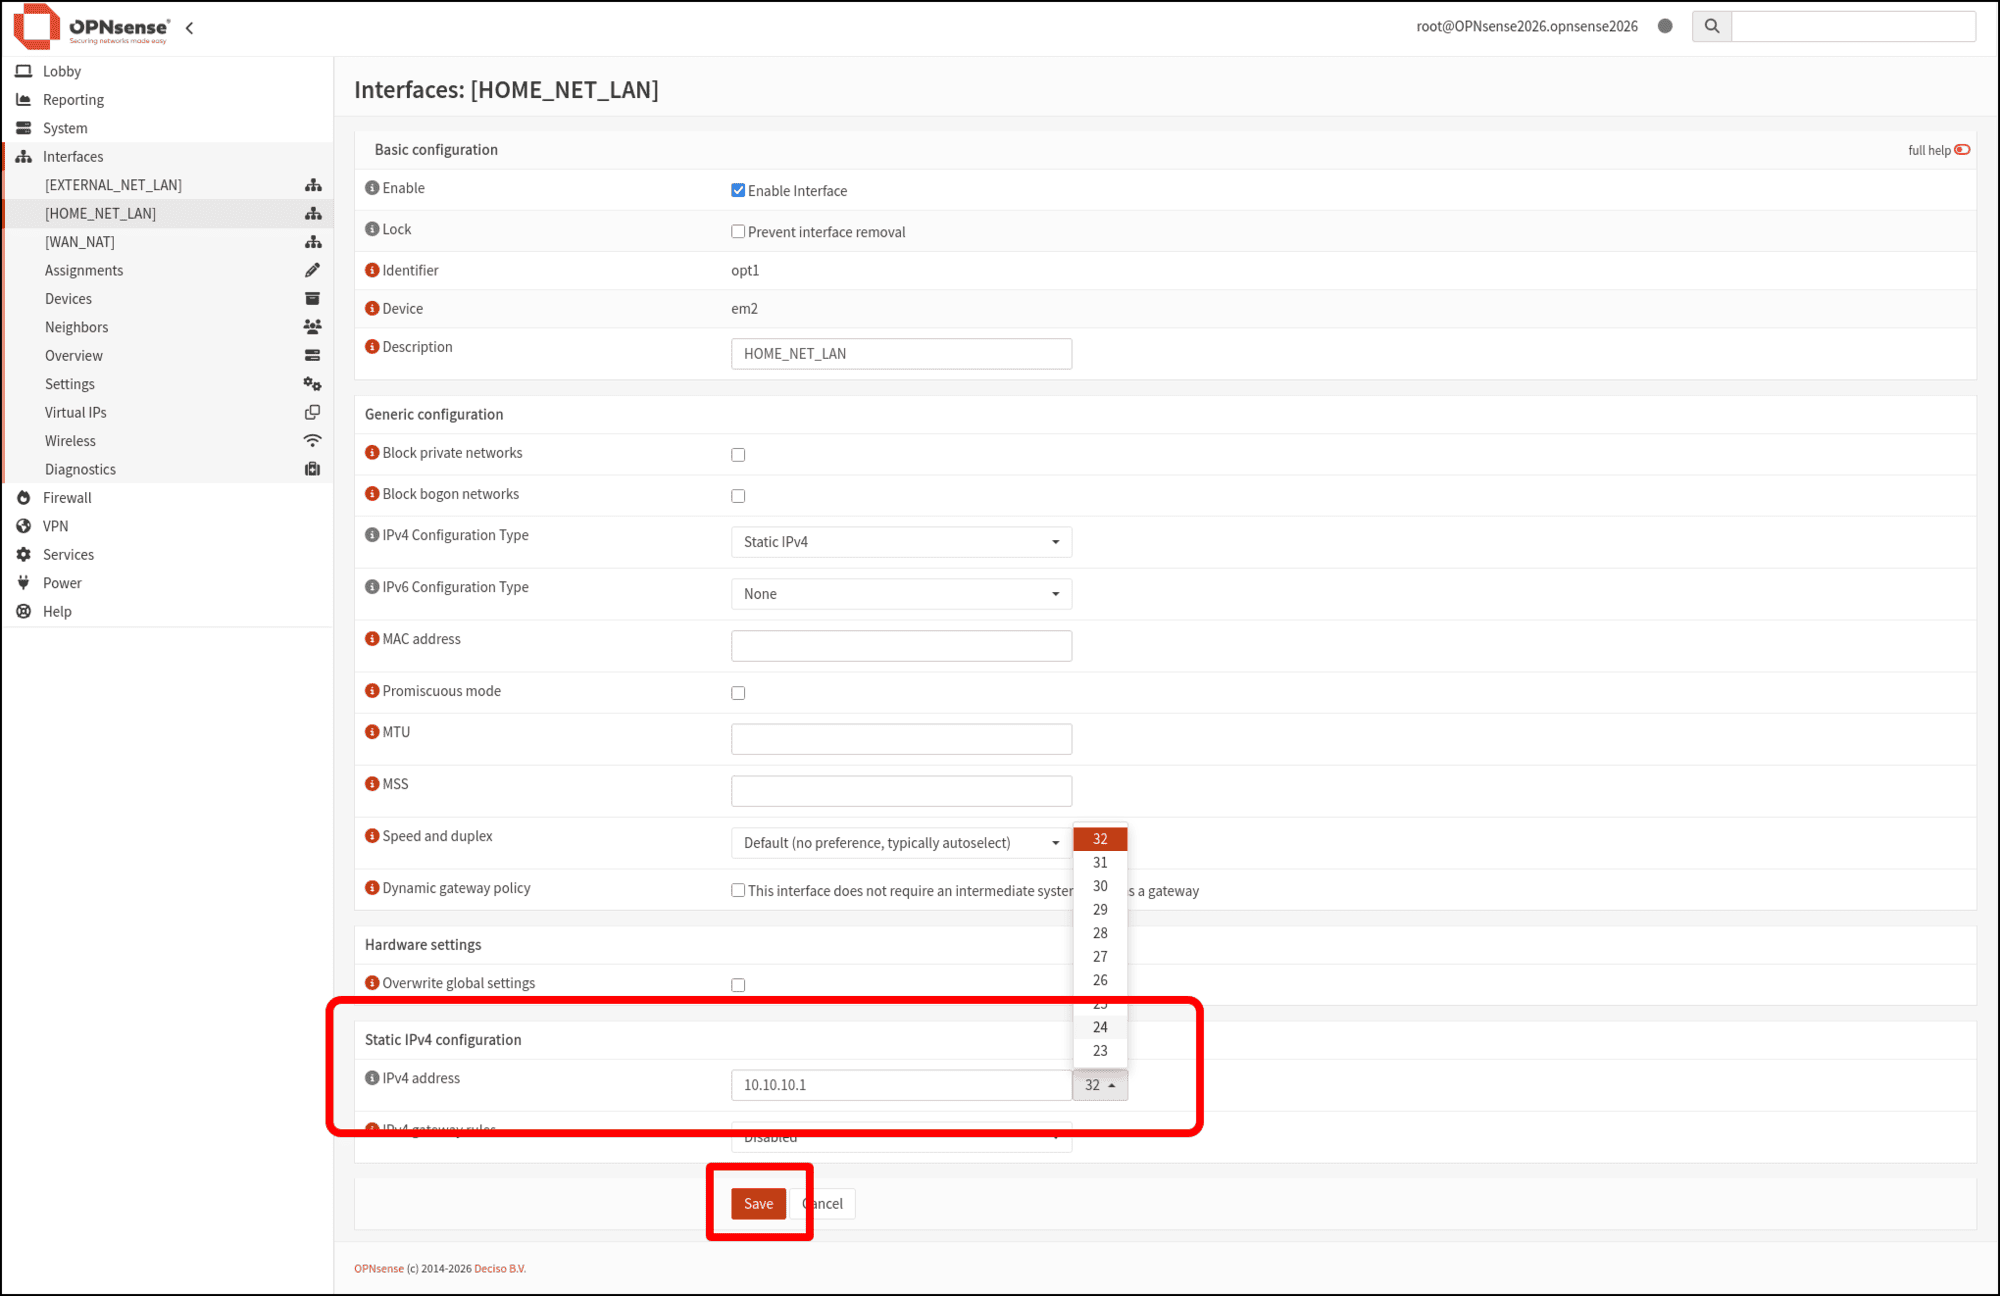
- Scroll down to the bottom of the page, which now displays a Static IPv4 configuration section. Enter the IPv4 address for the HOME_NET_LAN as 10.10.10.1 and select 24 as the subnet value, then click Save.
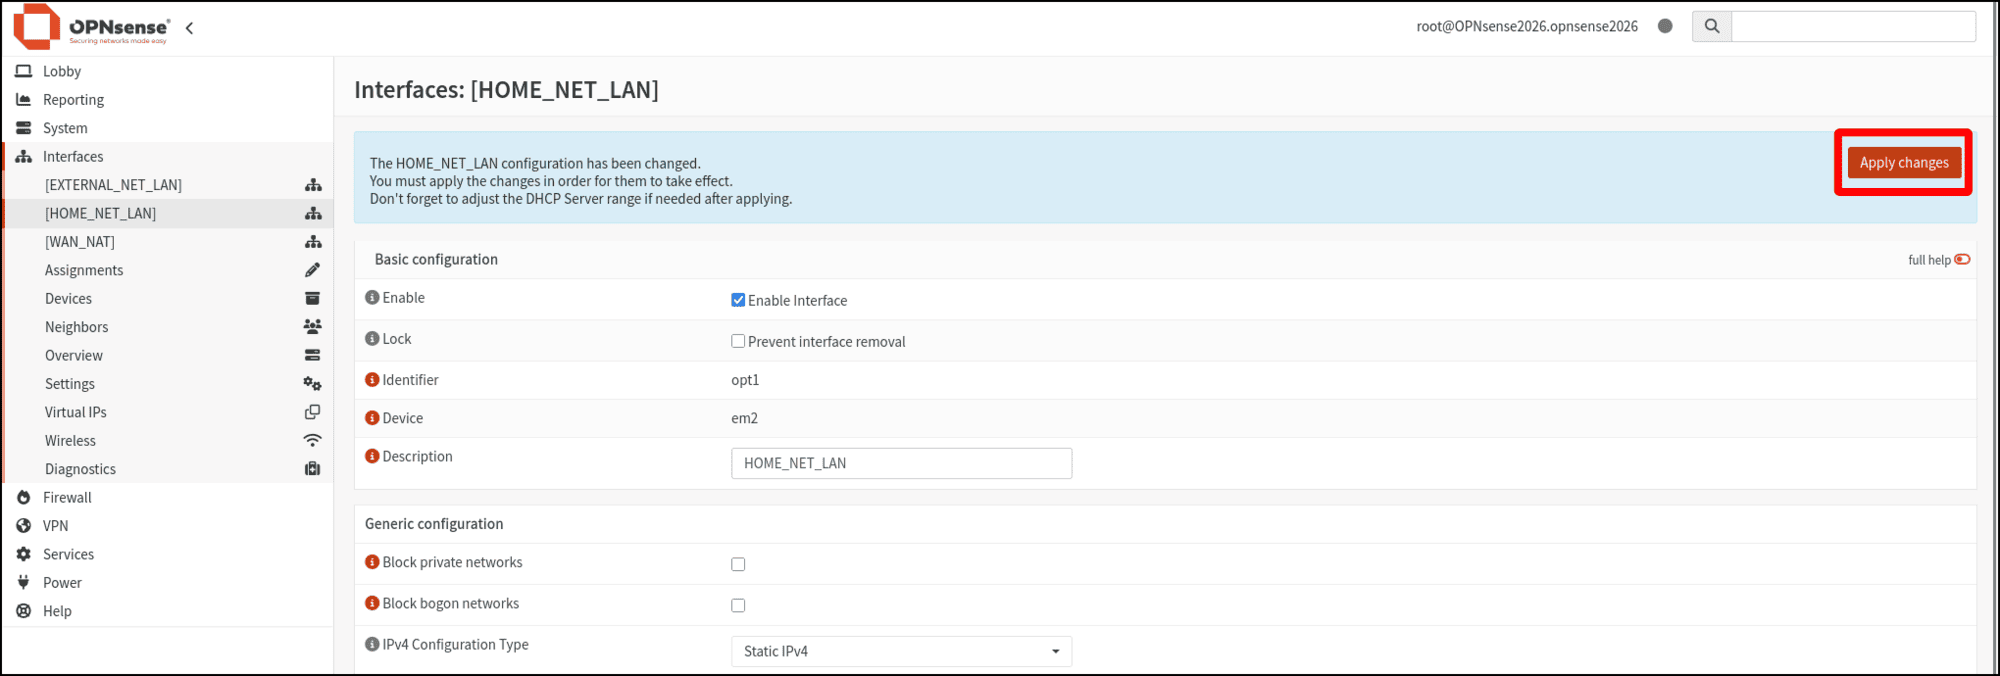
- Click Apply changes to enable the interface and apply the static IP address to it.
Configure DHCP for Local Interfaces
Next you need to configure DHCP for both the EXTERNAL_NET_LAN and the HOME_NET_LAN networks. You configured EXTERNAL_NET_LAN using the console for the OPNsense VM, we’re now going to review that configuration and add DHCP for the HOME_NET_LAN network.
As of version 26 in 2026, OPNsense provides three variants of DHCP software: KEA DHCP, Dnsmasq DNS & DHCP, and DHCrelay. KEA is “is designed for scalable and high-availability environments”, while OPNsense describes Dnsmasq “as the perfect DNS and DHCP server for small and medium sized setups,” and it is also the default DHCP server, so that is the one appropriate for this tutorial. (DHCrelay provides DHCP relay services, or sharing IP address assignments across multiple interfaces and networks, which is not a problem we need to solve in this lab.)
You can see the options for DHCP under Services in the left sidebar: 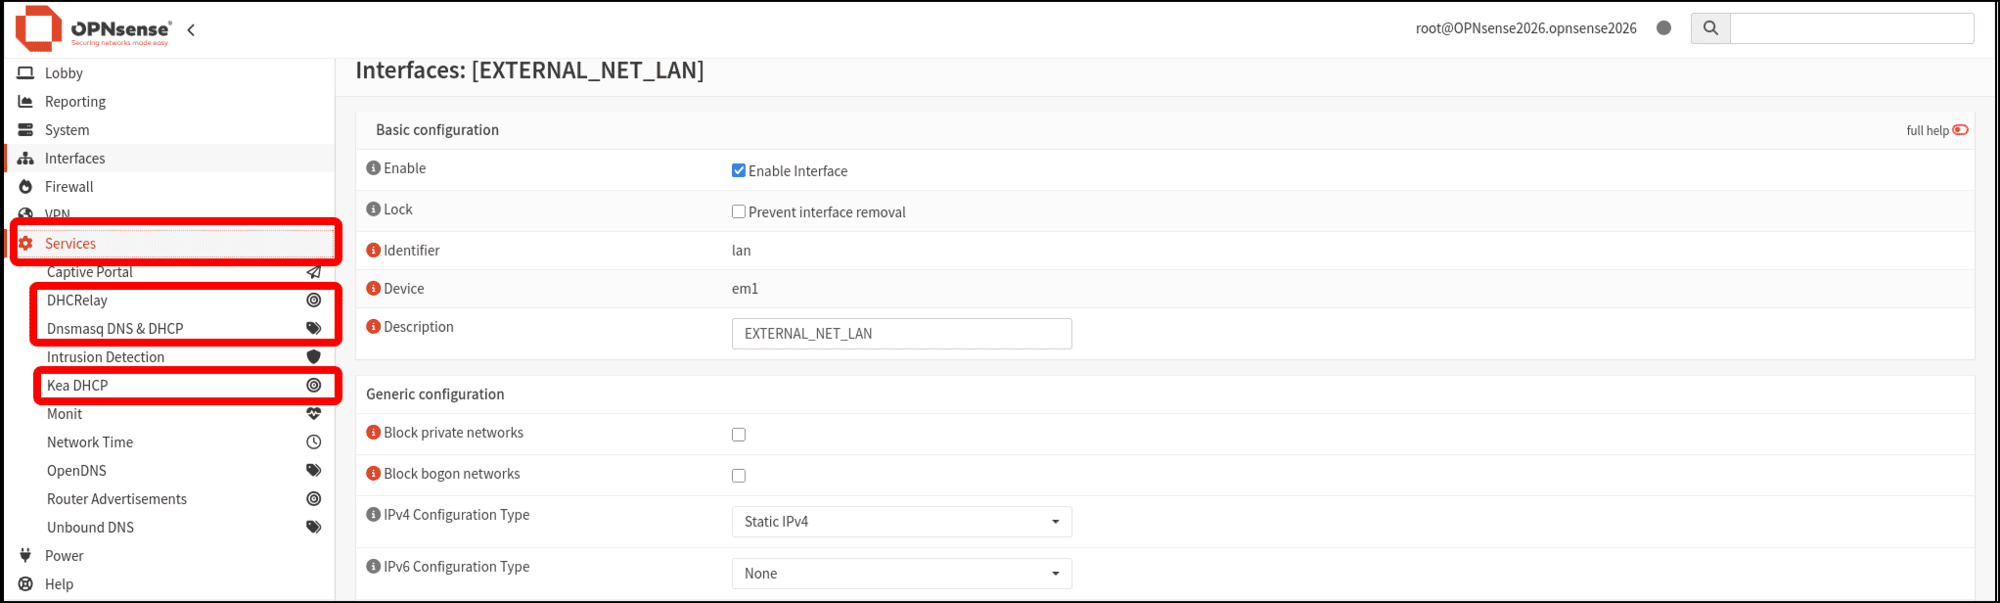
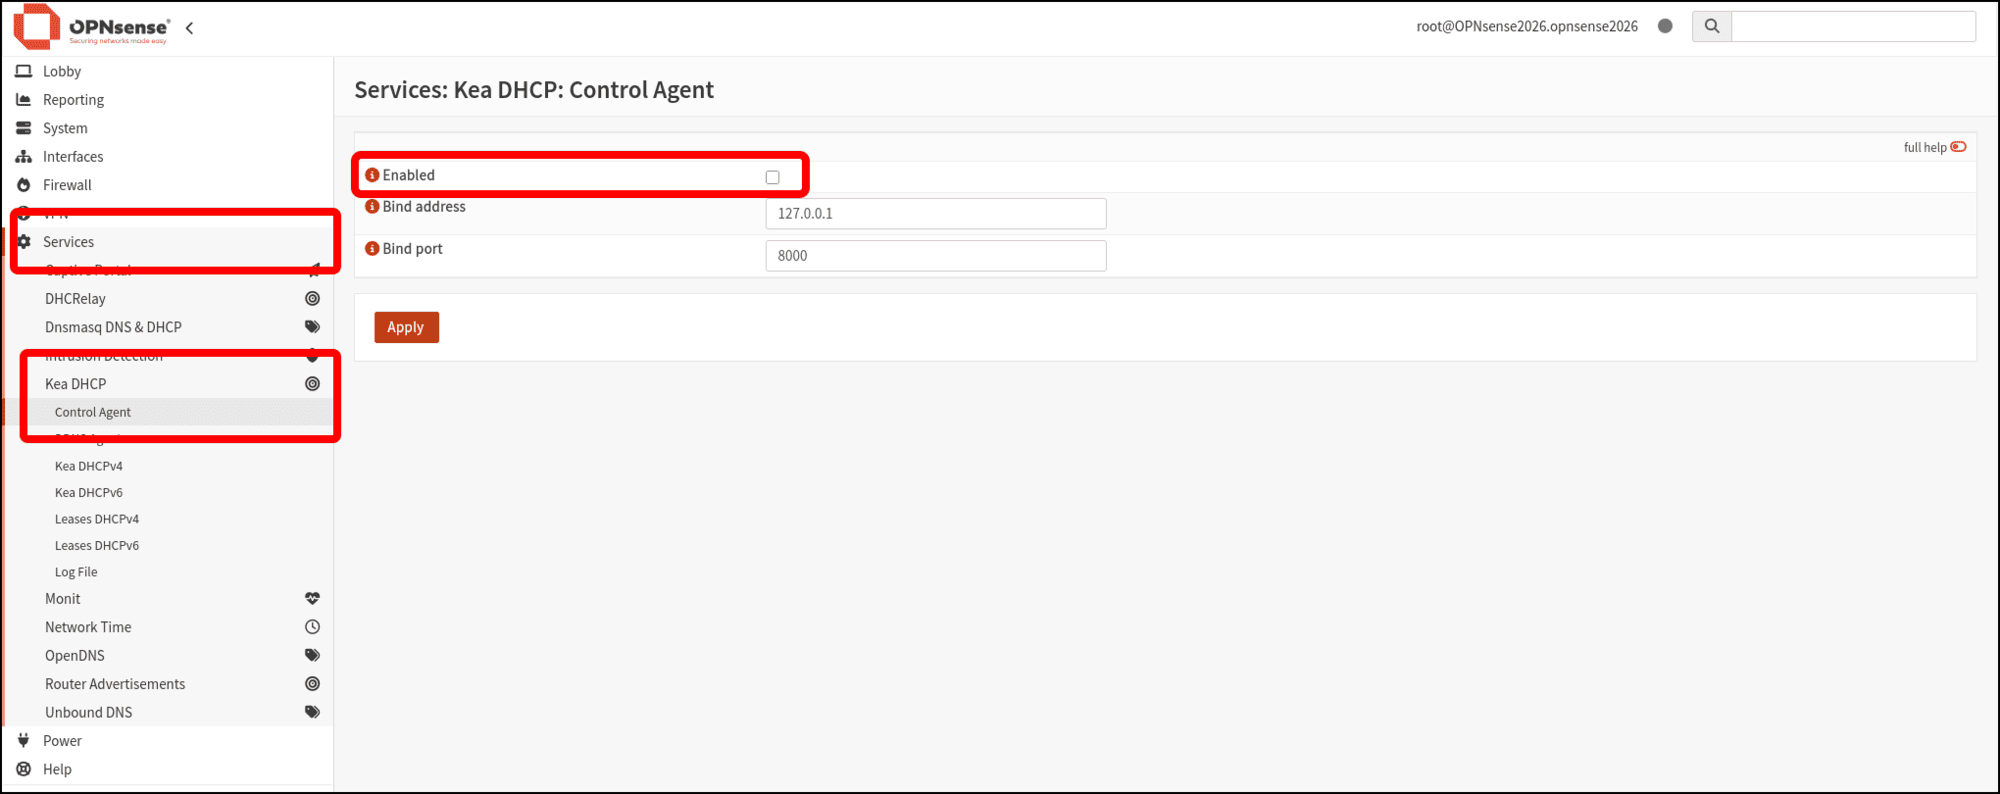
- Before configuring Dnsmasq for DHCP, check that KEA DHCP is not running by clicking Services in the left sidebar, then clicking Kea DHCP > Control Agent. Confirm that the Enabled checkbox is cleared. You don’t want different DHCP services running and conflicting with one another.
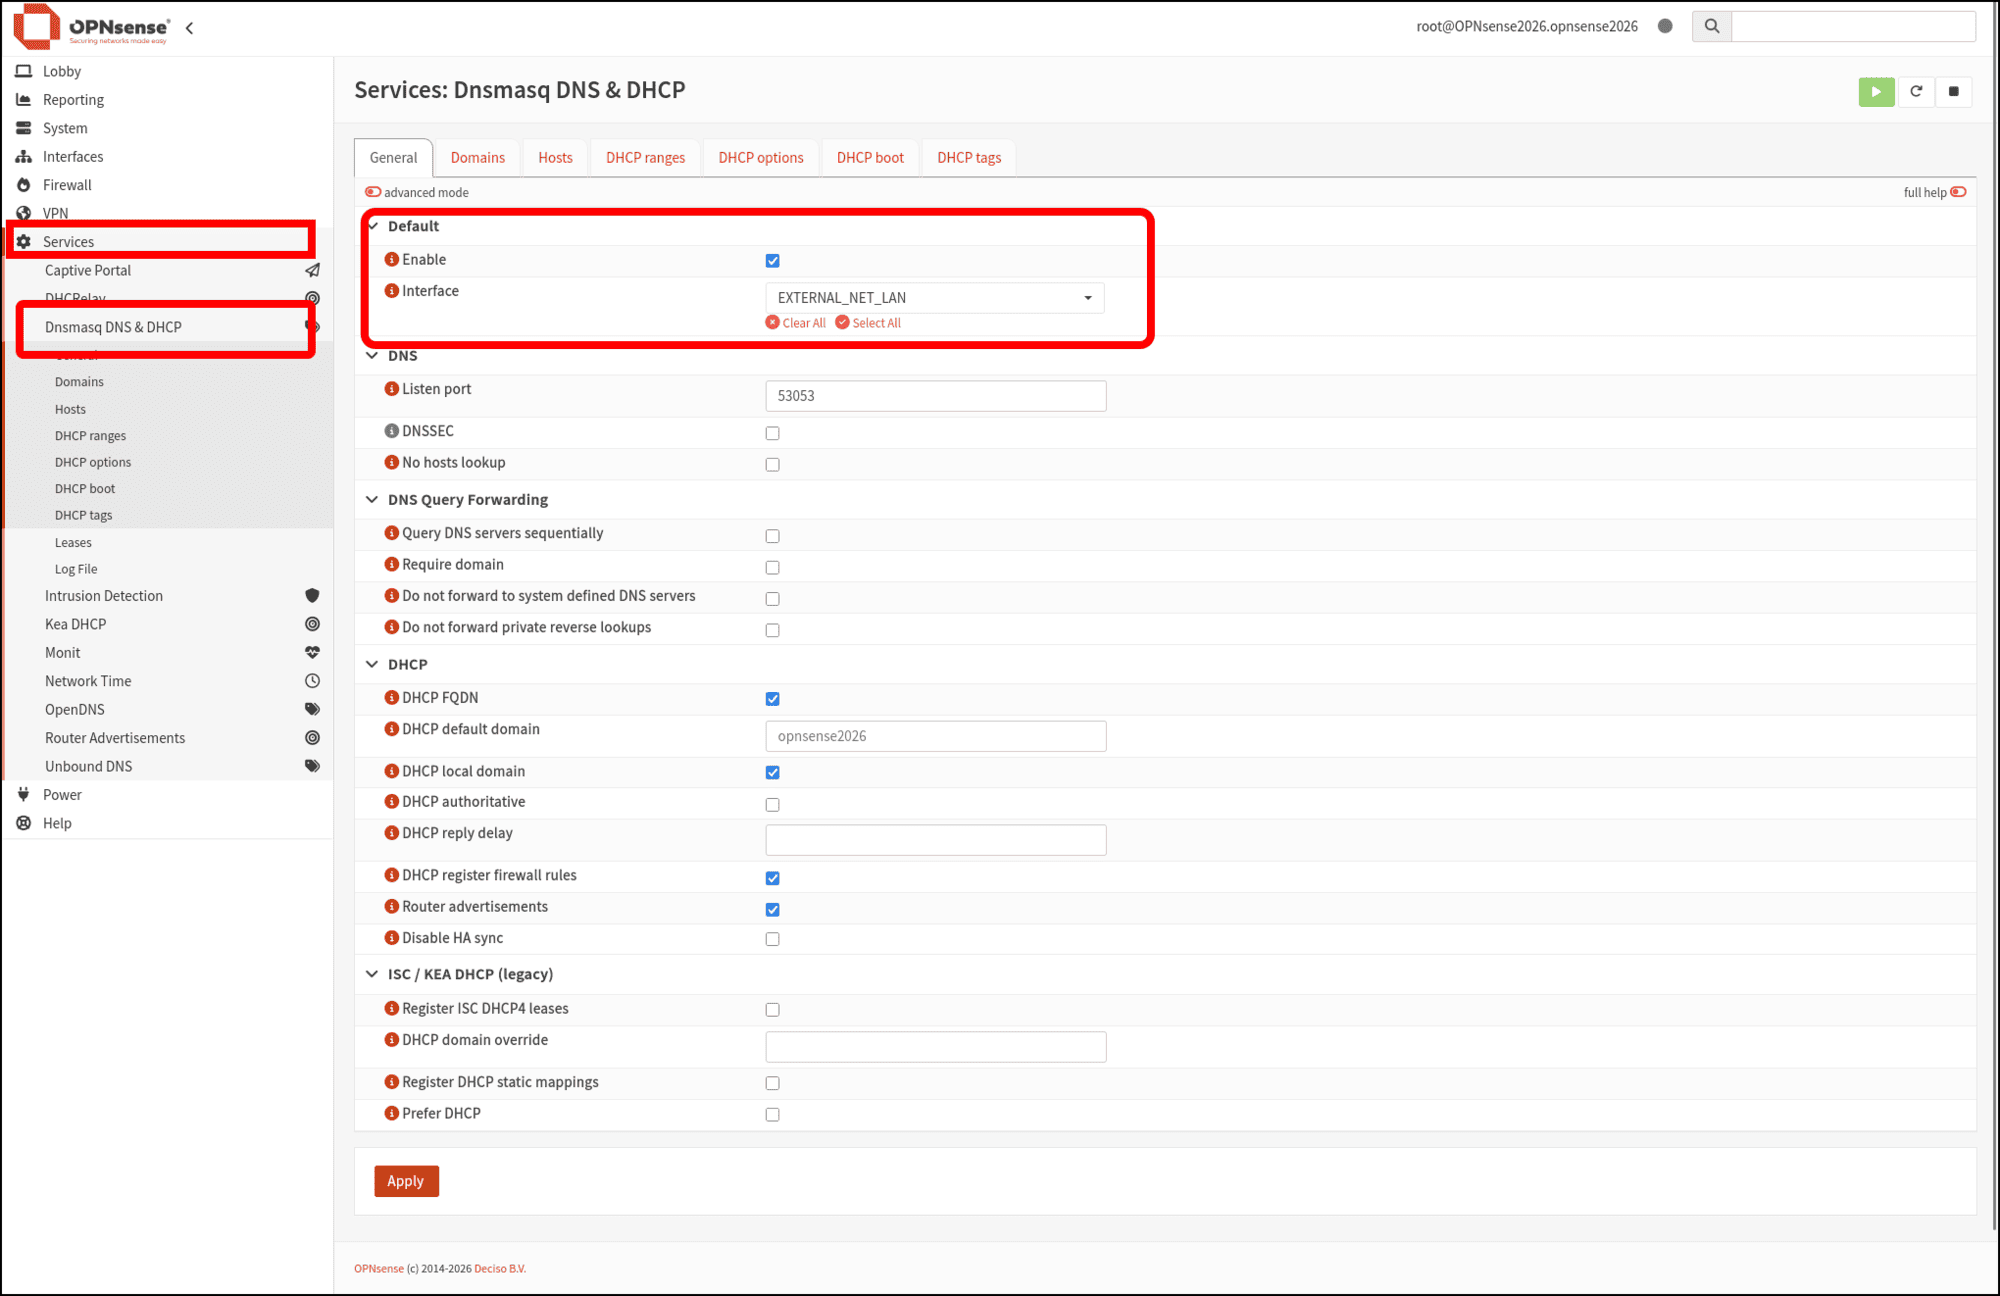
- Now click Services > Dnsmasq DNS & DHCP in the left sidebar. When the page loads, confirm that the Enable checkbox is selected and click the Interface drop-down menu.
- EXTERNAL_NET_LAN will already display a checkmark. Click HOME_NET_LAN to enable Dnsmasq for DHCP on both interfaces.
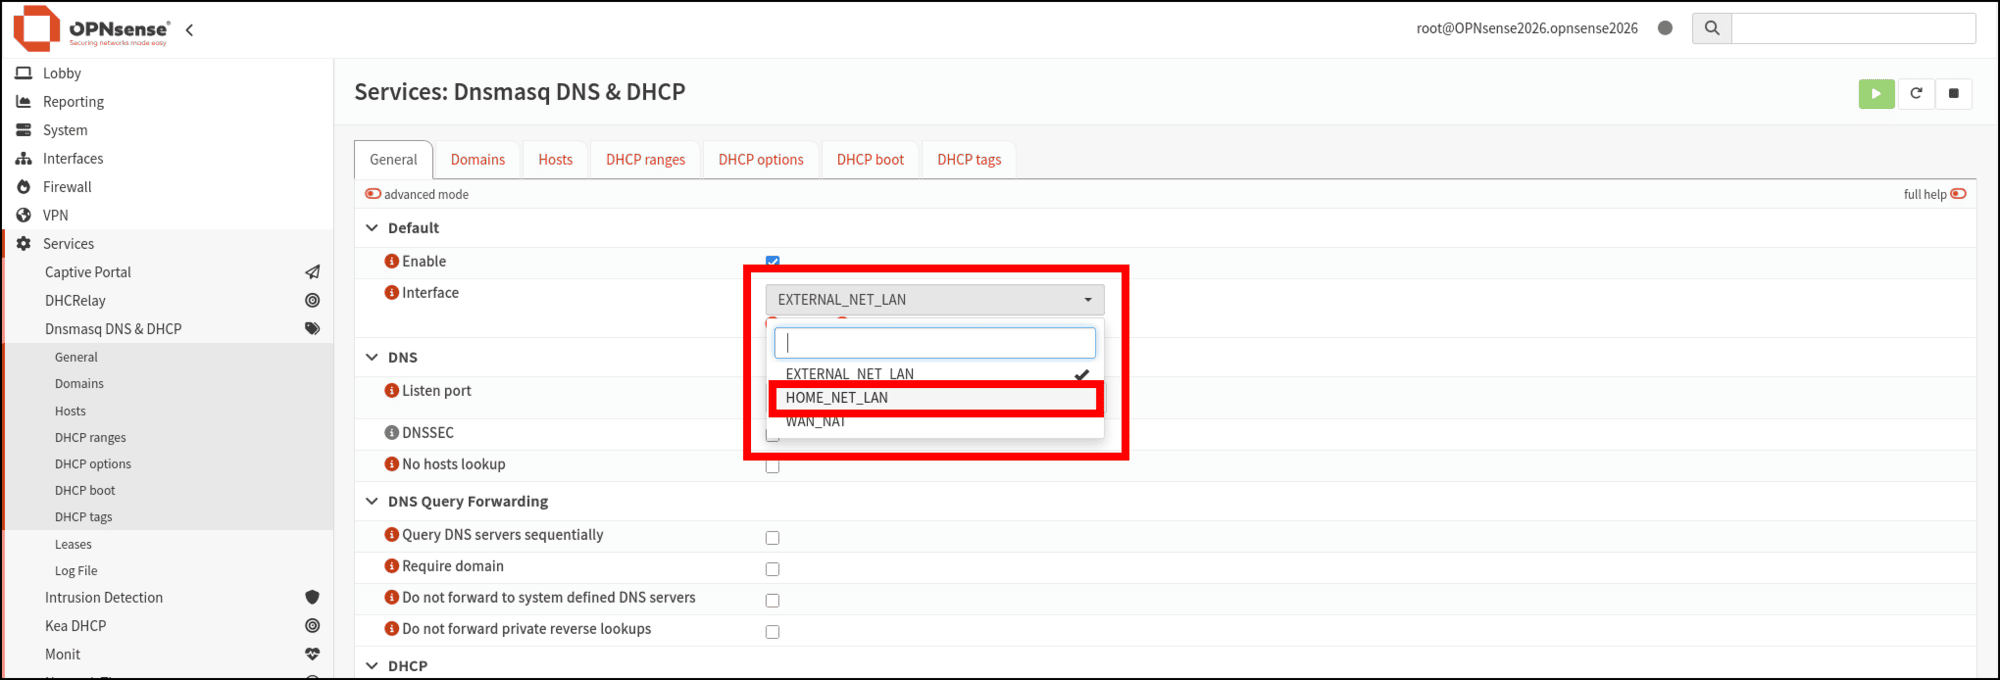
- Now that both interfaces are selected, click the DHCP ranges tab.
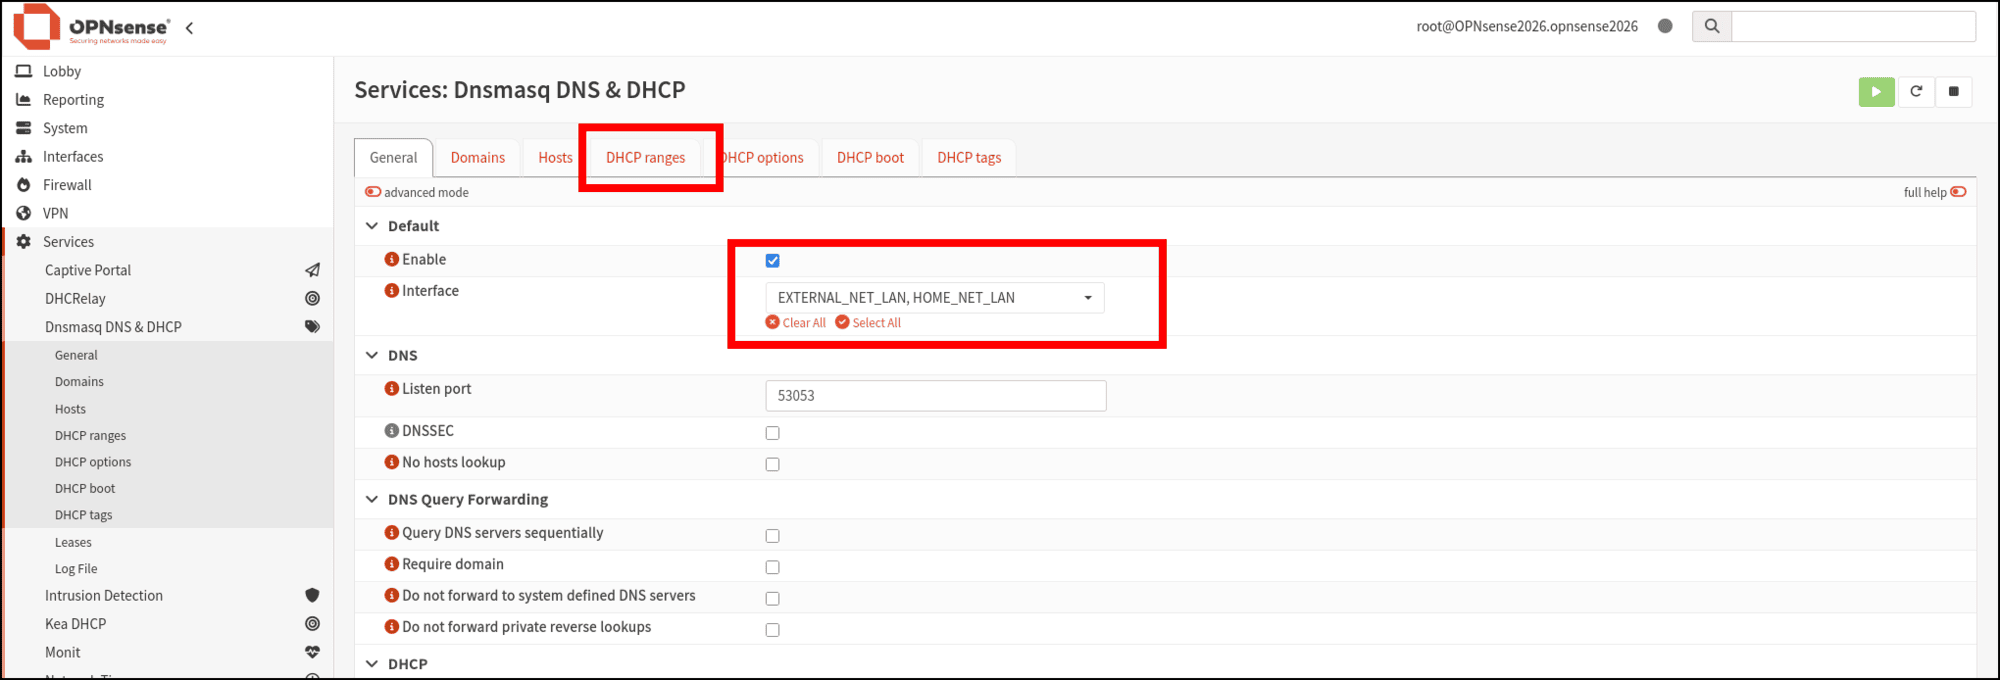
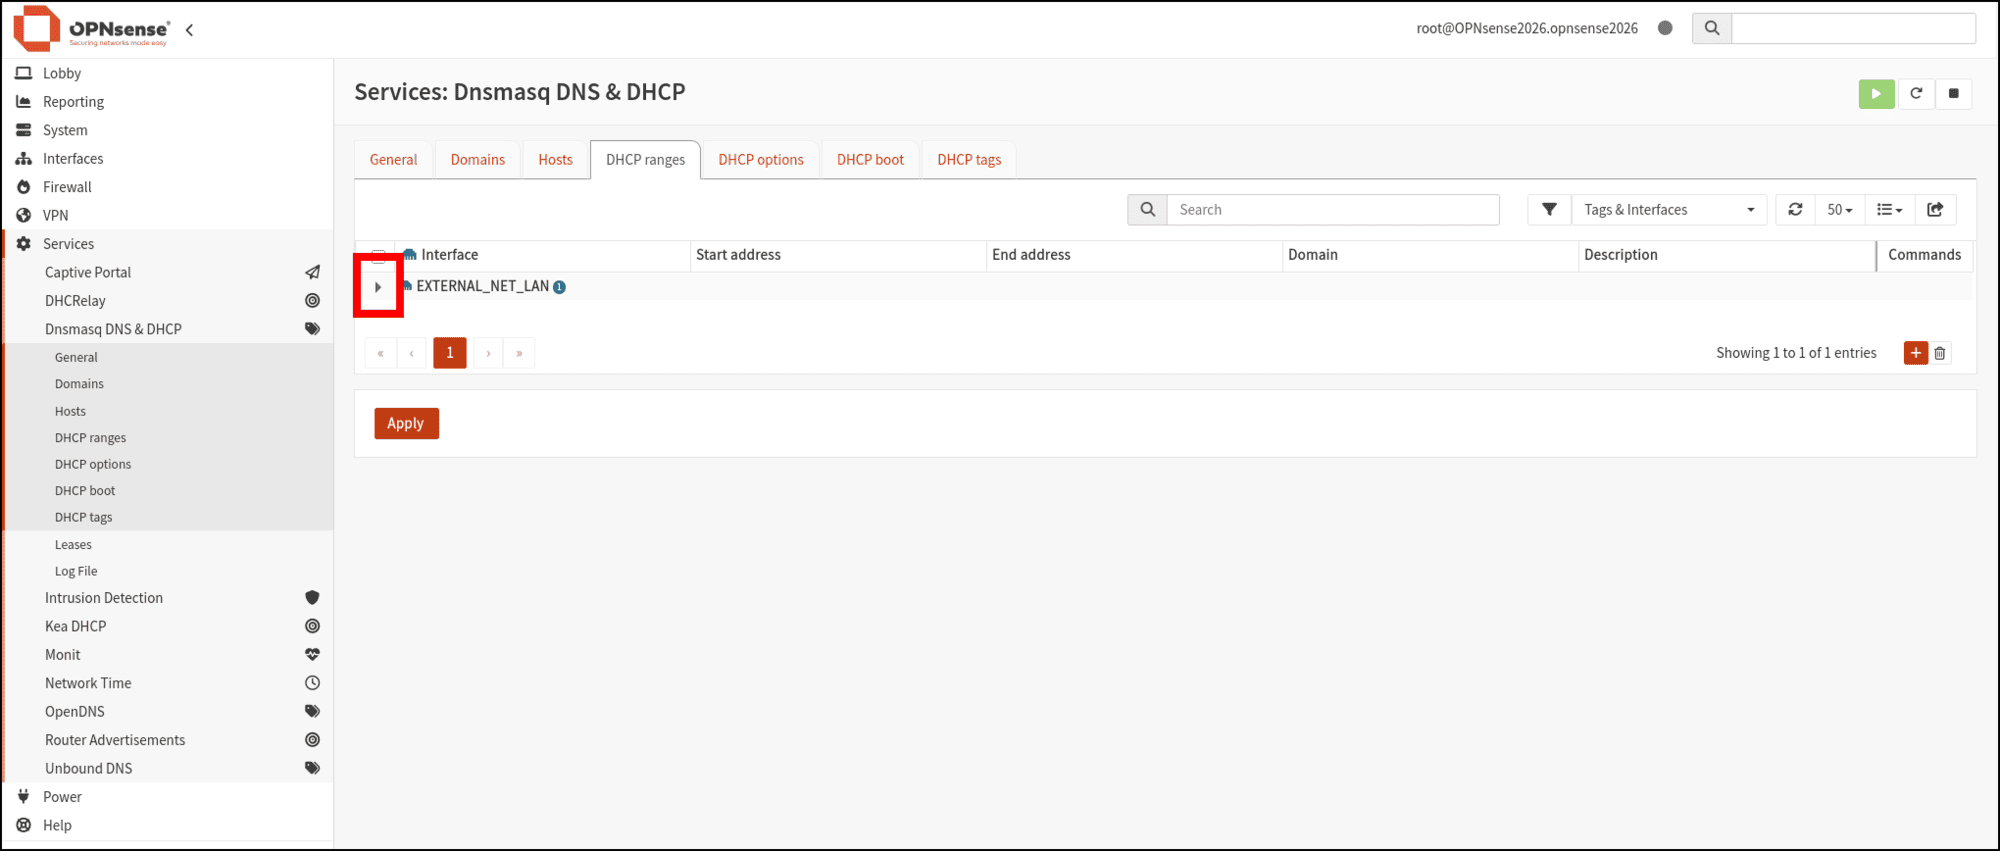
- The EXTERNAL_NET_LAN interface is already configured. Click the arrow to twirl it down to see more information.
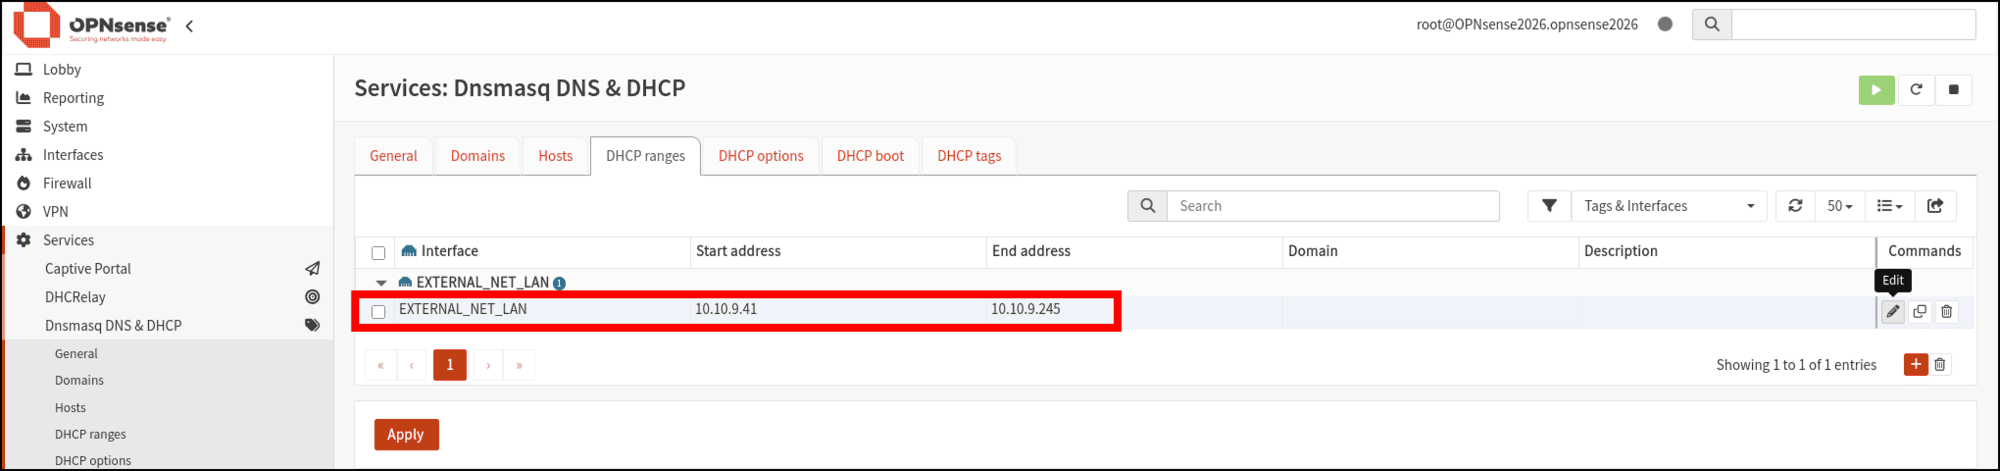
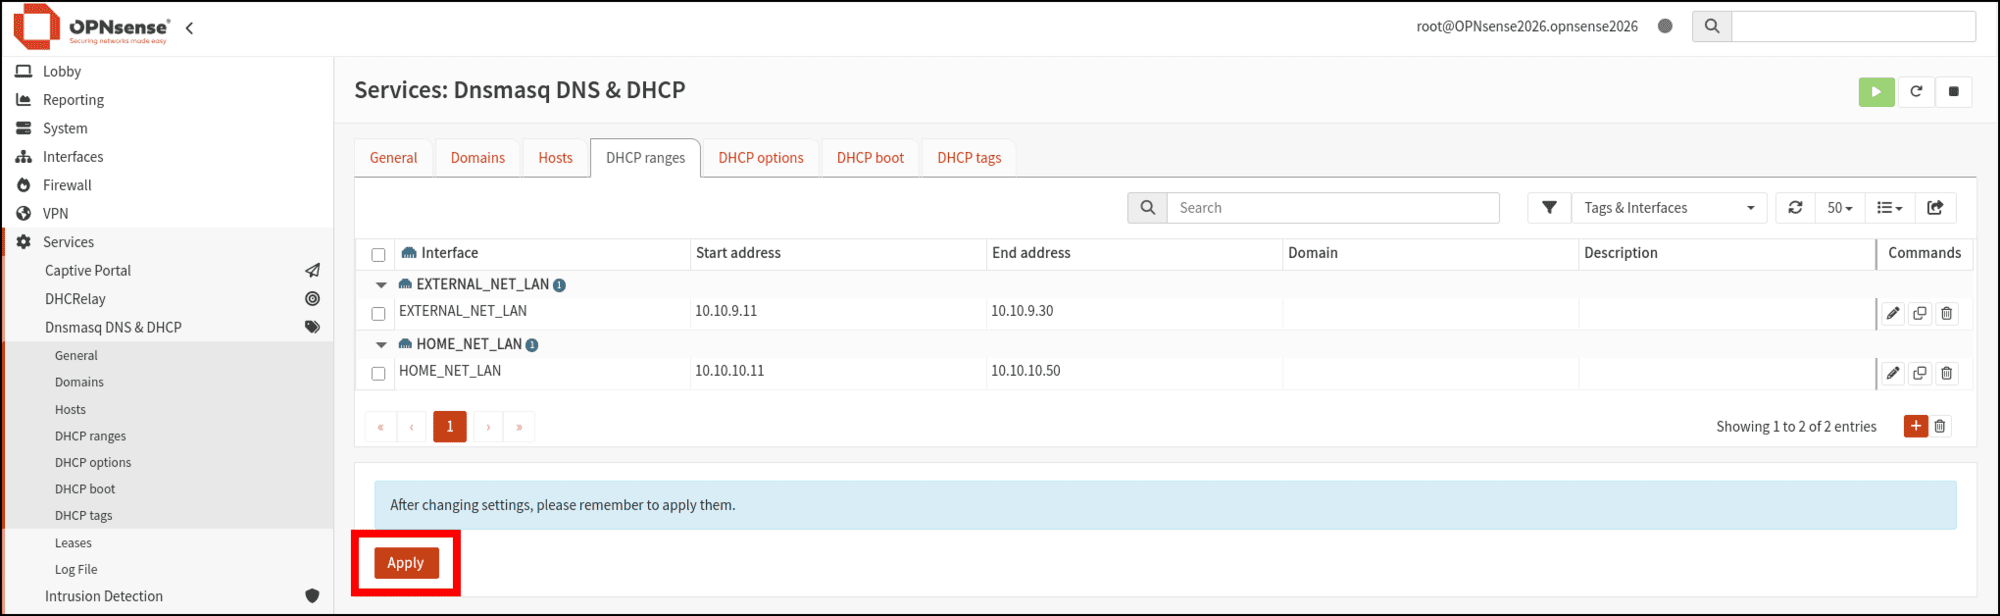
- EXTERNAL_NET_LAN is configured with both a Start address and an End address. (Although this may be a bug, as those values were not the ones that were set when assigning the interface IP address in the OPNsense console.)
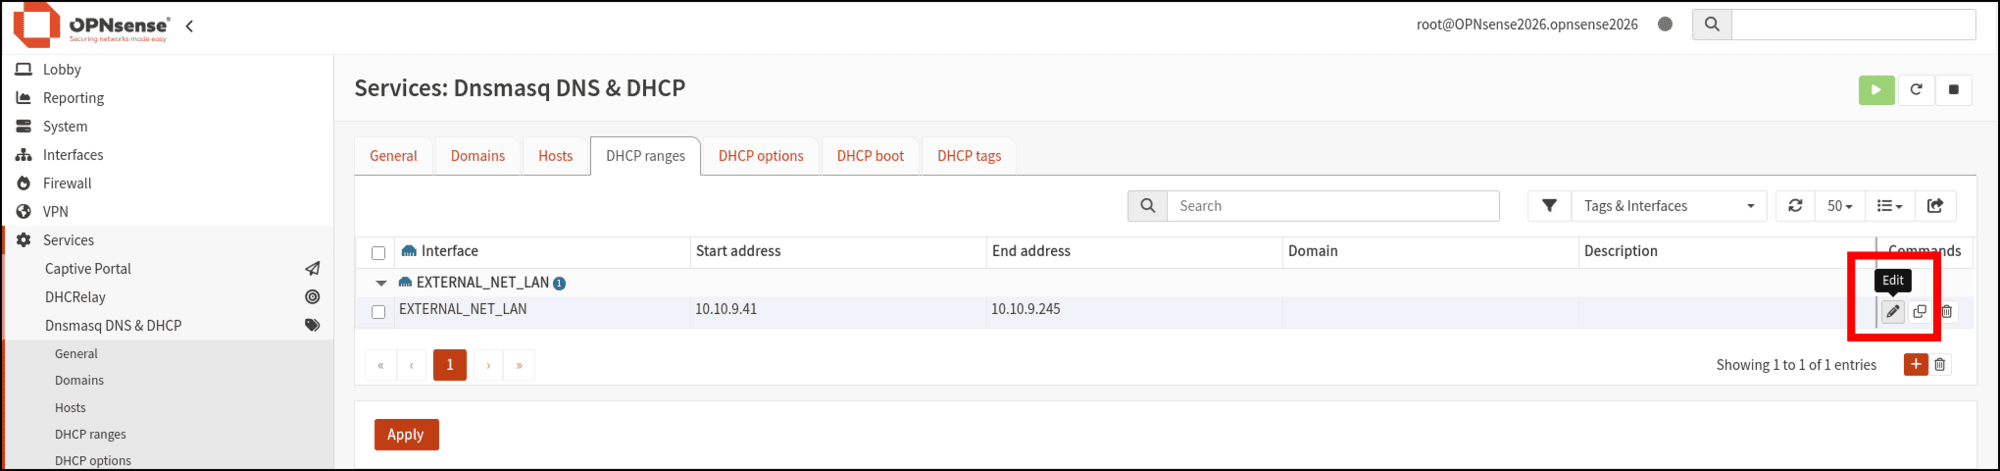
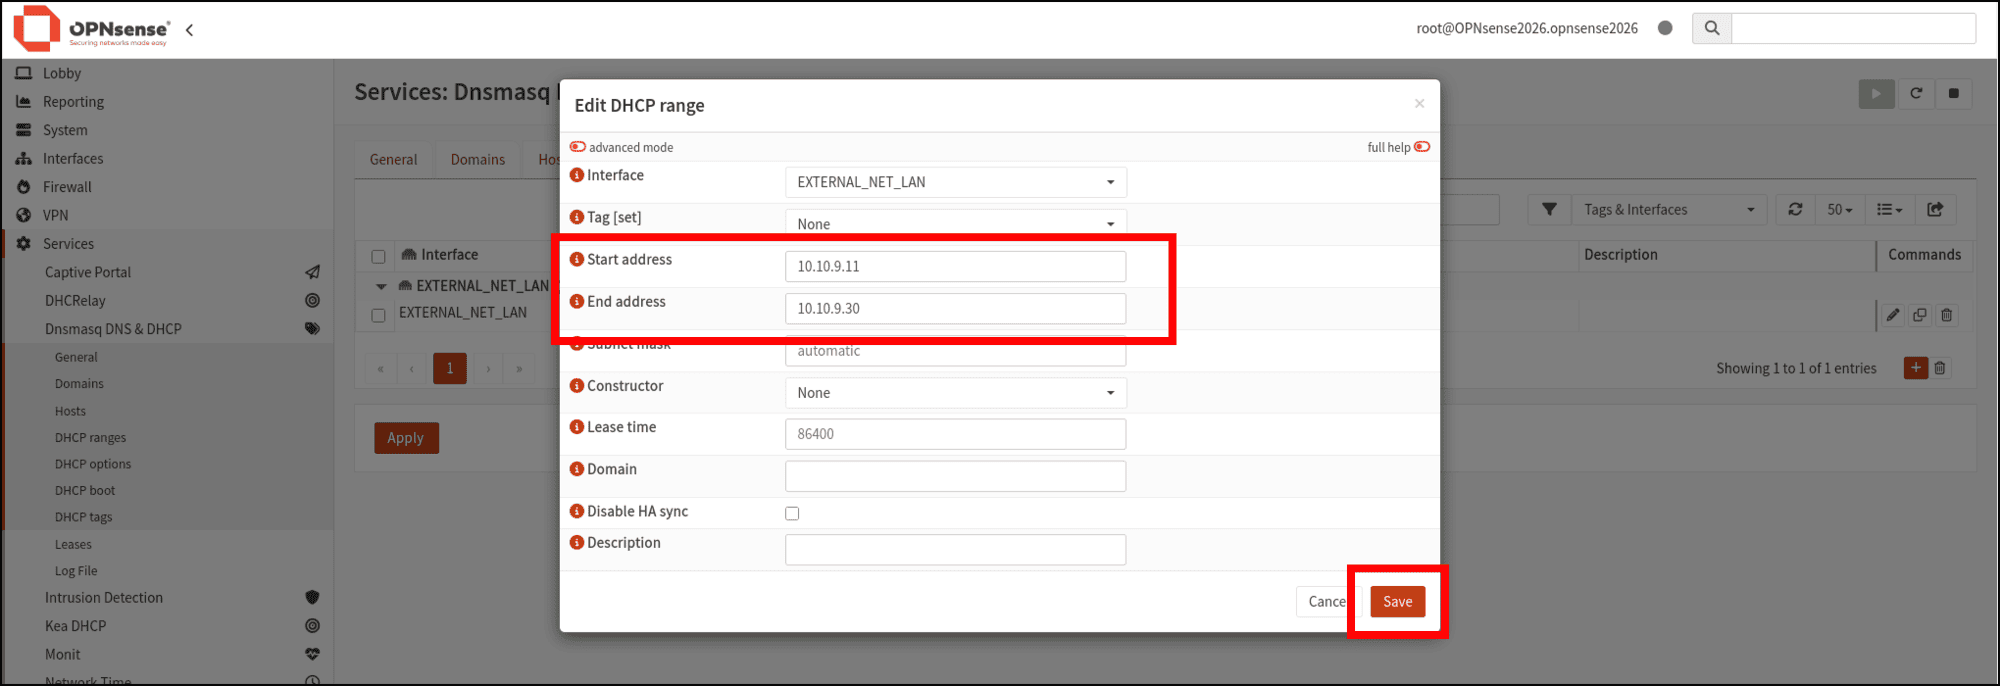
- Click the pencil icon to edit the address range.
- In the Edit DHCP range pane, you can update the Start address and End address values and click Save. The lab I am building is small and I won’t have many hosts that need IP addresses, so here I am setting the pool of IP addresses the DHCP server can distribute from 10.10.9.11 to 10.10.9.30.
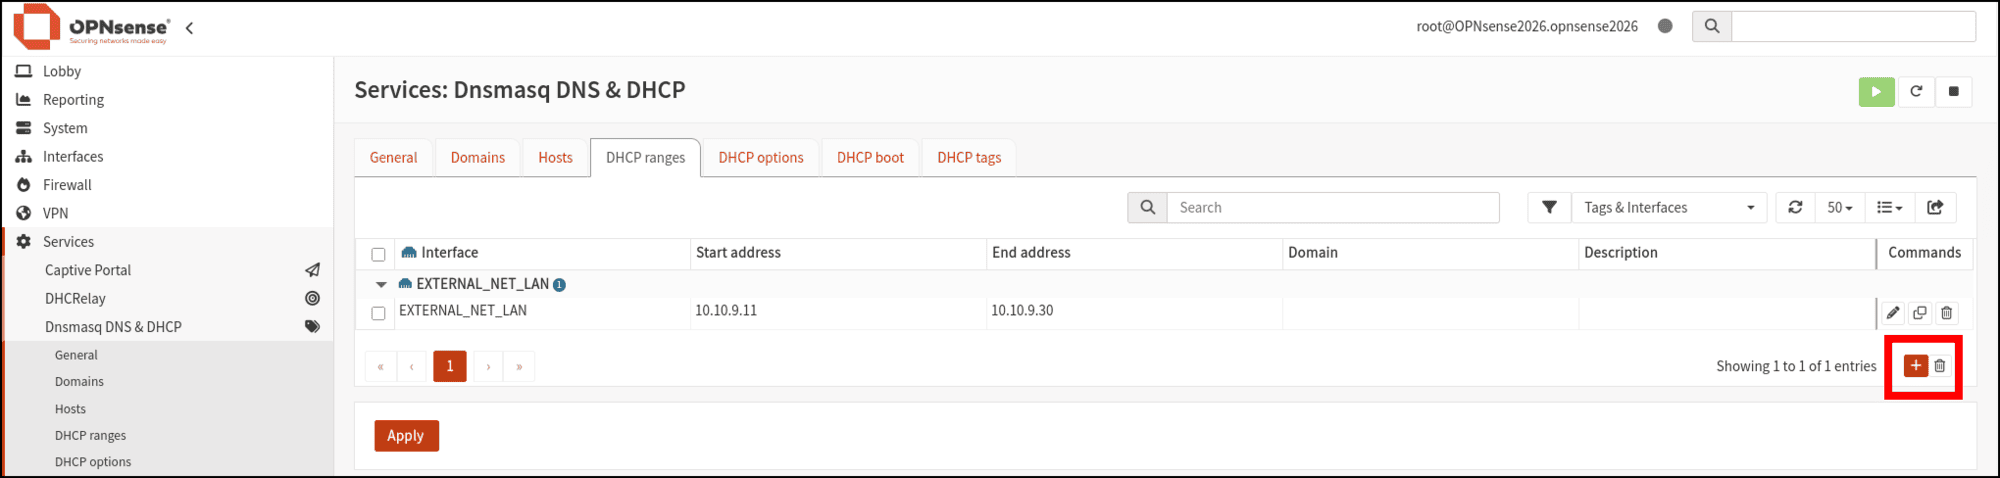
- Click the plus icon to the right of the table (under Commands).
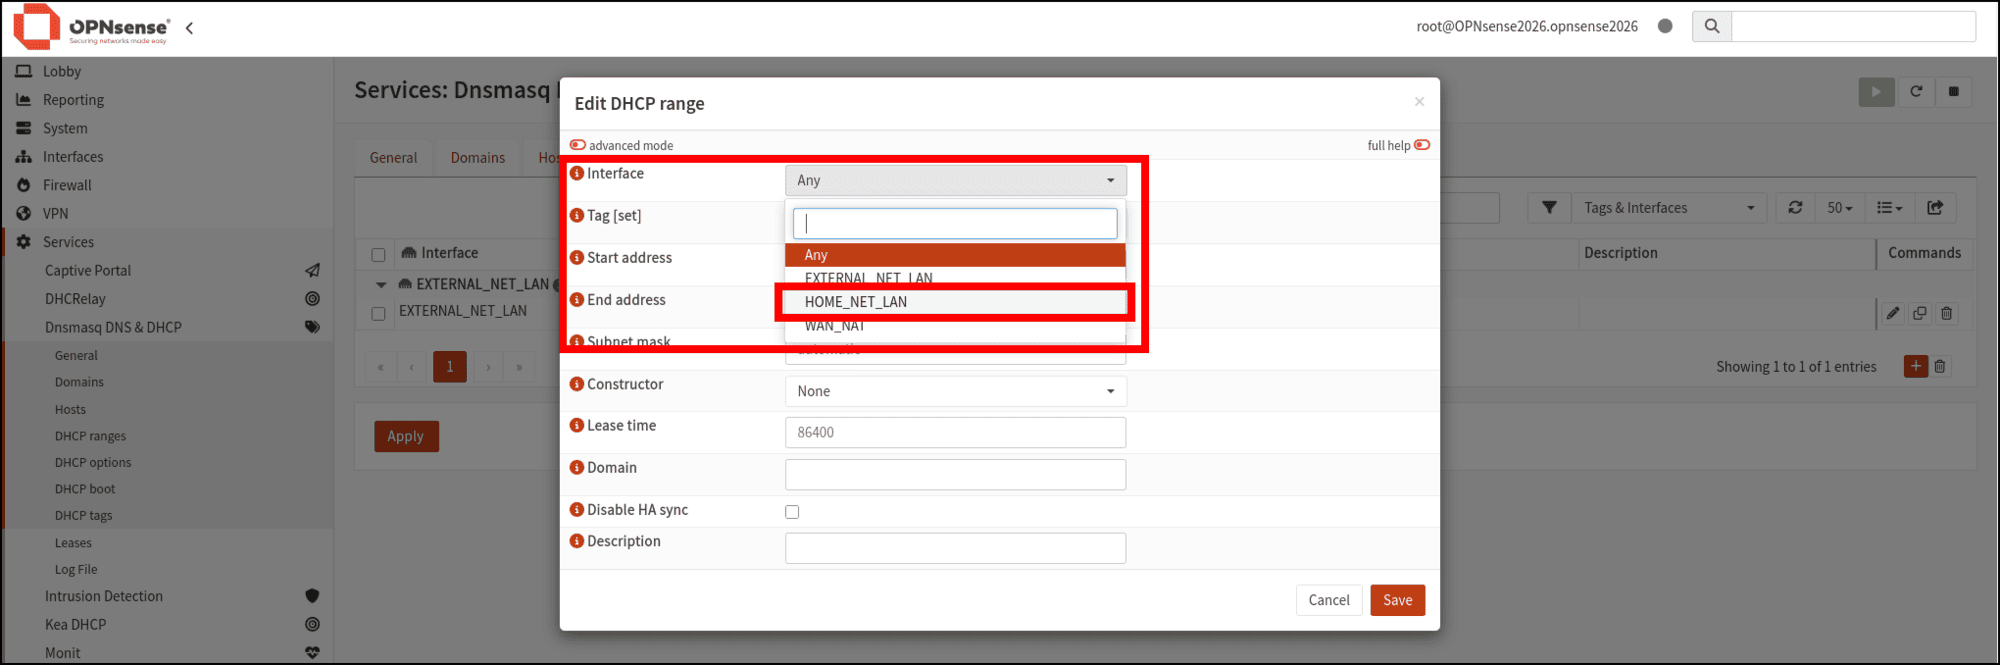
- Click the Interface drop-down menu in the Edit DHCP range pane and select HOME_NET_LAN.
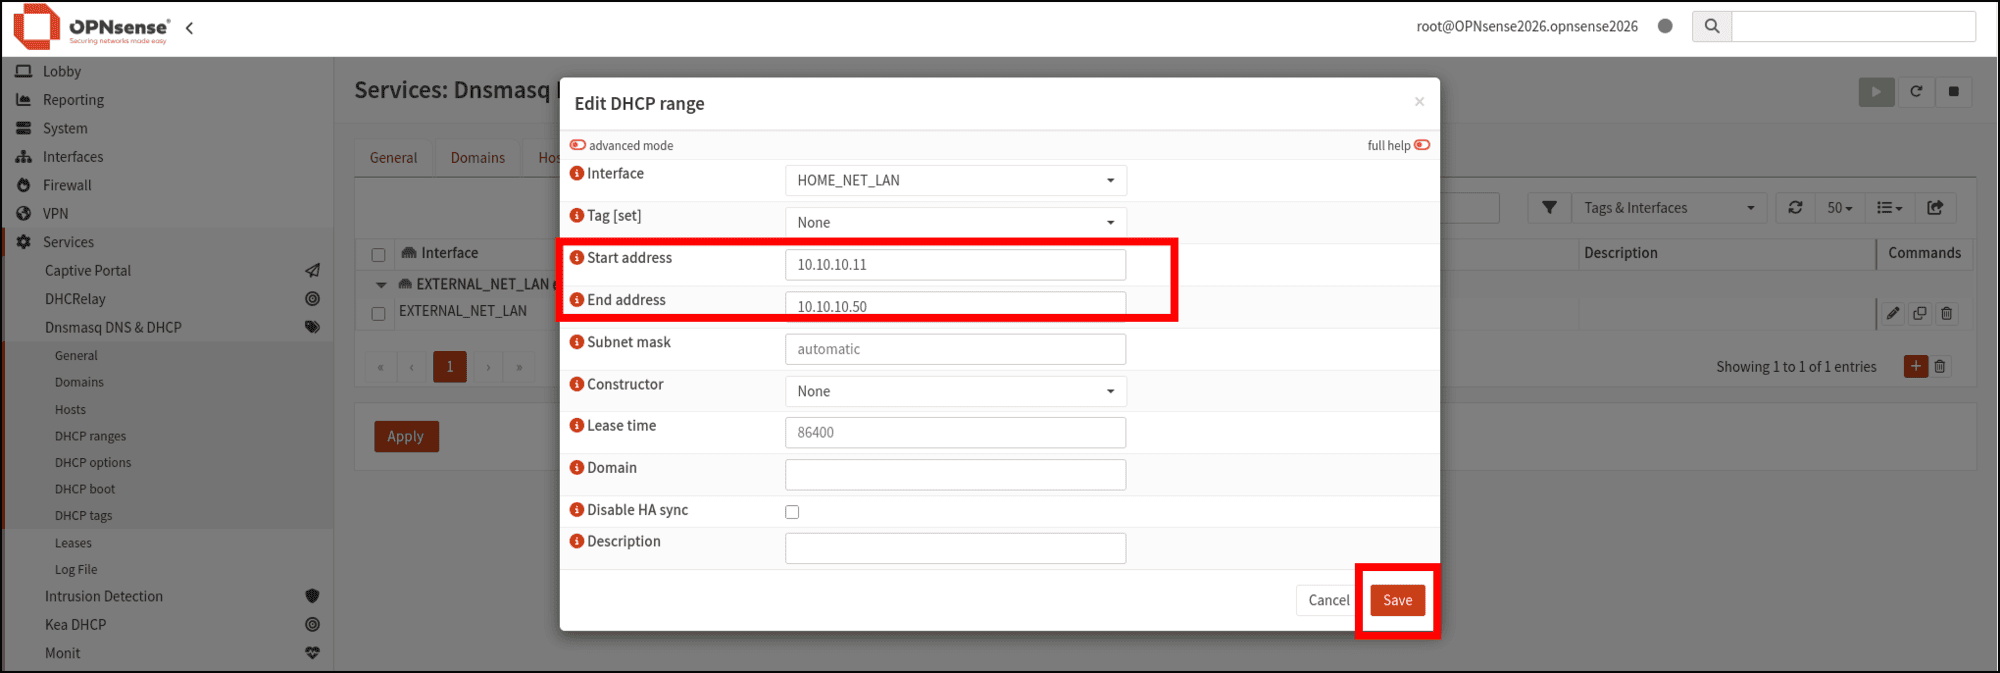
- Enter your Start address (for example, 10.10.10.11) and End address (10.10.10.50) values, then click Save.
- Now that DHCP has been set up for both interfaces, you are prompted to click the Apply button.
Disable the OPNsense Firewall
My primary use for OPNsense is as a router that can be used, with VMware Workstation Pro, to create virtual networks and route traffic. While I am using OPNsense primarily as a router, OPNsense’s primary purpose is as a firewall. It has many other integrations and features, including Suricata as an intrusion detection system, which is one of the things that Security Onion does.
Since I am using OPNsense as a router, and because I don’t want its firewall interfering with traffic between the two networks and the hosts on them, I want to make sure the firewall is turned off:
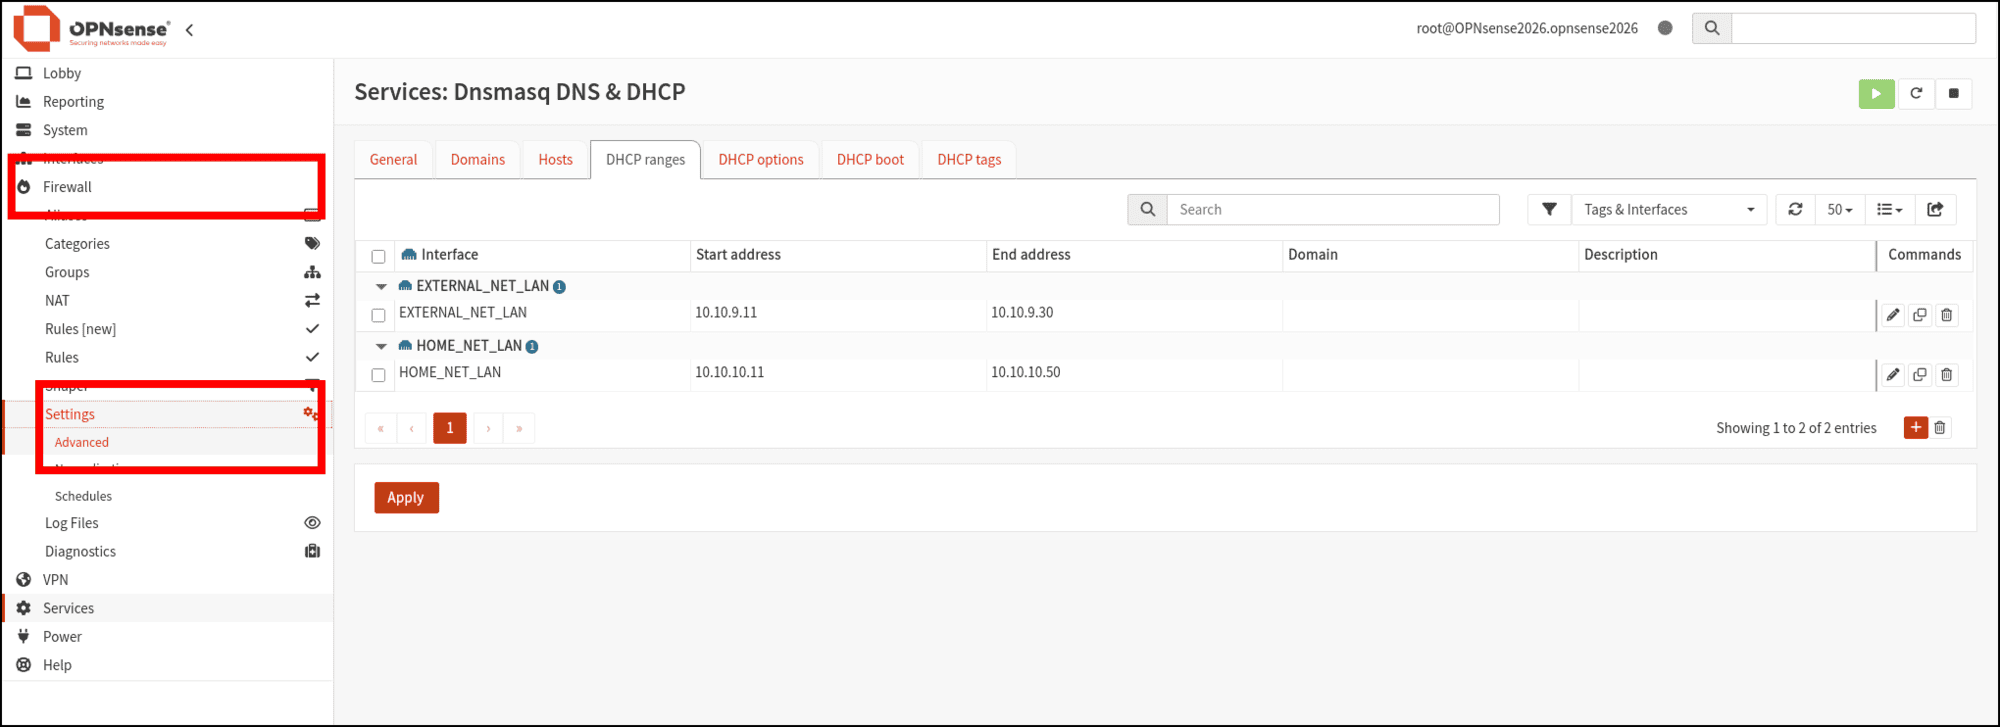
- Click Firewall in the left sidebar, the Settings, then Advanced.
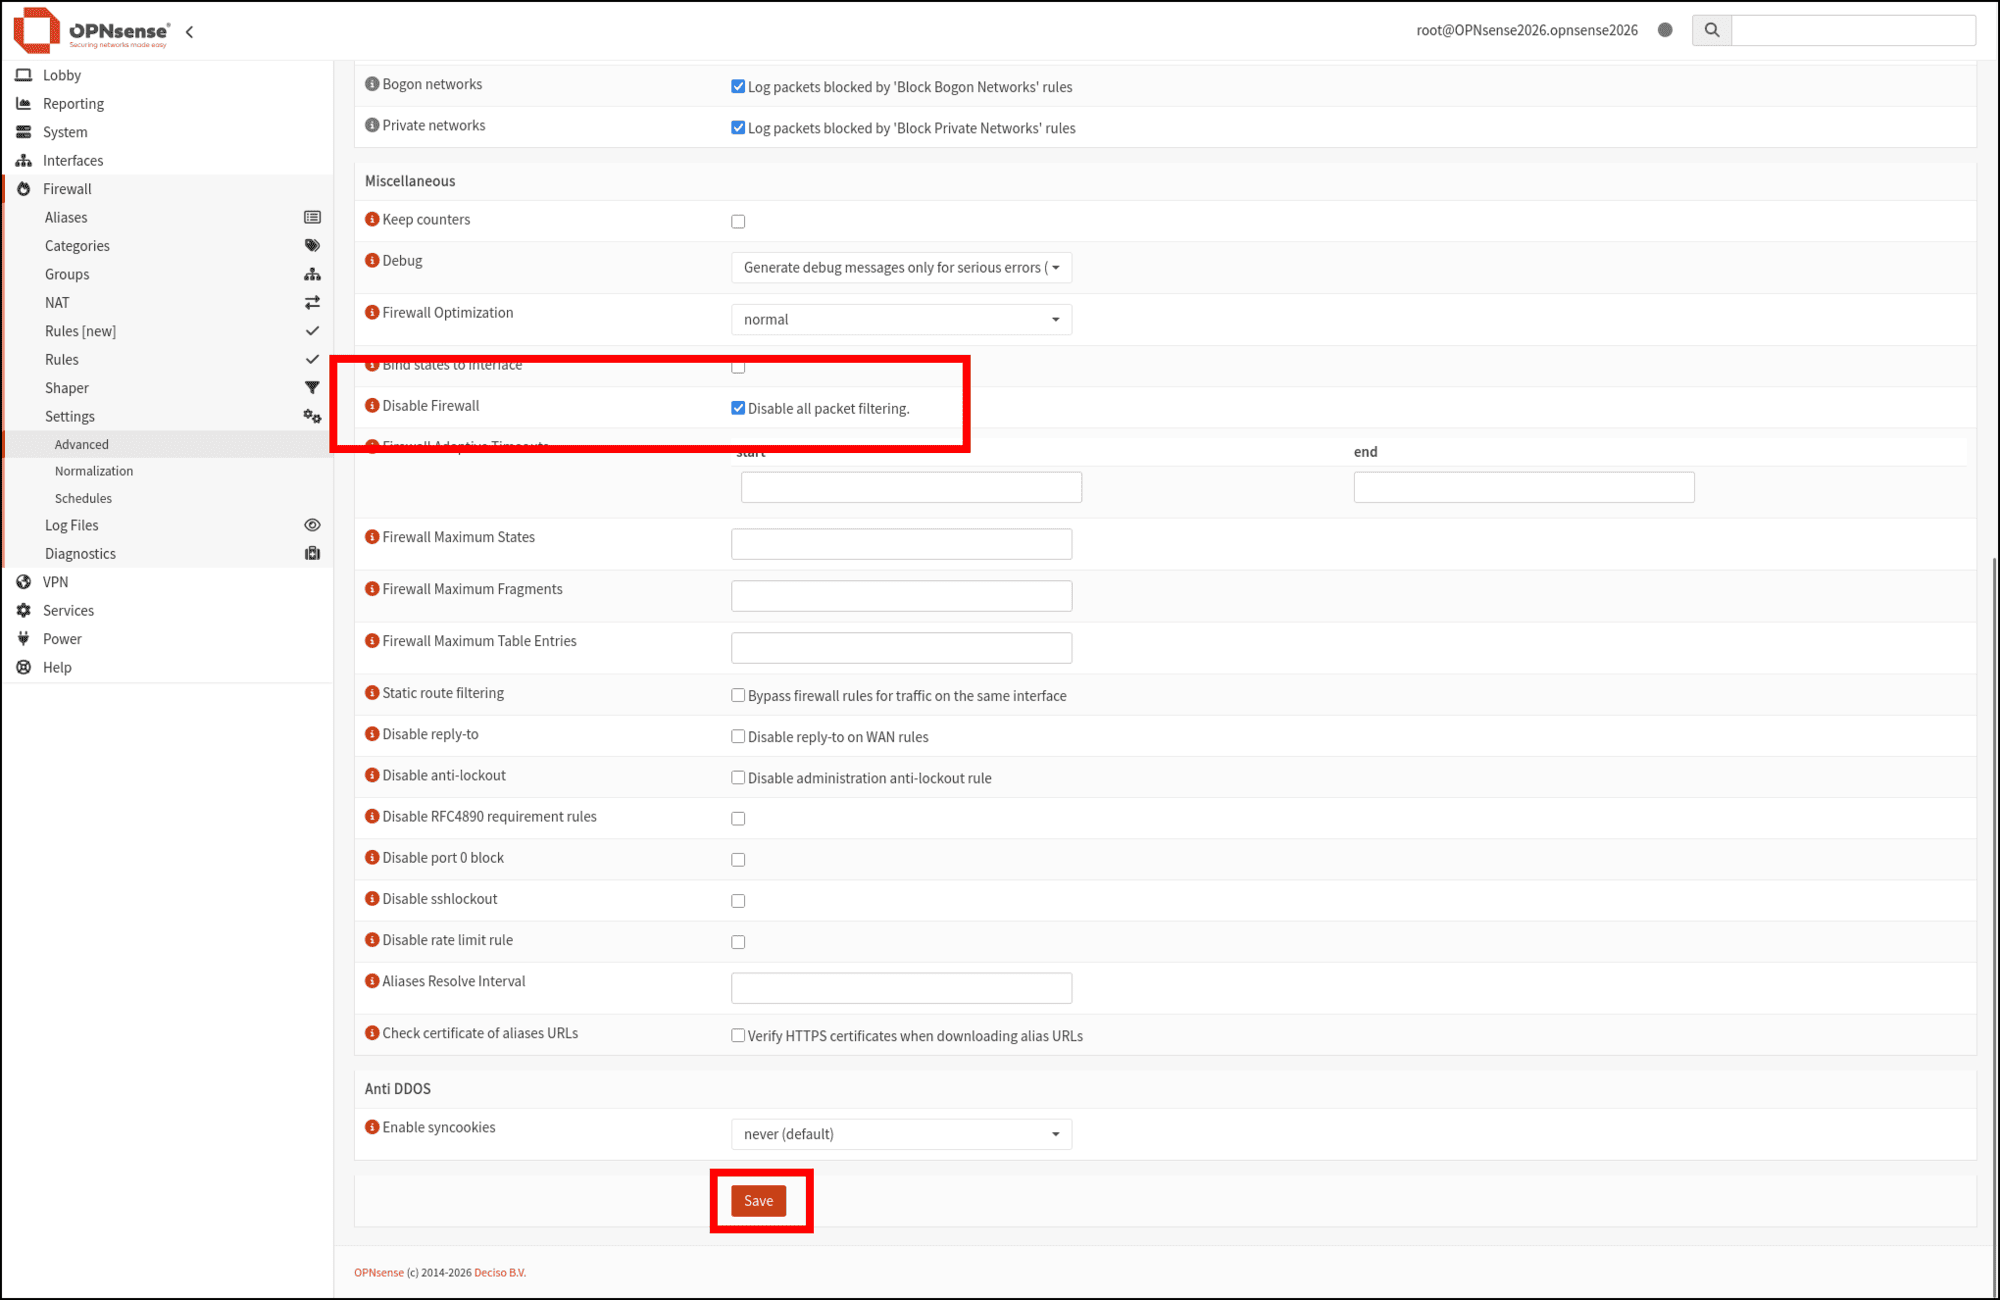
- Scroll down the page until you see Disable Firewall in the Miscellaneous section. Select the Disable all packet filtering checkbox, then click the Save button at the bottom of the page. The change is applied instantly.
Test Network Connectivity and DHCP IP Address Distribution
If you have followed along this far, you have virtualized the necessary network infrastructure. You are already testing the functionality of the EXTERNAL_NET_LAN (10.10.9.0/24) because you are using a Kali VM on that network to access the OPNsense management GUI. And you can also see its IP address by going to Services > Dnsmasq DNS & DHCP > Leases. 
To test the functionality of the HOME_NET_LAN (10.10.10.0/24) where you will deploy Security Onion, you need to add something to that network and see if it gets an IP address and is discoverable. In my example, I have added a third virtual machine to the Security-Onion-2026 folder in VMware Workstation Pro. This is a Metasploitable 3 VM that I created from their GitHub repo. I have set the virtual network adapter on this VM to the HOME_NET_LAN network. 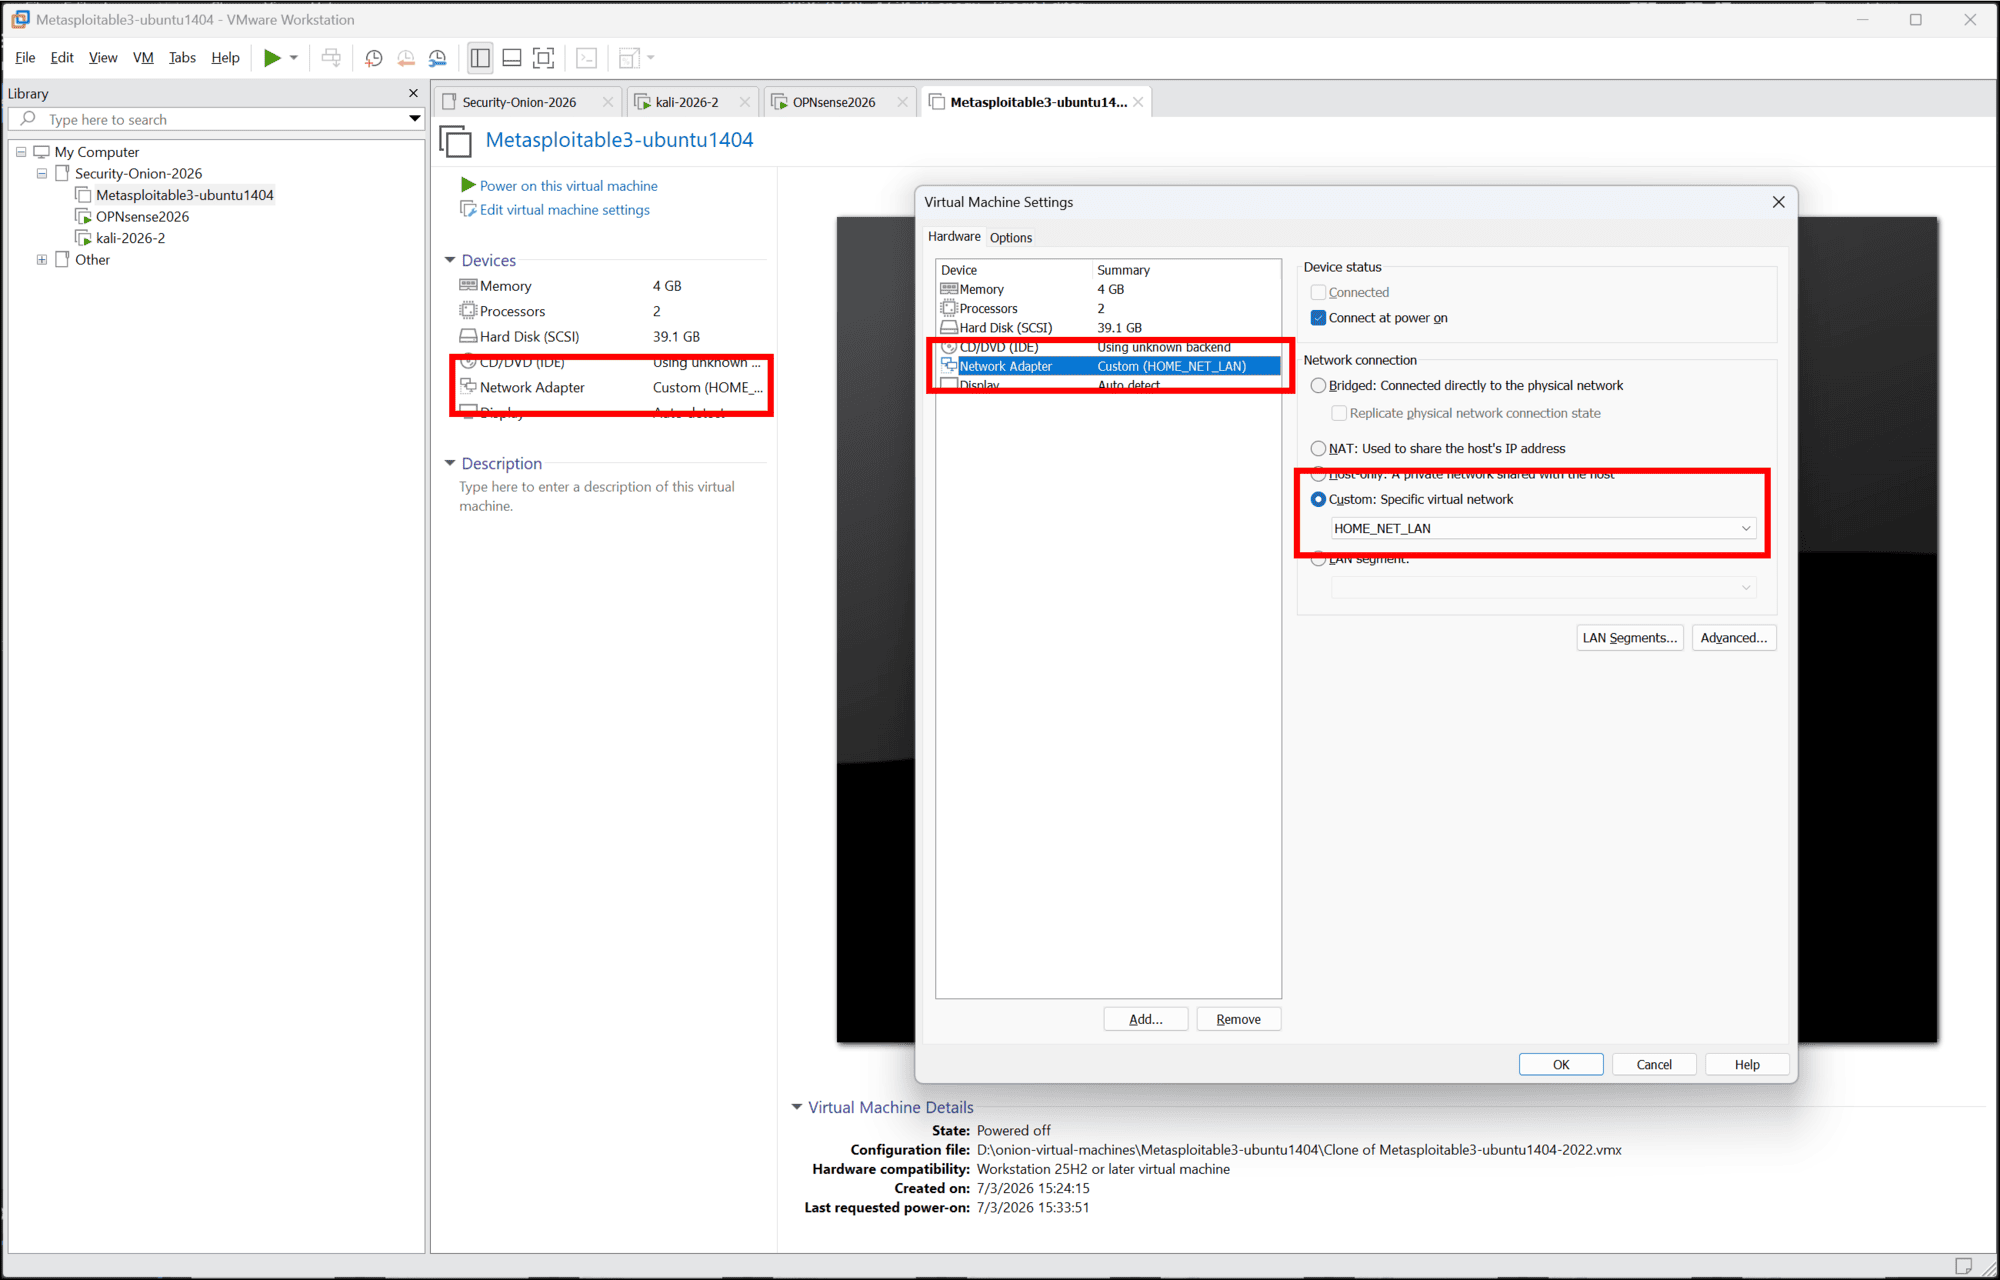
When you boot the Metasploitable 3 VM, you can log in (the default username and password are both vagrant), and then enter the ip a command. The output includes the status of the Metasploitable VM’s eth0 interface, which has been assigned an address within the 10.10.10.0/24 subnet. 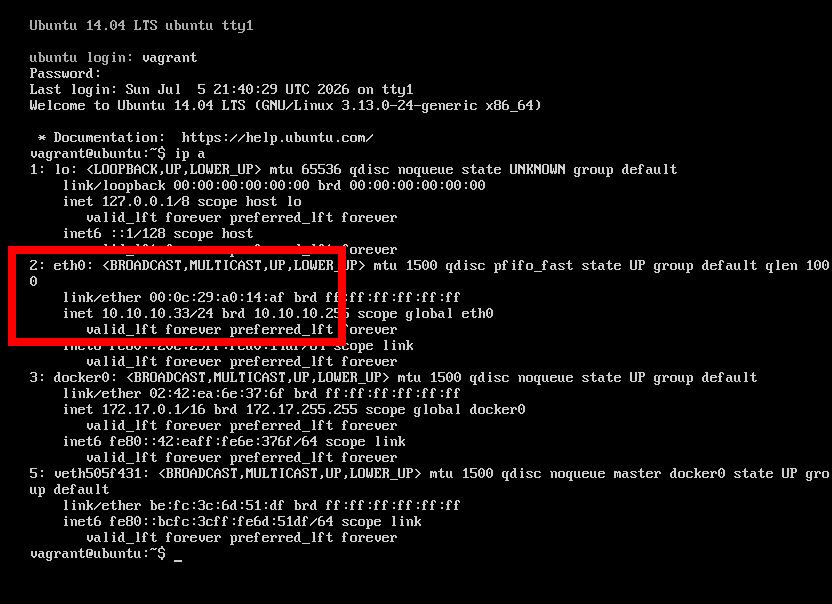
And if you reload the Leases page, it should display the lease for the Metasploitable 3 VM (hostname ubuntu) on the HOME_NET_LAN network, along with the Kali VM on the EXTERNAL_NET_LAN network. 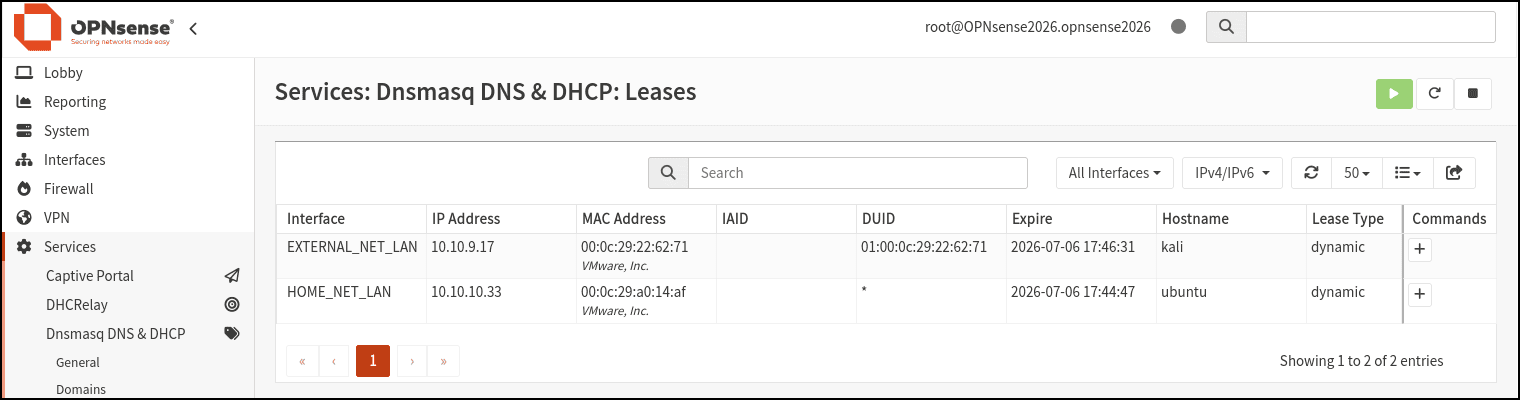
You can further confirm the connectivity between the two networks by using the Kali VM to run an Nmap scan of the HOME_NET_LAN network, using the command sudo nmap -A 10.10.10.0/24. The output is very long, but at the end you can see that it detected two hosts, one at 10.10.10.1 (the OPNsense router interface) and one at 10.10.10.33 (the same IP address of the Metasploitable VM). You can also see the hostname of the Metasploitable VM, ubuntu. 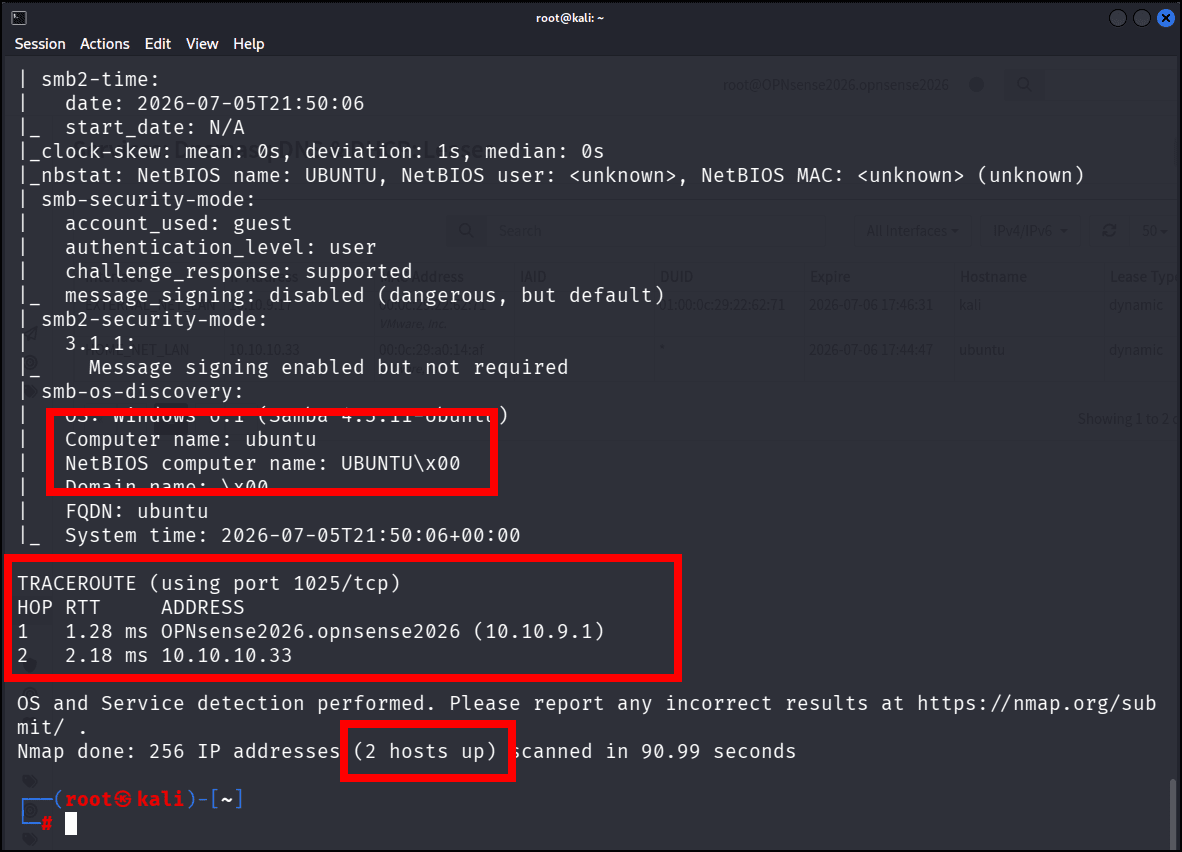
Update the OPNsense VM and Take Another Snapshot
Now that everything is working, you can update the OPNsense router, shut it down, and take a snapshot.
- On the Lobby: Dashboard page, look for the Updates section in the System Information widget and click the Click to check for updates link.
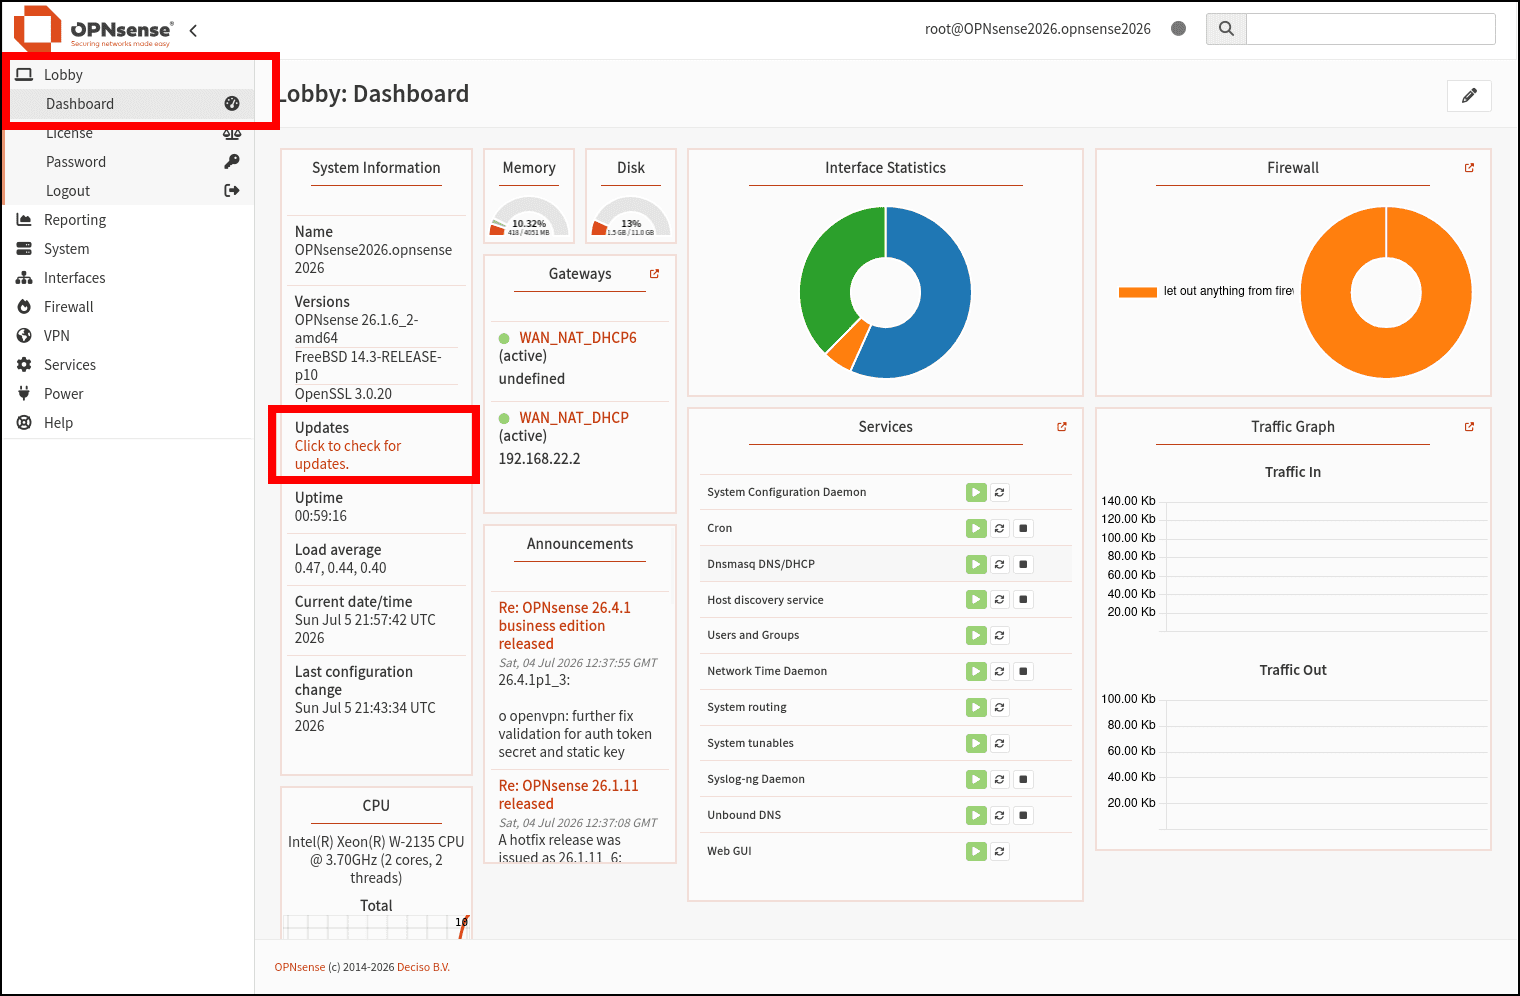
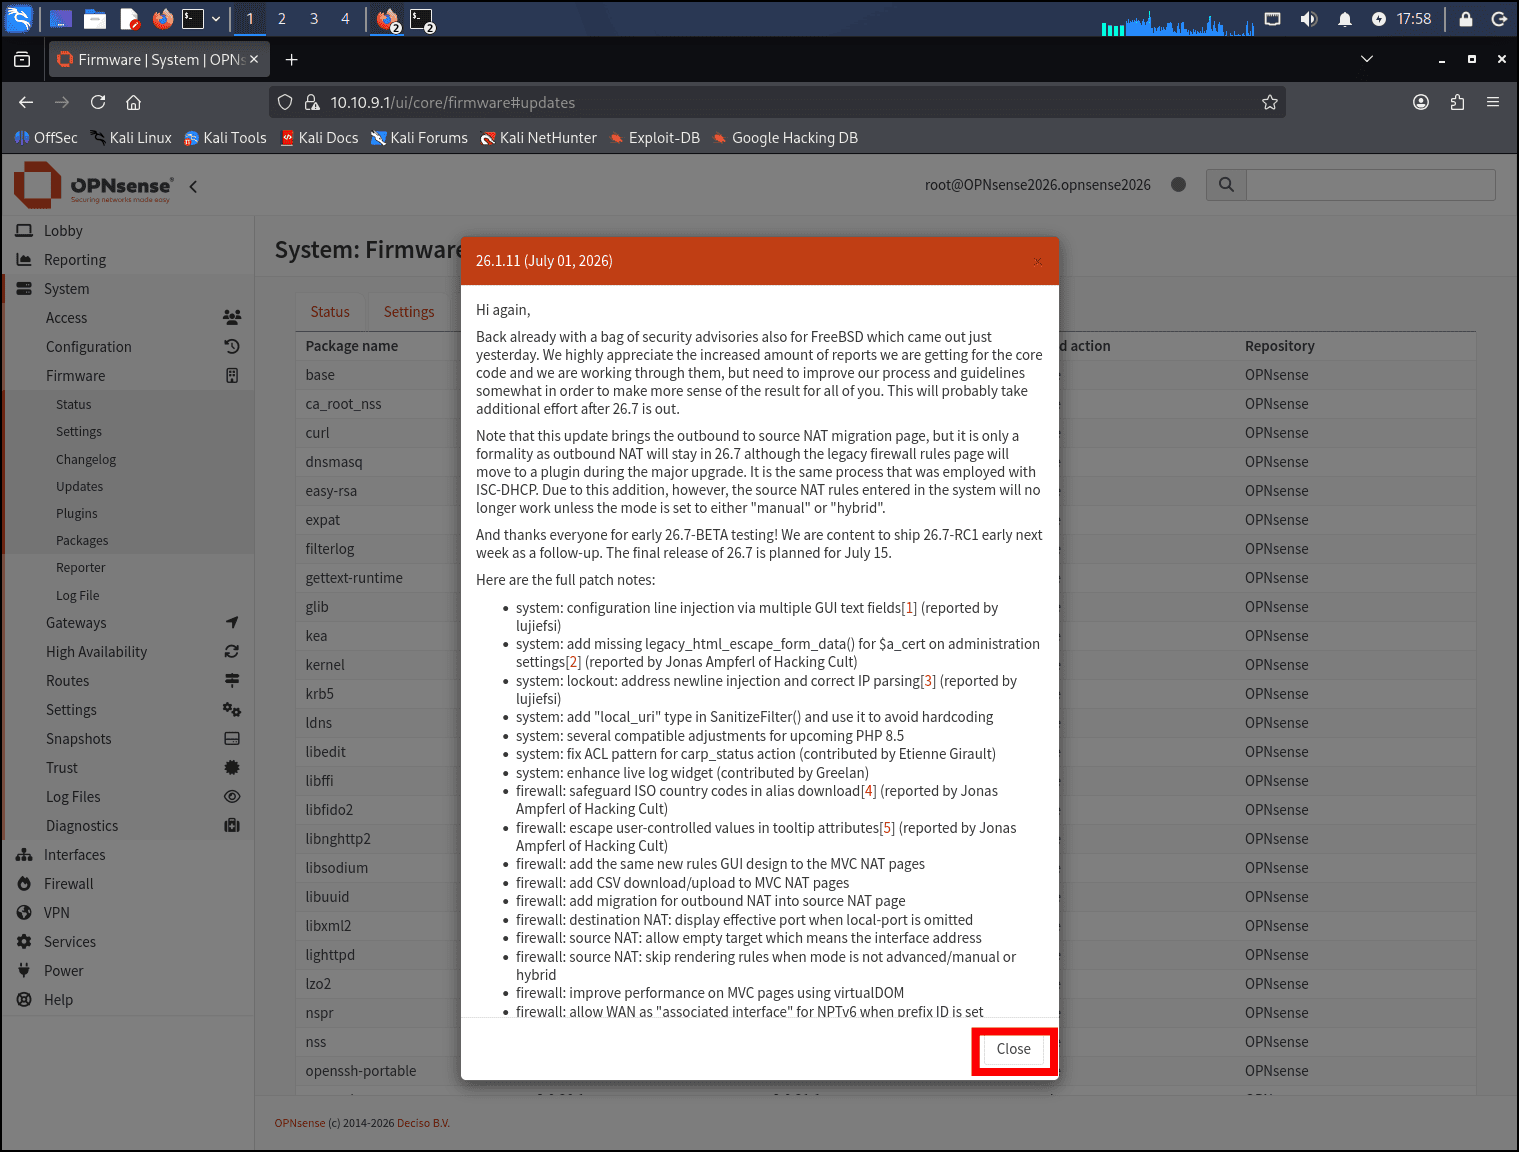
- If OPNsense finds any updates, it will display a pane with the version number and date of the update release, along with the details of all the update components. Click the Close button at the bottom of the pane.
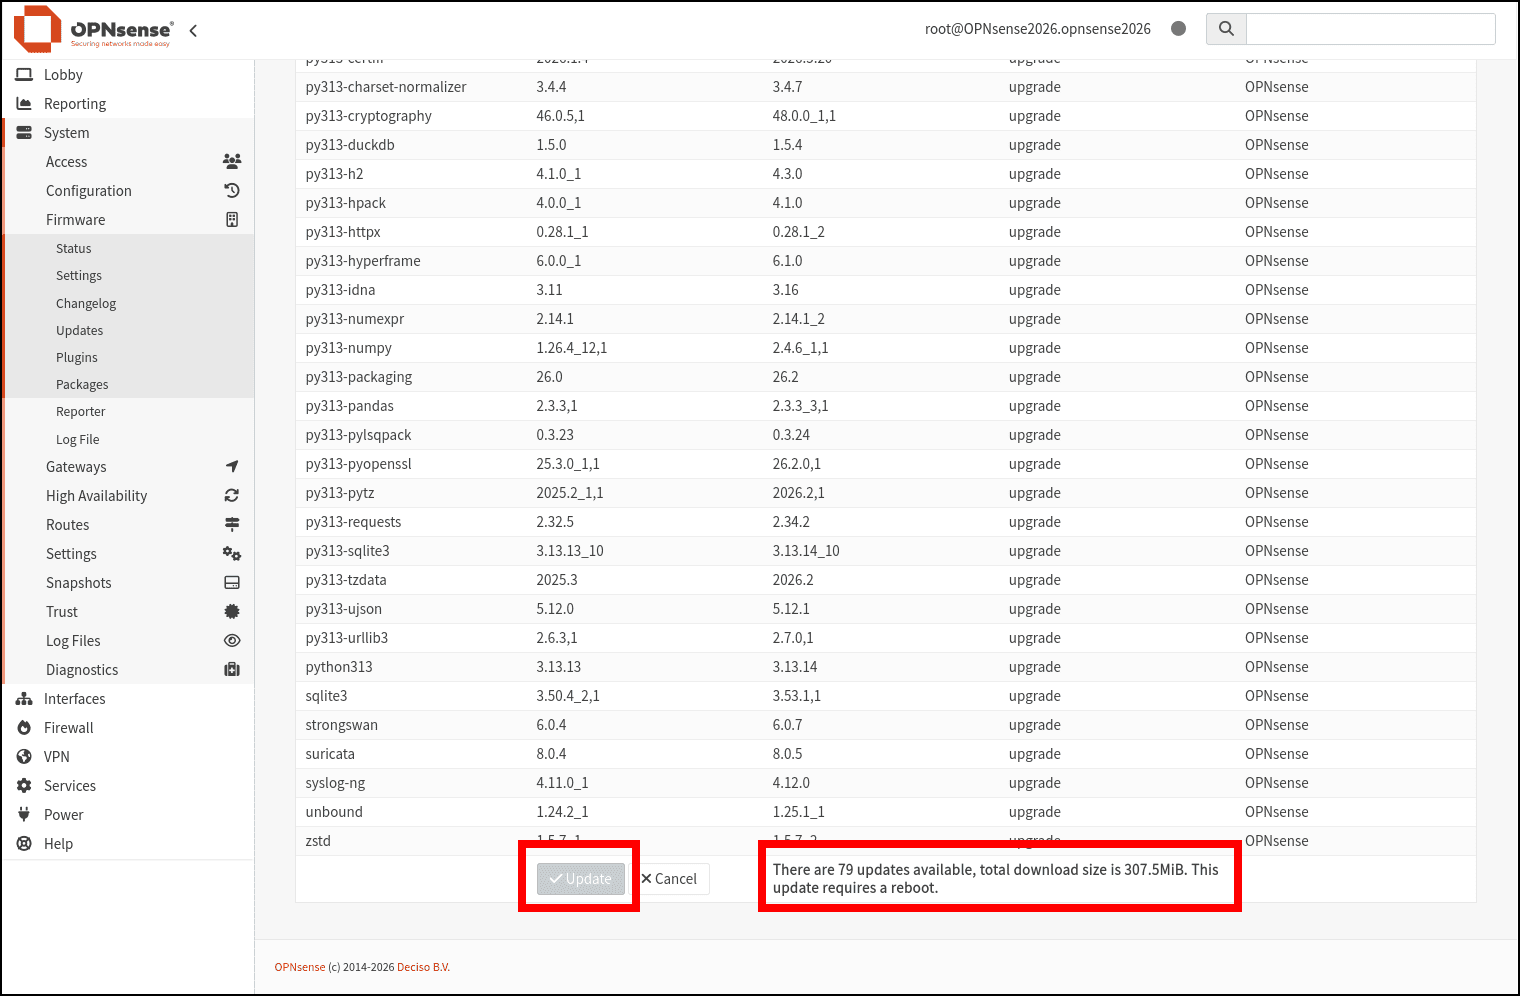
- Scroll to the bottom of the list of available updates and click Update.
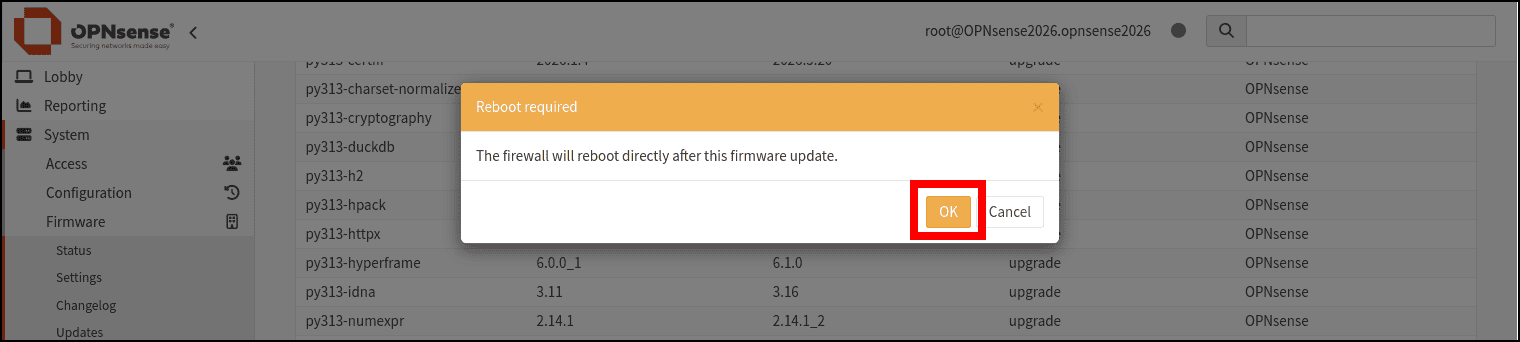
- Click OK in the Reboot required pane.
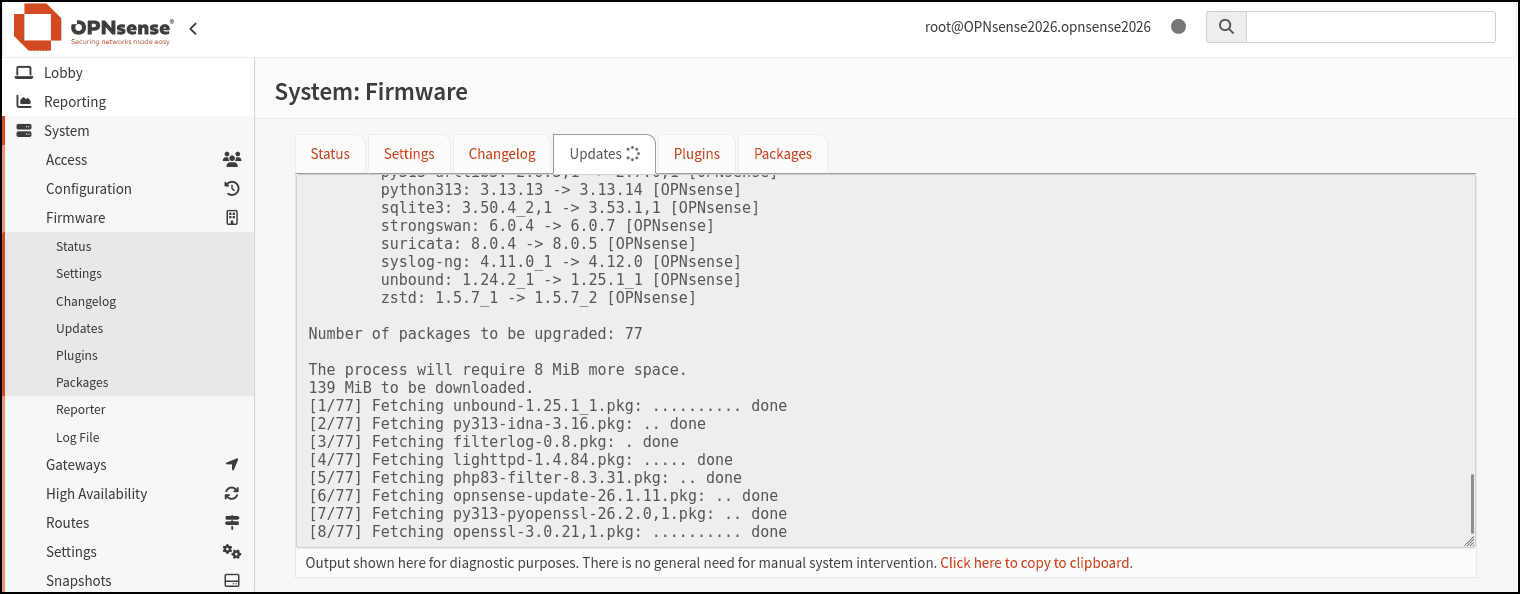
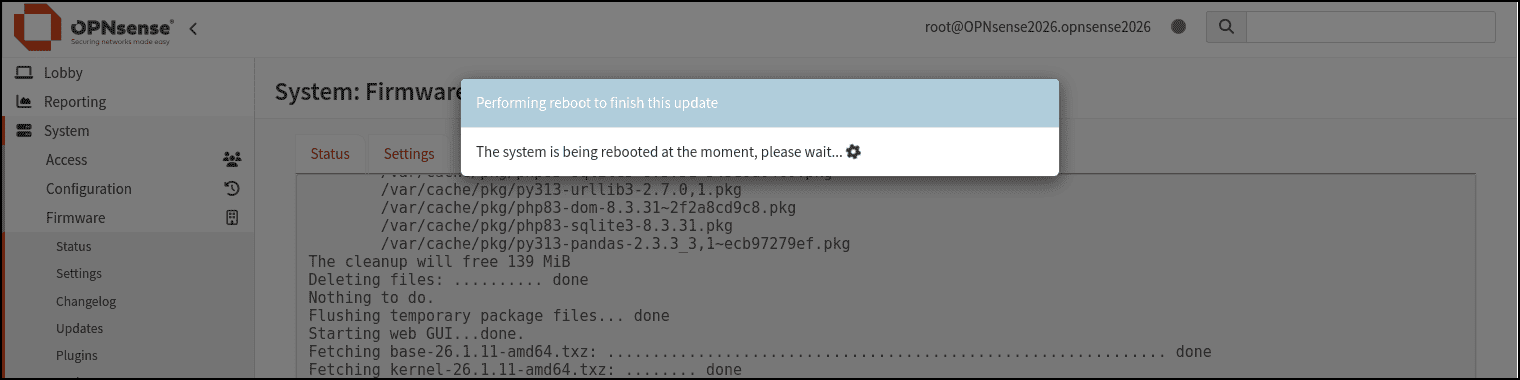
- The System: Firmware page will display the update progress.
- A Performing reboot to finish this update pane displays and you will lose the ability to interact with the management GUI.
- When the update is complete, shut down the VM and take another snapshot of it.
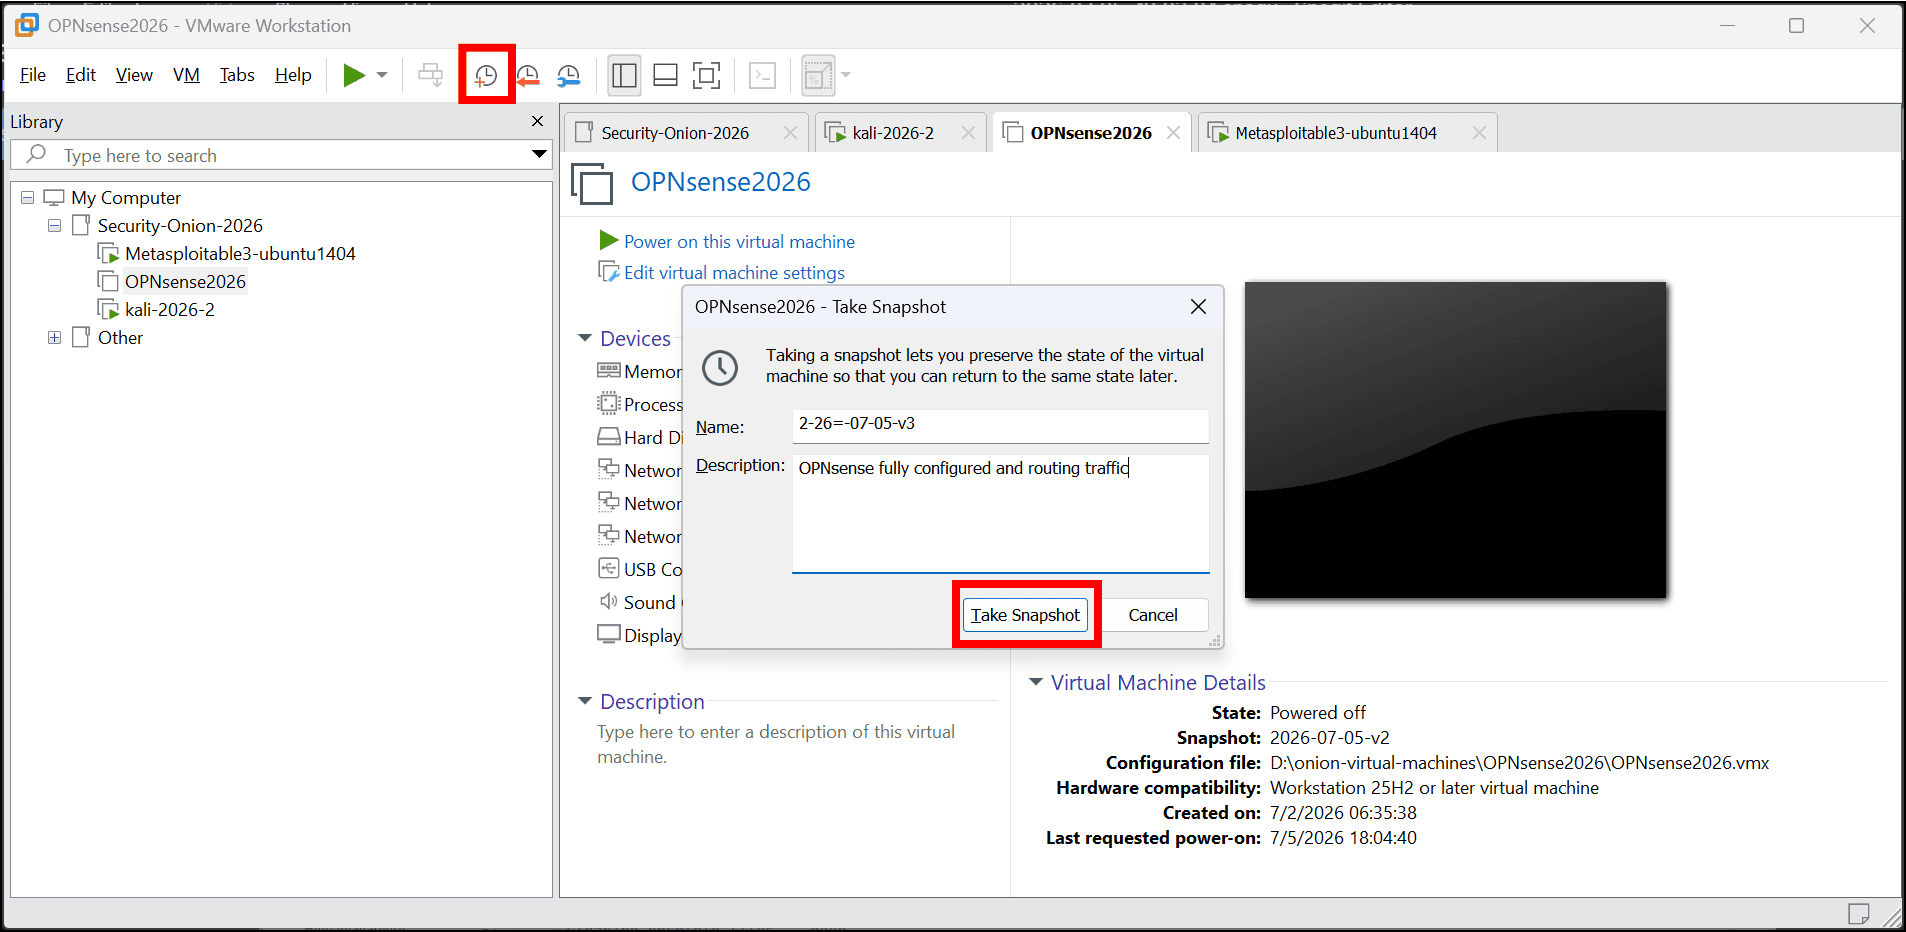
You have now completed the creation of the OPNsense router and the network environment needed to run a Security Onion deployment.