Add Images, Links, and More to Your Jekyll Pages
Overview
This is not an in-depth course on Jekyll. This site you are looking at represents the entirety of my Jekyll experience, so in the spirit of keeping it basic, I’m only going to cover what I needed to create what you are looking at.
- Adding Images to Your Jekyll Posts and Pages
- Hyperlinks in Jekyll
- Use SASS to Apply Custom CSS to Your Jekyll Site
- Use Plugins to Add Functionality to Your Jekyll Website
- Add Google Analytics to Your Jekyll Site
Adding Images to Your Jekyll Posts and Pages
I am an avid hobbyist photographer. I had a lot of affinity for doing things in Adobe Photoshop and in the last several years I have become a big fan of Adobe Lightroom Classic. So when I first used Snagit in 2013, I was not impressed. I was wrong. I do technical writing for a living. I like to joke that screenshots are the “bread and circuses of tech writing.” And I suspect that some people have told me that they love my documentation but have probably never read it, and instead just like the presentation and the screenshots. Snagit helps me accomplish that.
For this website and other technical writing content, I capture the screenshot with Snagit, open it in Snagit Editor, size it, add a 1px black border, and I use callouts like the red outline with a width of 5px or 6px and some border radius in the corners. Once I have captured and edited my images in Snagit, I save them with a common file format, usually portable network graphics (PNG), and usually with an incrementing digit in the filename. I save or place them in their own folder. If a single Jekyll page has a lot of screenshots, I might put all of them in their own sub-folder within the images folder.
To place the image in the post or page using Markdown, you use the following syntax, which starts with an exclamation point, then the alt text in square brackets, then the relative path to the image file (which can be a directory path or a URL) in parentheses.

For this tutorial, I am going to create an image directory in the learning-jekyll directory and call it learning-jekyll-images.
So let’s start with a screenshot I took earlier for the Start Your First Jekyll Site part of this tutorial. After I started the Jekyll server, I took a screenshot to show how the site should preview. I edited the image and saved it in the learning-jekyll-images directory as a PNG file with a name that tells me something about it, and an incrementing digit at the end:
02-learn-jekyll-start-jekyll-site-001.png.
I methodically name and organize my images because it allows me to insert a bunch of images into a page quickly. I can copy the image code and paste it wherever I need, as many times as I need, and then just update the digits in the file name. I recommend this approach, especially for more complex content with many images.
Now the image is created, I will place it back on that other page, after step 11.
11. In your browser, reload the page that you last used to view the website. You will see that the new theme has been implemented and your site has a new look.

Now if you run bundle exec jekyll serve and load the local site, you the image displays on the page. 
Decisions Around Alt Text
Adding alternative or “alt” text to your images is important for accessibility issues. It is considerate towards users who have vision issues or who use screen readers. Depending on your audience and why you are writing, it might even be required by statutes like the Americans with Disabilities Act (ADA). It can also help search engines find your content.
However, in my technical writing, I am usually describing everything that is in a screenshot in my body text. The image itself is more decorative (going back to the “bread and circuses of tech writing” comment.) Therefore, most of the images on this site do not have alt text, because everything I would put in there is already in the body text. I believe this is consistent with the guidance from my most-trusted technical writing style guide, the Google Developer Documentation Style Guide, which says “If the image is purely decorative, use empty alt text… Don’t present new information in images. Always provide an equivalent text explanation with the image.”
Hyperlinks in Jekyll
Markdown already has a syntax for easily creating hyperlinks. In this section I am going to introduce some of the Jekyll-specific features you need to link your Jekyll pages together.
A Word About Liquid
We call Jekyll a static-site generator, and it is, but you want some dynamic features within that website to make it usable. Jekyll uses the Liquid templating language (created by Shopify) to take your static Markdown code and turn into web pages at build time. Jekyll uses Liquid to create certain elements, like {% link} to process dynamic hyperlinks.
If you are writing a tutorial like this one, and you want to show all of the code syntax, format it properly in Markdown, and not cause an error in Jekyll, you need to add another code element to “escape” that code in Liquid. Whether that is inline or in a code block, you open a curly brace ({), a space, a percent sign (%), the word raw, then close that with a space, percent sign, and a close curly brace (}). When you are done with your sample that includes Liquid tags, close it again using the same tag, only with the word endraw. It’s very hard to demonstrate this in the code itself, so I need to use a screenshot. 
If you do not properly escape any and all Liquid tags, you will break your website. Which is what happened to me when I wrote this section on hyperlinks and I kept getting errors when I tried to run Jekyll serve.
Basic Linking in Jekyll
Adding hyperlinks in your Markdown files is almost the same as adding images. Here is a code sample from the intro page that opens this tutorial:
Jekyll is often used for "Docs as Code" websites. Docs as Code ["refers to a philosophy that you should be writing documentation with the same tools as code"](https://www.writethedocs.org/guide/docs-as-code/){:target="_blank"}. These websites are often integrated into the wider software applications they support [using continuous integration and continuous delivery (CI/CD)](https://www.redhat.com/en/topics/devops/what-is-ci-cd){:target="_blank"}.
This sample includes two hyperlinks to external sites, where the link text is enclosed in square brackets ([]), and the URL being linked to is in parentheses (()).
Those two links are for external websites. If you want to link to other pages within your Jekyll site, you must use a more Jekyll-specific syntax. To link back to the intro page that starts this tutorial, I refer to the page title that I declared in the Jekyll front matter (or really any other text) in square brackets, and then a relative path to the markdown file in parentheses. The Jekyll specific thing is that after you open the parentheses, you include the code {% link and you close with %}. So my link to Create a Static Site Using Jekyll: Introduction is encoded as [Create a Static Site Using Jekyll: Introduction]({% link learning-jekyll/00-learn-jekyll-intro.md %}).
Setting the Hyperlink Target with Liquid
Another piece of Liquid markdown that I use when creating my hyperlinks is {:target="_blank"}. You use this to set the target for the hyperlink. When I want my hyperlinks to open in a new browser window or tab, I use {:target="_blank"}. When Jekyll builds the site, it adds the target="_blank" within the <a href="<hyperlink-URL>"> open tag for that hyperlink.
Use SASS to Apply Custom CSS to Your Jekyll Site
Jekyll uses Syntactically Awesome Style Sheets, or SASS, as a way to apply Cascading Style Sheets (CSS) customizations to your Jekyll sites in a more programmatic way, such as declaring variables. You can use Jekyll’s SASS capabilities to add custom CSS to your theme and website by creating your own SASS file within the website.
- In the root directory of your Jekyll project, create a folder called
_sass. You can do this through the operating system’s graphical user interface (GUI), using the Explorer panel in VS Code, or on the command line withmkdir -p _sass. - Create another directory within
_sasscalledcustom. This seems unnecessary, but I think it is specific to at least the Just the Docs theme, which looks in this location for your custom SASS file (mkdir -p _sass/custom). - Navigate into this directory and create a SASS file. The name does not matter, but I think it is standard to call it
custom.scss, wherescssis the extension for SASS files using the newer “Sassy CSS” syntax. Again, use the GUI, VS Code, or the command line (touch _sass/custom/custom.scss). -
Now that you have the
custom.scssfile, you need to tell Jekyll about it in your_config.ymlfile. Open the config file and add this code at the bottom of the file and then save_config.yml.# Custom SASS/CSS sass: sass_dir: _sass style: compressed /_sass/custom/custom.scssis where you will put your own CSS styles to override the theme defaults. This is not a tutorial on SASS or CSS, so I am only demonstrating customization. A problem that I want to solve is that I notice that when I create code blocks in Markdown, the text enclosed in that code block cuts off after about 100 characters, like here (notice the scroll bar under the code block):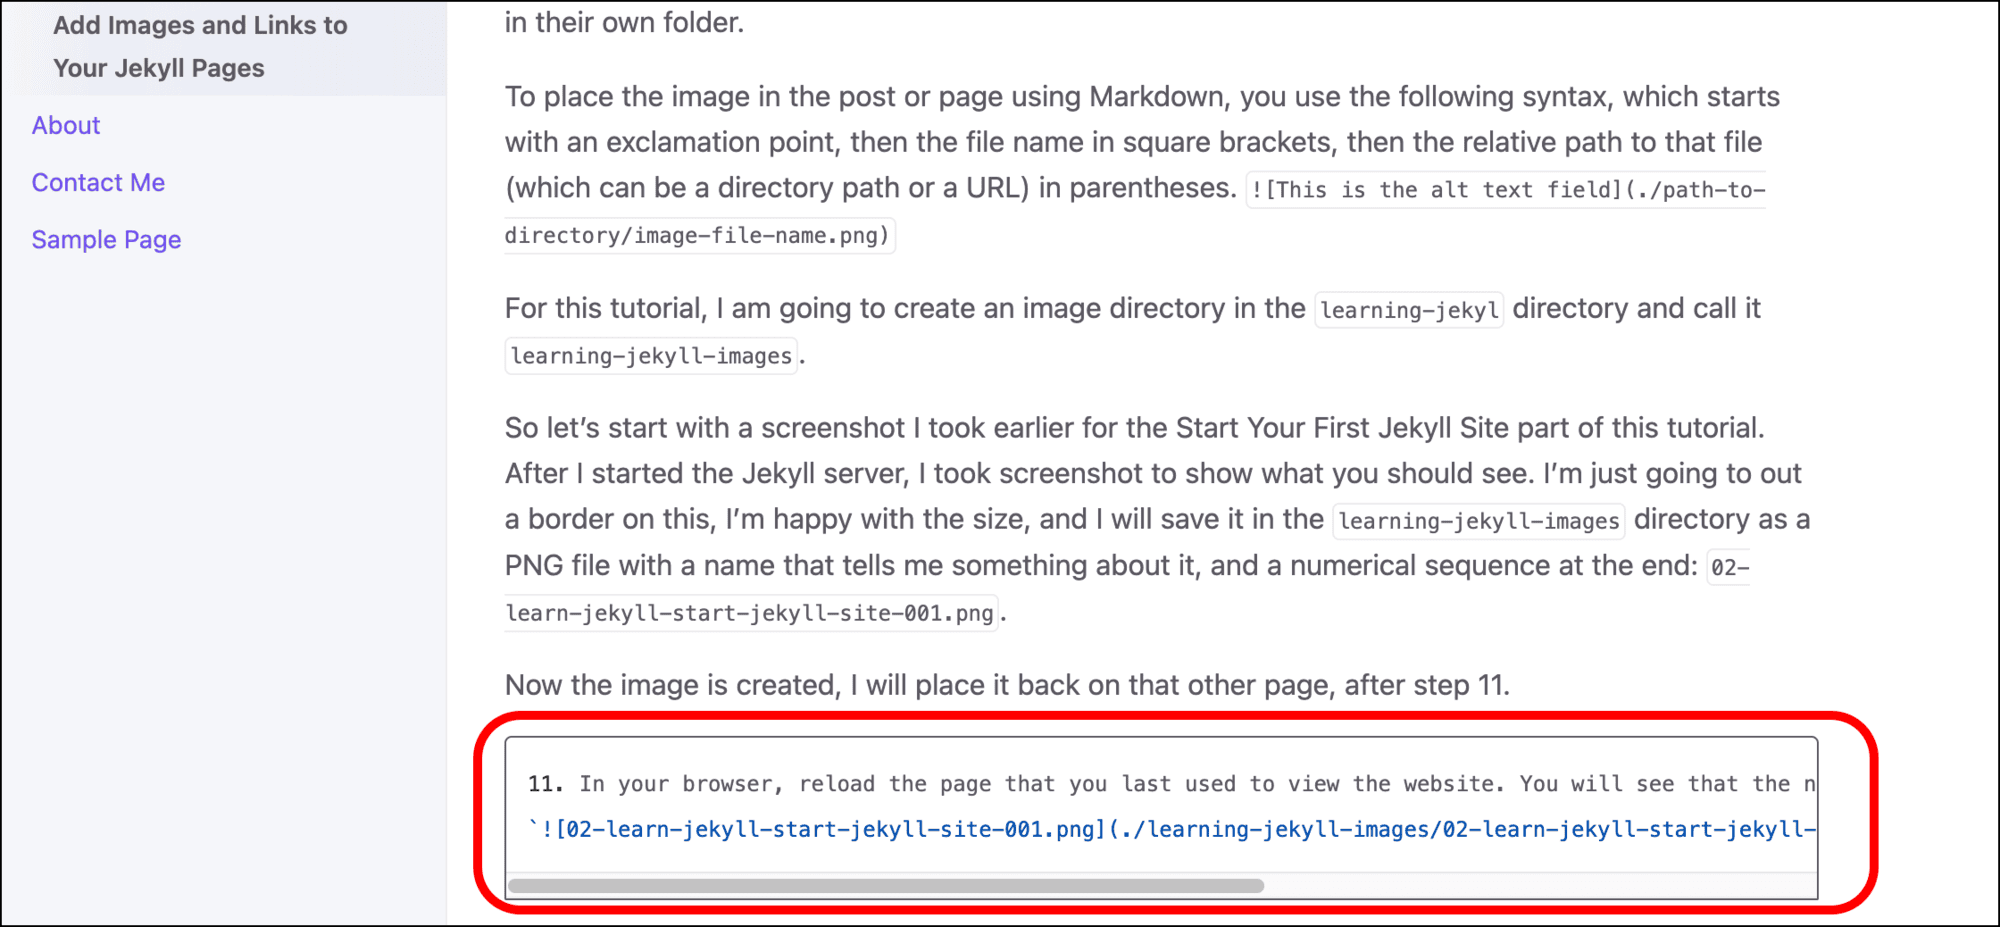
- If I use the browser’s developer tools to inspect this element, I can see that the CSS generated by Jekyll creates a CSS
codesection within apresection.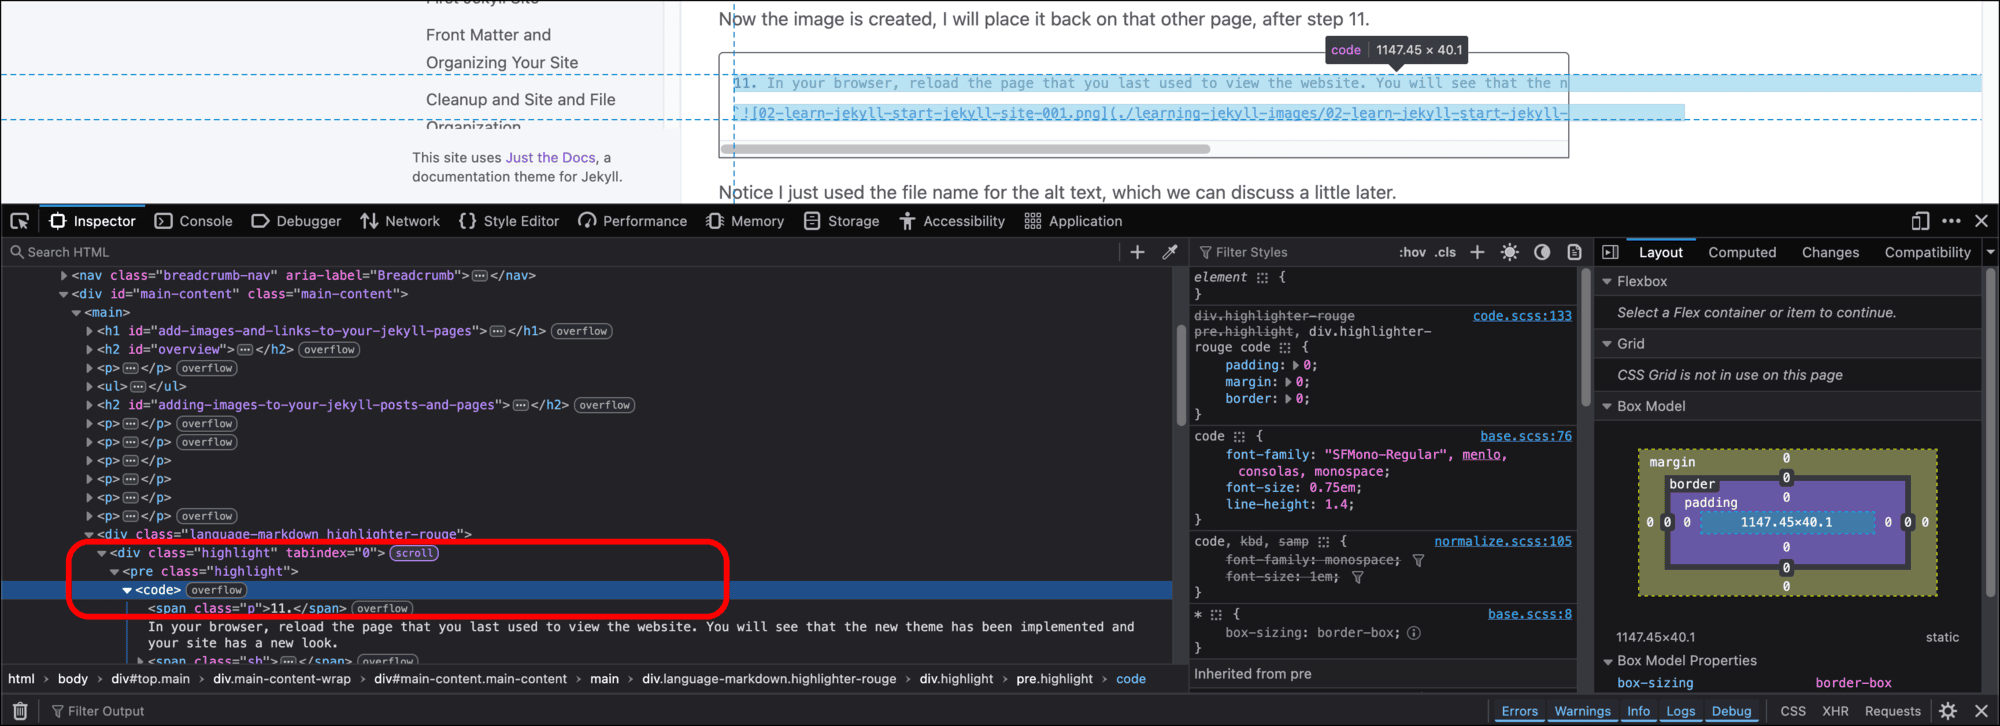
-
I use some CSS knowledge to add this to
custom.scss:pre, code { white-space: pre-wrap; word-break: break-word; } - If I save
custom.scss, restart the Jekyll server process, and reload the page, the CSS now wraps the words in my code block. (You can also see the scroll bar on the bottom of the code block no longer displays.)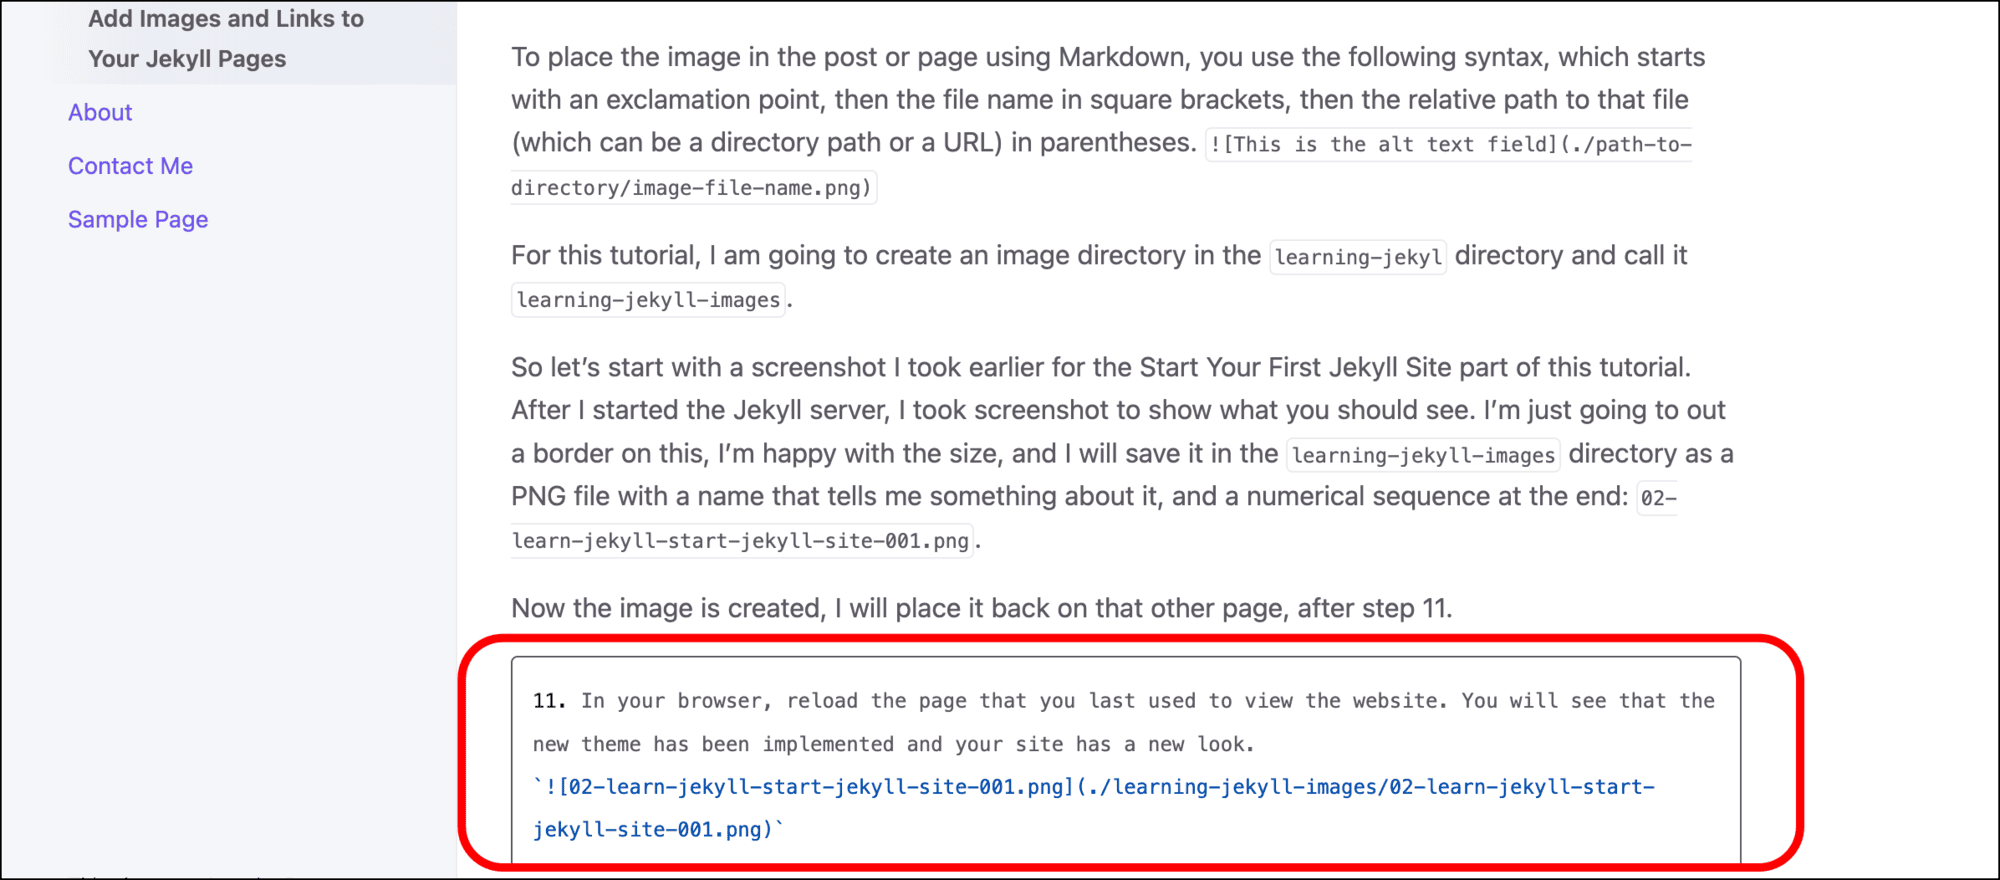
Use Plugins to Add Functionality to Your Jekyll Website
You can use Jekyll plugins to add more functionality to your Jekyll site. I am currently using four Jekyll plugins on this website:
- jekyll-compose: We installed this earlier in Build Content for Your First Jekyll Site. This plugin allows you to quickly create posts and pages from the command line.
- jekyll-feed: This creates “an Atom (RSS-like) feed of your Jekyll posts” if you want to share or syndicate content.
- jekyll-sitemap: This plugin helps with search engine optimization. It generates an XML sitemap and
robots.txtfile that points to the sitemap. - jekyll-seo-tag: This plugin allows you to add additional metadata to your website for search engine optimization.
To add plugins to your site:
- Go to the
Gemfilefor your Jekyll project. - Previously we added
gem "jekyll-compose", group: [:jekyll_plugins]under# Installing Plugins. -
Underneath this line, add the other plugins. When you are done, it will look like this:
# If you have any plugins, put them here! group :jekyll_plugins do gem "jekyll-compose" gem "jekyll-feed" gem "jekyll-sitemap" gem "jekyll-seo-tag" end - Save the
Gemfile. -
Open
_config.ymland look for the section# Build settings, where you changed the theme. Paste this block under the line where you declared the theme.plugins: - jekyll-feed - jekyll-sitemap - jekyll-seo-tag - Save
_config.yml. - Go to the command line and run the
bundlecommand.
Add Google Analytics to Your Jekyll Site
If you have a Google Analytics account, you can create a “property” and add it to your Jekyll site so that you can track traffic to the site.
- Open the
_config.ymlfile. -
I added two lines to the bottom of my
_config.ymlfile:ga_tracking: G-01234ABCDE # Your Google Analytics 4 Measurement ID ga_tracking_anonymize_ip: true # To specify a GDPR compliant Google Analytics setting (true/nil by default) - Save
_config.yml.
After your site is live, remember to check your Google Analytics console to see if your site is getting traffic.
Now let’s move on to Building Your Jekyll Site.